![How to Build a $500 Flagstone Fire Pit Area [DIY 2026]](https://lawnmajesty.com/wp-content/uploads/2026/05/How-to-Build-a-500-Flagstone-Fire-Pit-Area-DIY-2026.jpeg)
How to Build a $500 Flagstone Fire Pit Area [DIY 2026]
How to Build a $500 Flagstone Fire Pit Area [DIY 2026]
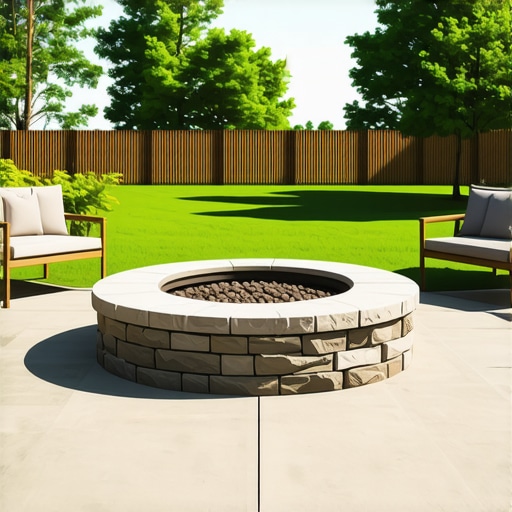
I have spent the last 24 years fixing what I call ‘weekend warrior catastrophes.’ I recently got called out to tear up a $30,000 patio that was sinking into the subgrade because the previous contractor thought he could save money by skipping the non-woven geotextile fabric and using pea gravel as a base. It was a structural disaster. The stone was literally floating on a layer of liquid mud. When you are building a fire pit area, especially on a $500 budget, the temptation to cut corners on the ‘invisible’ parts is high. Don’t do it. A fire pit area is not just a circle of rocks; it is a miniature civil engineering project that must manage heat, drainage, and soil compaction. If you do not fix the soil grading first, every flagstone you put in the ground is just expensive compost. I am going to show you how to build a 10-foot diameter flagstone area that will not heave, wobble, or wash away when the first frost hits.
The Foundation of a Stable Hardscape Area
Building a stable flagstone fire pit area requires a minimum 4-inch base of compacted 21A or CR-6 modified gravel topped with a 1-inch leveling layer of coarse concrete sand. This structural sandwich prevents stones from shifting during freeze-thaw cycles and ensures proper hydrostatic drainage away from the fire feature.
Before you touch a shovel, you need to understand your soil. If you have heavy clay, you are dealing with a material that holds water like a sponge. Water is the enemy of hardscaping. When it freezes, it expands with enough force to crack concrete. You need a base that allows water to move through it without destabilizing the surface. Most DIYers think ‘gravel is gravel.’ Wrong. You need ‘modified’ gravel, which contains ‘fines’ or dust. These smaller particles fill the voids between the larger rocks, allowing for a 95% Proctor density compaction. Without these fines, the stones will just roll around under your feet like marbles. Use a plate compactor. Do not use a hand tamper unless you enjoy doing the same job twice. The compactor should literally bounce off the surface when the base is fully locked in.
“A retaining wall or patio base doesn’t fail because of the stone; it fails because of the water trapped behind or beneath it.” – Hardscape Engineering Axiom
Budget Breakdown and Material Selection
To stay under a $500 budget, you must source bulk local flagstone and quarry-direct aggregates rather than buying bagged materials from big-box retailers. Focus your spending on the base aggregates and a heavy-duty steel fire ring, as these components determine the longevity and safety of the installation.
| Material | Quantity | Estimated Cost (Bulk) |
|---|---|---|
| 21A / CR-6 Modified Gravel | 2 Tons | $80 – $120 |
| Coarse Concrete Sand | 0.5 Tons | $30 – $50 |
| Irregular Local Flagstone | 1 Pallet (approx. 100 sq ft) | $250 – $300 |
| Steel Fire Ring (36-inch) | 1 Unit | $40 – $60 |
| Polymeric Sand | 1 Bag | $30 – $40 |
Notice that I specified ‘irregular local flagstone.’ If you try to buy thermal-cut Pennsylvania Bluestone, your $500 budget will be gone before you finish the first row. Local fieldstone or quarry off-cuts are your best friend. They have character and they are heavy enough to stay put. Look for stones at least 1.5 to 2 inches thick. Anything thinner is a ‘stepper’ and will snap the moment someone sits a heavy Adirondack chair on it. Thin stones also lack the mass required to resist thermal expansion from the fire. Heat is a physical stressor. If your stones are too thin, the temperature differential between the top and bottom of the stone will cause it to spall or crack.
How much modified gravel do I need for a patio base?
To calculate the amount of modified gravel needed, multiply the square footage by the desired depth in feet, then multiply by 150 (the approximate weight of gravel in lbs per cubic foot). For a 100-square-foot area at a 4-inch depth, you will need approximately 2.5 tons of CR-6 or 21A gravel to ensure a stable sub-base.
Excavation and Grade Logic
Excavation is the most physically demanding part of the process, but it is where the battle is won. You need to dig down approximately 7 to 8 inches. This allows for 4 inches of gravel, 1 inch of sand, and 2 inches of stone. You must also establish a 1% to 2% slope. Even a fire pit area needs to shed water. If it sits perfectly level, it will become a puddle. If it slopes toward your house, you are asking for foundation issues. Use a line level. Check it twice. I see guys all the time who just ‘eye-ball it.’ Those guys are the ones calling me three years later when their backyard is a swamp. Your subgrade (the dirt at the bottom of the hole) must be compacted before any gravel goes in. If the dirt is soft, the gravel will just sink into it. It is a common failure point I call ‘base contamination.’
“Poor drainage is the primary cause of premature failure in residential hardscapes, leading to uneven settling and substrate erosion.” – Penn State Agricultural Extension
What is the best stone for a DIY fire pit?
The best stone for a DIY fire pit area is natural flagstone like sandstone or limestone because of its slip resistance and thermal durability. Avoid using river rocks or porous stones that have been submerged in water, as trapped moisture can turn to steam and cause the stones to explode when heated.
The Installation Checklist
Follow this rigorous sequence to ensure your fire pit area lasts for decades:
- Mark the Radius: Use a center stake and a 5-foot string to mark a perfect 10-foot circle.
- Excavate to 8 Inches: Remove all organic matter; grass and roots will rot and cause voids.
- Lay Geotextile Fabric: This prevents the gravel from mixing with the soil over time.
- Layer Gravel in 2-Inch Lifts: Compact each layer separately to reach maximum density.
- Screed the Sand: Use 1-inch PVC pipes as rails to create a perfectly flat (but sloped) sand bed.
- Set the Fire Ring: Place the ring first so you can ‘puzzle-piece’ the flagstone around it.
- Lay the Flagstone: Leave 1/2-inch to 1-inch gaps for the jointing material.
- Apply Polymeric Sand: Sweep it into the cracks, vibrate the stones, and mist with water to lock them in.
When you are laying the stone, think about the ‘wobble.’ If a stone rocks when you step on it, take it up and add or remove sand. Do not rely on the jointing sand to hold the stone still. The stone must be stable on its own. I tell my apprentices: if you can’t jump on the stone without it moving, it isn’t set. For the fire ring, ensure you have a 3-inch layer of lava rock or decorative gravel at the bottom of the ring itself. This protects the soil underneath from the intense heat and provides a clean base for your logs. Do not build your fire directly on the dirt or on the flagstone itself. Direct heat on flagstone will cause it to shatter due to moisture expansion within the stone’s pores. It won’t happen the first time, but it will happen. Be smart. Build for the long haul.
![Build a $500 Outdoor Kitchen Base [2026 Budget]](https://lawnmajesty.com/wp-content/uploads/2026/06/Build-a-500-Outdoor-Kitchen-Base-2026-Budget.jpeg)