Build a $400 2026 Stone Fire Pit Seating Wall
Engineering the Perfect Outdoor Social Hub on a Budget
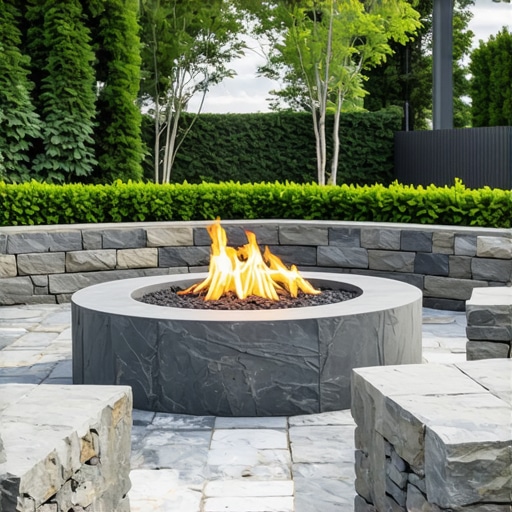
Building a stone fire pit seating wall for $400 in 2026 requires a focus on structural integrity and site-specific drainage. By utilizing reclaimed materials or overstock pavers and prioritizing a compacted gravel base, you can create a permanent outdoor feature that resists frost heave and lateral pressure. This project is not about aesthetics alone; it is an exercise in soil mechanics and masonry physics. You are building a retaining structure that must withstand the weight of human occupants and the expansion of the earth beneath it. Do not cut corners. It will fail. Every successful hardscape begins with a deep understanding of the subgrade. If you ignore the geology of your backyard, your $400 investment will be a pile of loose rubble within two seasons. We are targeting a semi-circular wall, approximately 18 inches high and 8 to 10 feet long, designed to provide ergonomic seating around a central fire ring. This is the blueprint for a build that lasts decades, not months.
The Hardscape Autopsy: Why Cheap Walls Fail
I recently got called out to tear up a $30,000 patio that was sinking because the previous contractor failed to recognize a high water table and used sand instead of modified gravel for the base. It was a mess. The pavers were undulating like a mountain range, and the seating wall had tilted five degrees outward. The culprit was hydrostatic pressure. When water cannot escape the soil behind or beneath a wall, it exerts force. In colder climates, that water freezes, expands, and pushes the stones out of alignment. Even on a $400 budget, you cannot skip the 2A modified gravel. If you don’t have a solid, compacted foundation, you are just throwing money into a hole. I see this every week: homeowners buying beautiful natural stone and stacking it directly on topsoil. Topsoil is organic matter. It decomposes. It shrinks. It moves. Your wall must rest on mineral soil or a compacted aggregate. There are no exceptions to this rule in my book. If a crew tells you they can ‘just level the dirt,’ fire them immediately. They are hacks. We build for the long haul.
“A retaining wall doesn’t fail because of the stone; it fails because of the water trapped behind it.” – Hardscape Engineering Axiom
How deep should a seating wall base be?
A **seating wall base** should be excavated to a depth of at least **10 to 12 inches** to accommodate 6 inches of **compacted aggregate** and the first course of stone. For a standard 18-inch wall, burying the first course of blocks—known as the **base course**—is essential for preventing **lateral kick-out** and ensuring long-term stability. This burial depth acts as a toe-hold for the structure. Without it, the weight of a person sitting on the wall could cause the entire stack to slide across the surface. You also need to account for the thickness of your leveling pad. We use 2A modified stone because the varying sizes of the aggregate (from dust to 3/4 inch) lock together under compaction. It creates a solid, yet semi-permeable, plate. This allows for minor moisture movement without compromising the vertical lift of the wall. In heavy clay soils, you might even go deeper to provide better drainage.
The $400 Material Breakdown for 2026
| Material Item | Quantity / Specs | Estimated Cost |
|---|---|---|
| Wall Blocks (Overstock) | 45-50 Units | $220 |
| 2A Modified Gravel | 1/2 Cubic Yard | $45 |
| Masonry Adhesive | 4 Tubes (High Strength) | $35 |
| Fire Pit Insert (Steel) | 36-inch Ring | $60 |
| Landscape Fabric | 1 Roll (Non-woven) | $25 |
| Polymeric Sand | 1 Bag | $15 |
To hit the $400 mark in 2026, you need to be a savvy shopper. Check local masonry yards for ‘pallet ends’ or ‘discontinued colors.’ These are often sold at a 50% discount. The physics of the block doesn’t change just because the color is last year’s trend. Avoid the big-box store ‘garden wall’ blocks if possible; they are usually too light and lack the lip-system or pinning mechanism required for a true seating wall. Look for a block with a depth of at least 8 inches. This provides a stable ‘footprint’ for the person sitting down. A narrow wall is a dangerous wall. It will tip. We are aiming for a total height of 18 to 21 inches from the finished grade. This is the standard ergonomic height for a bench. Anything lower feels like a curb; anything higher leaves your feet dangling.
What is the best stone for a DIY fire pit wall?
The **best stone** for a **fire pit wall** is either **pre-cast concrete masonry units (CMUs)** or **natural heavy-layered limestone**, as these materials resist **thermal expansion**. Avoid porous stones like river rock or wet sandstone, which can trap moisture and **explode** when subjected to high heat from the fire pit. If you are using concrete blocks, ensure they are rated for structural use. The fire pit itself should have a steel liner to provide a thermal break between the flame and the stone. This prevents the stone from ‘spalling’ or cracking over time. Natural stone looks great but requires more skill to level. For a $400 budget, high-quality concrete wall units are your best bet for a clean, professional finish that you can execute in a weekend.
The Build Process: Step-by-Step Engineering
- Mark the Radius: Use a center stake and a string line to mark two concentric circles—one for the fire pit and one for the seating wall.
- Excavation: Dig out the seating wall trench. It should be twice as wide as the block you are using. Go 12 inches deep.
- Subgrade Compaction: Use a hand tamper or a rented plate compactor. The dirt should be hard enough that you can’t push a screwdriver into it.
- Geotextile Layer: Lay down non-woven landscape fabric to prevent the gravel from mixing with the native soil.
- The Base Lift: Add 3 inches of gravel, wet it slightly, and compact. Repeat until you have a 6-inch solid base.
- Leveling the First Course: This is the most critical step. Use a 4-foot level. If the first stone is off by 1/8 of an inch, the top will be off by an inch.
- Stacking and Gluing: Offset the joints (running bond pattern). Apply two beads of masonry adhesive to every block.
- Backfilling: Fill the space behind the buried blocks with clean gravel to facilitate drainage.
“Soil compaction is the most overlooked phase of residential landscaping; a 95% Proctor density is the difference between a wall and a pile of rocks.” – Agricultural Extension Service Bulletin
The compaction process is where most DIYers fail. They get tired. They think ‘close enough’ is fine. It isn’t. The tamper should literally bounce off the compacted base when you’ve reached the right density. If the base feels ‘spongy,’ you have too much moisture or organic material in the hole. Dig it out and start over. It will rot if you don’t. Once the wall is up, don’t sit on it for 24 to 48 hours. The adhesive needs time to cure. Modern polyurethane adhesives are incredible, but they are not instant. They require a chemical bond to form between the concrete surfaces. Keep the area dry during this period. If it rains, cover the wall with a tarp. Moisture can weaken the bond before it sets. You are building a structural asset. Treat it with the respect an engineer would. This isn’t just a weekend craft; it’s a permanent modification to your property’s topography.
Maintenance and Long-Term Stability
Once the wall is finished, you must manage the transition between the stone and your lawn care routine. Don’t let your weed whacker chew up the bottom of the blocks. I recommend a small ‘no-mow’ strip of decorative gravel or mulch at the base. This protects the stone and keeps the area looking sharp. Check the wall every spring after the ground thaws. Look for any shifting or ‘heaving.’ If you built the base correctly, the wall should move as a single unit, if it moves at all. If you see individual blocks popping out, your adhesive failed or you have a localized drainage issue. Seal the top ‘cap’ stones with a breathable silane-siloxane sealer. This prevents water from soaking into the block and freezing, which causes the surface to flake off. Do not use high-gloss ‘wet look’ sealers on seating surfaces; they become incredibly slippery when wet and can peel in direct sunlight. Stick to the professional-grade penetrating sealers. They cost more, but they work. Your future self will thank you when the wall still looks new in 2035. Structure first, aesthetics second. That is the master landscaper’s creed.