Why Your Retaining Wall Is Leaning (And the Simple Fix)
You hear it before you see it: a low, rhythmic grinding of stone against stone when the ground thaws in late March. Or perhaps you notice it after a heavy summer downpour, a hairline fracture in the mortar that was not there last season. That slight, five degree tilt in your retaining wall is not just an aesthetic quirk; it is the physical manifestation of gravity and physics fighting against a failing structure. When a wall begins to ‘nose over,’ it is telling a story of structural neglect that started long before the first block was ever set. I have spent over two decades remediating these failures, and the reality is almost always hidden beneath the surface. [IMAGE_PLACEHOLDER]
Why Hydrostatic Pressure is Your Wall’s Worst Enemy
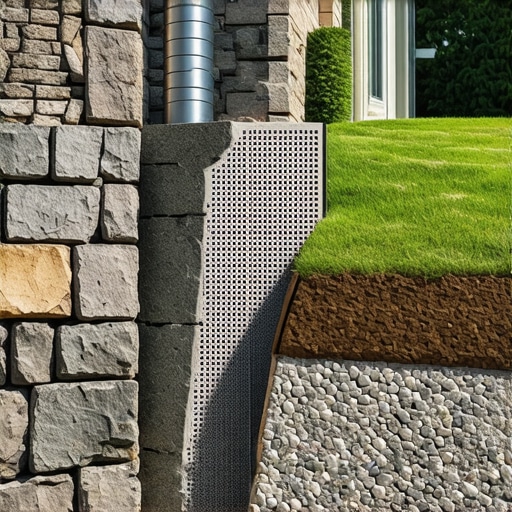
Hydrostatic pressure occurs when saturated soil exerts lateral force against a wall. Without a clean stone backfill and functional drainage pipe, water accumulates, increasing the weight of the soil significantly. This pressure forces the wall to lean or ‘blow out’ as it seeks relief from the moisture weight.
I recently got called out to tear up a $30,000 patio that was sinking because the previous contractor thought they could use native clay soil as backfill behind a four foot wall. During the forensic tear-down, we found the ‘drainage’ pipe was completely crushed and filled with silt. The wall was essentially acting as a dam. When you have a hundred tons of wet earth pushing against a stack of dry-laid stone, the stone loses every single time. Water weighs roughly 62.4 pounds per cubic foot. When your soil becomes a saturated sponge, that weight is transferred directly to the back of your wall blocks. This is the ‘death tilt.’ It starts with a slight lean and ends with a catastrophic collapse that can take out your fence, your lawn, or your neighbor’s property.
“A retaining wall doesn’t fail because of the stone; it fails because of the water trapped behind it.” – Hardscape Engineering Axiom
Soil Compaction and the 95 Percent Standard
Soil compaction is critical for structural integrity; a base must reach 95 percent Proctor density to prevent settling. Using a vibratory plate compactor in thin ‘lifts’ ensures the modified gravel particles interlock, creating a solid foundation that resists the vertical load of the stone blocks.
Most ‘mow-and-blow’ guys who try their hand at hardscaping skip the compaction phase because it is loud, heavy, and slow. They throw down six inches of gravel, run a light tamper over it once, and call it a day. That is a recipe for disaster. To achieve 95 percent Proctor density, you must work in ‘lifts’ of no more than two to three inches at a time. Each layer needs to be moisture-conditioned and hit with a heavy-duty vibratory plate compactor until the machine literally bounces off the surface. If the base moves even a quarter of an inch under your boot, it is not ready. The base of a wall is the only part you cannot fix later. If the foundation settles unevenly, the wall will develop ‘steps’ and eventually lean forward under the weight of the courses above it.
| Material | Drainage Capability | Compaction Stability | Best Use |
|---|---|---|---|
| Native Clay | Poor | Variable | Avoid as backfill |
| Modified Gravel (2A) | Fair | Excellent | Base preparation |
| 3/4 Clean Stone | Superior | Good | Behind the wall drainage |
| Sand | Good | Poor | Leveling only |
How much modified gravel do I need for a patio base?
For a standard residential patio or retaining wall base, you typically need a minimum of six inches of compacted modified gravel. This requires excavating deep enough to account for the gravel thickness plus the depth of the first ‘buried’ course of stone to ensure structural stability.
When calculating your needs, remember that six inches of loose gravel will not be six inches after compaction. You need to factor in a 20 percent ‘fluff factor’ when ordering your materials. If you need a finished six inch base for a 20 foot wall that is two feet wide, do not just calculate the raw volume. You need that extra material to ensure you hit your density targets. I have seen countless DIY projects fail because the homeowner tried to save fifty dollars by skimping on the 2A modified stone. You are not just building a base; you are building a bridge between the shifting earth and your rigid wall structure.
“Effective drainage systems are the single most important factor in the longevity of any earth-retaining structure.” – Penn State Agricultural Extension
The Role of Geogrid in Soil Stabilization
Geogrid is a high-tenacity polyester mesh that provides tensile strength to the soil mass. By interlocking with the aggregate, it creates a reinforced soil block that acts as a unified gravity mass, preventing the lateral movement of the wall face under heavy surcharge loads.
Think of geogrid as the ‘rebar’ of the soil. When you are building a wall over three feet high, the weight of the earth behind it creates a wedge of pressure that wants to slide forward. By laying geogrid between the courses of block and extending it back into the hillside, you are tying the wall face to the earth itself. The friction of the stone and soil against the grid makes it impossible for the wall to tip without moving the entire hillside with it. This is not optional for high-load areas. If you have a driveway or a parking spot anywhere near the top of that wall, geogrid is the only thing keeping your car from ending up in the neighbor’s yard.
When should I worry about a leaning wall?
You should worry the moment the wall deviates more than one inch from its original vertical batter. Any visible separation of the capstones or significant ‘bulging’ in the middle of the wall indicates a structural failure of the backfill or a lack of proper hydrostatic relief.
The Forensic Fix: Step-by-Step Remediation
Fixing a leaning wall requires excavation of the failed backfill, leveling the base course, and installing a perforated drain pipe wrapped in fabric. Proper remediation involves replacing heavy clay with 3/4 inch clean stone to ensure water drains freely, removing the cause of the tilt.
If your wall is already leaning, there is no ‘magic’ spray or bracket that will fix it from the outside. You have to perform a forensic excavation. Here is the professional checklist for a permanent fix:
- Excavate the soil behind the wall to a distance equal to the wall’s height.
- Remove all native clay and ‘dirty’ soil from the drainage zone.
- Check the base course for level; if it has dipped, the wall must be dismantled to the foundation.
- Install a 4-inch perforated PVC pipe (Schedule 40 is best) at the bottom of the trench.
- Daylight the drainage pipe so water can actually exit the system at a lower grade.
- Backfill with 3/4 inch clean, angular stone. Do not use rounded pea gravel; it rolls like ball bearings.
- Wrap the clean stone in a non-woven geotextile fabric to prevent soil from clogging the gaps.
- Re-install the blocks with a slight ‘batter’ (leaning back into the hill) of about 1 inch for every foot of height.
This process is labor-intensive, but it is the only way to ensure the wall stands for another fifty years. If you just push the wall back and throw some dirt behind it, you will be doing the same job again next spring. The physics of soil do not care about your weekend schedule. You either build it to handle the water, or the water will eventually unbuild it for you.
Why Your Wall Needs a Proper ‘Toe’
The ‘toe’ of the wall is the portion of the first course that is buried underground. This is one of the most common mistakes I see. A wall should never sit on top of the grass. You need to bury at least one full block, or 10 percent of the wall’s total height, whichever is greater. This ’embedment’ provides the lateral resistance needed to keep the bottom of the wall from kicking out. Without a proper toe, the entire structure can slide forward along the base like a sled on ice. It is a fundamental rule of hardscape engineering: the strength of what you see is entirely dependent on the stability of what you have buried.
Finally, stop using ‘weed-and-feed’ chemicals near the base of your wall. These salts can leach into the concrete and cause premature efflorescence or scaling, especially on cheaper big-box store blocks. Stick to high-quality, nursery-grade materials and professional-grade drainage solutions. Your back and your wallet will thank you in ten years.

![Build a $500 Natural Stone Retaining Wall [2026 DIY]](https://lawnmajesty.com/wp-content/uploads/2026/06/Build-a-500-Natural-Stone-Retaining-Wall-2026-DIY.jpeg)