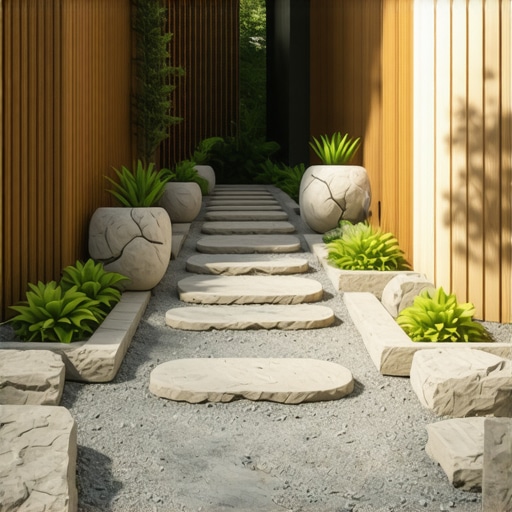
5 Ways to Transform a Narrow Side Yard into a Stone Feature
The Engineering Reality of Narrow Side Yards
Building a stone feature in a narrow side yard is not a weekend craft project; it is a civil engineering challenge in a confined space. These corridors are the primary drainage arteries of your property, often tasked with moving thousands of gallons of roof runoff away from your foundation. I recently got called out to tear up a $30,000 patio that was sinking because the previous contractor used 4 inches of uncompacted stone screenings instead of a properly graded aggregate base. Within two freeze-thaw cycles, the entire walk had buckled into a trip hazard. The dirt does not lie. If you fail to respect the hydrostatic pressure and soil mechanics of these tight spaces, your expensive stone will eventually become expensive rubble. Every successful side yard re-engineering begins with a 95% Proctor density compaction and a clear understanding of the local water table.
1. The Permeable Stepping Stone Corridor
A permeable stepping stone corridor utilizes large-format flagstone or pavers set within a matrix of clean angular stone to allow vertical water infiltration while providing a stable walking surface. This method prevents the side yard from becoming a muddy sluice during heavy rain events. By using a 4 inch sub-base of 2A modified stone and a 2 inch top layer of clean 3/4 inch decorative aggregate, you create a capillary break that keeps the surface dry and stable. Don’t skip the geotextile fabric. Without it, your gravel will eventually migrate into the subsoil, a process known as soil pumping. It will fail. You need that separation layer to maintain the structural integrity of the stone feature. Use a heavy-duty non-woven fabric, not the cheap plastic stuff from a big-box store.
How much modified gravel do I need for a patio base?
To calculate the required modified gravel, multiply the total square footage of your narrow side yard by the intended depth (minimum 4 to 6 inches for stability) and divide by 27 to find the cubic yardage. Always add a 15% waste factor for compaction. Proper compaction reduces the volume of the stone significantly as the angular pieces interlock under the force of a plate compactor. A 1,000 pound plate compactor is the bare minimum for this work. If the machine doesn’t literally bounce off the surface, you haven’t reached the required density.
“A retaining wall doesn’t fail because of the stone; it fails because of the water trapped behind it.” – Hardscape Engineering Axiom
2. The Dry Creek Bed for Managed Runoff
A dry creek bed re-engineers a side yard into a functional drainage swale using river rock and boulders of varying sizes to mimic a natural waterway. This is the primary solution for properties where the side yard acts as a low point between two houses. You are essentially building a surface-level French drain. The key is the parabolic shape of the trench. It must be deep enough to contain the peak flow from your downspouts. I prefer to use a mix of 2 to 6 inch river jacks for the bed and larger 12 inch boulders as ‘anchor’ stones to break up the velocity of the water. If the water moves too fast, it will scour the soil beneath your stones. You are managing kinetic energy as much as you are managing water. Slow it down, spread it out, and soak it in.
3. Raised Stone Planters with Drainage Integration
Raised stone planters in narrow spaces must be constructed with CMU backings or heavy dry-stack stone to resist the lateral earth pressure of saturated soil. In a narrow side yard, these planters often double as retaining walls. You must include a 4 inch perforated pipe behind the wall, wrapped in a silt sock and surrounded by clean stone. This ‘drainage chimney’ prevents water from building up behind the stone and blowing the wall out. I have seen 2 foot walls collapse because the homeowner forgot to provide a path for the water to escape. Use a high-quality masonry adhesive or mechanical interlock stones. If you are using natural stone, every third stone should be a ‘tie-back’ stone that extends deeper into the soil to anchor the face of the wall.
| Stone Material | Compressive Strength (PSI) | Permeability Rate | Best Use Case |
|---|---|---|---|
| Granite Flagstone | 15,000+ | Low (Joint Dependent) | High-traffic walking paths |
| Travertine Pavers | 8,000 – 12,000 | Moderate | Pool surrounds and heat reduction |
| River Rock (Basalt) | N/A | High | Drainage swales and creek beds |
| Concrete Pavers | 8,000 | Variable | Structured geometric designs |
4. The Vertical Stone Mosaic Wall
A vertical stone mosaic or ‘veneer’ wall utilizes thin-cut natural stone applied to a concrete masonry unit (CMU) core to maximize aesthetics in tight 3 to 5 foot wide corridors. When you don’t have the horizontal space for a thick gravity wall, you go vertical with a reinforced core. This requires a footer dug below the frost line, typically 30 to 36 inches deep depending on your local municipality codes. Use rebar reinforcement. The stone itself is just the skin; the concrete and steel are the bones. This is civil engineering on a micro-scale. I tell my apprentices: if the footer is wrong, the whole wall is a lie. You cannot hide bad prep with expensive stone. Check your levels every two courses. A 1 percent lean inward, known as ‘batter,’ will help the wall resist the pressure of the soil over decades.
What is the best stone for a narrow shady side yard?
The best stone for a narrow shady side yard is a light-colored, non-porous material like Quartzite or light Granite to reflect limited sunlight and resist moss and algae growth. Porous stones like Sandstone or certain Limestones will absorb moisture in the shade and become covered in slick green biofilm. This creates a significant slip hazard. Always opt for a ‘thermal’ or ‘natural cleft’ finish to provide mechanical grip underfoot. Smooth, honed surfaces have no place in a damp side yard. You want a Coefficient of Friction (COF) of at least 0.6 for safety in wet conditions.
“Compaction to 95% Proctor density is the non-negotiable standard for any load-bearing stone surface.” – ICPI Technical Manual
5. The Inlaid Ribbon Path
The inlaid ribbon path uses linear stone slabs separated by low-growing groundcovers or ornamental pebbles to create a sense of movement in a cramped space. This design trick breaks the ‘tunnel’ effect of a long, narrow side yard. By staggering the joints and varying the widths, you force the eye to move side-to-side rather than just straight down the line. Use 24×36 inch slabs for a bold look. If you use plants between the stones, ensure you have a specialized soil mix that can handle the high pH of the surrounding stone and the lack of airflow common in narrow corridors. Most guys just throw some dirt in there. It will rot. You need a 50/50 mix of compost and expanded shale for drainage. Use a creeping thyme or a dwarf mondo grass if the light allows.
The Critical Installation Checklist
- Call 811 to mark all underground utility lines before excavating.
- Verify the 2% minimum slope away from the house foundation to prevent basement flooding.
- Excavate to a depth that accounts for the stone thickness, the bedding sand, and the compacted aggregate base.
- Use a plate compactor in 2 inch ‘lifts’ to ensure maximum density of the base material.
- Apply polymeric sand to joints to prevent weed seed germination and insect intrusion.
- Install a hidden edge restraint to prevent the stones from migrating laterally over time.
Maintaining the Structural Integrity
Maintenance is where the hacks disappear. A stone feature needs an annual inspection. Check the joints. If the polymeric sand has eroded, replace it immediately. If you see ‘efflorescence,’ which is that white salty powder on the stone surface, don’t just scrub it. That is a sign of water moving through the stone from behind. You have a drainage problem that needs to be addressed at the source. Clean the stones with a pH-neutral cleaner. Avoid high-pressure washing at close range, as it can de-bond the stone’s surface and blast out your jointing material. A side yard stone feature is an investment in your home’s infrastructure. Treat it like the engineering project it is, and it will outlast the house itself.
![Building a Hidden Trash Can Screen [DIY 2026]](https://lawnmajesty.com/wp-content/uploads/2026/09/Building-a-Hidden-Trash-Can-Screen-DIY-2026.jpeg)