Build a $300 Backyard Fire Pit with Paver Wall Blocks
The Reality of Low-Budget Hardscaping
Building a $300 backyard fire pit using paver wall blocks requires a fundamental understanding of soil mechanics and thermal expansion to prevent structural failure within the first frost cycle. Most DIY guides ignore the hydrostatic pressure and base compaction necessary to keep a heavy masonry ring level over time.
I recently got called out to tear up a $30,000 patio that was sinking because the previous contractor used rounded pea gravel instead of angular modified stone for the sub-base. The entire surface was undulating like a wave because the gravel acted like ball bearings. It was a total failure of engineering. When you build even a small fire pit, you are essentially building a miniature retaining wall. If you treat it like a weekend craft project instead of a civil engineering task, it will lean, crack, and become a hazard within eighteen months. Real hardscaping starts with a shovel and a level, not a bag of marshmallows. You have to respect the dirt. If the dirt moves, your money is gone. I have seen countless homeowners waste three hundred dollars on blocks only to have them shift because they didn’t want to dig. Don’t be that person. Dig the hole.
Selecting the Optimal Site for Fire Pit Safety and Drainage
Choosing a location for your paver fire pit involves analyzing soil drainage patterns, overhead clearances, and proximity to flammable structures to ensure landscaping longevity. Avoid low spots where water collects, as saturated soil loses its load-bearing capacity and will cause your fire pit wall to settle unevenly.
“A retaining wall doesn’t fail because of the stone; it fails because of the water trapped behind it.” – Hardscape Engineering Axiom
How far should a fire pit be from a house?
Standard safety protocols dictate a minimum of 10 to 25 feet from any structure or low-hanging trees. Check your local municipal codes as many jurisdictions have specific distance requirements for open flames. You also need to look up. Tree canopies catch fire faster than you think.
Excavation and the Science of the Sub-Base
The foundation of a $300 fire pit must consist of 4 to 6 inches of compacted 2B modified gravel to create a stable platform that resists frost heave. Soil is not a stable base; it contains organic matter that decays and air pockets that compress under the weight of concrete wall blocks.
Use a hand tamper. You should feel the tamper bounce off the ground when you hit it. That is the sound of maximum density. If it feels soft, keep hitting it. We are looking for 95 percent compaction. This is where the lawn care aspect comes in: you must remove all turf grass and organic topsoil. If you leave grass under your pavers, it will rot. Rotting grass creates voids. Voids create sinking blocks. It is a simple chain of failure. I tell my crew that every inch of excavation is an insurance policy for the finished product. We use screed pipes to ensure the gravel is perfectly flat. If your base is off by a quarter inch, your top course will be off by an inch. Math does not lie.
How much modified gravel do I need for a fire pit base?
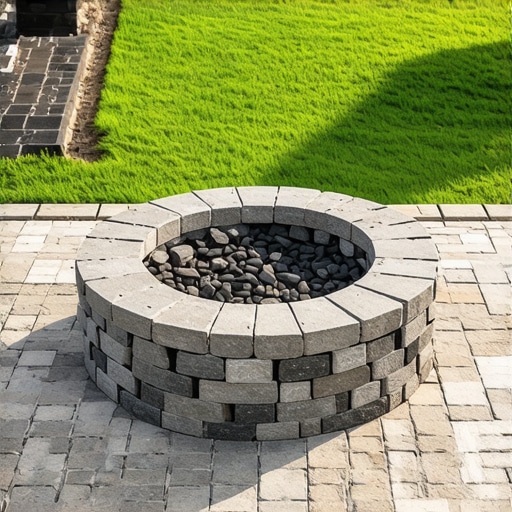
To calculate gravel needs, multiply the square footage of your ring by the depth (0.5 feet) and divide by 27 to get cubic yards. For a standard 4-foot diameter pit, roughly 5 to 7 bags of 0.5-cubic-foot leveling stone will suffice for a 6-inch deep trench. [image_placeholder_1]
Material Selection: Pavers vs. Fire Bricks
Choosing trapezoidal wall blocks allows for tight joints in a circular configuration, but you must ensure the interior is lined with a steel fire ring or refractory fire bricks to protect the outer concrete from thermal shock. Standard concrete blocks are not designed for direct flame contact; they contain moisture that can turn to steam and cause the block to shatter.
| Material Type | Estimated Cost | Pros | Cons |
|---|---|---|---|
| Standard Wall Blocks | $2.50 – $4.00 each | Easy to stack, affordable | Low heat resistance |
| Steel Fire Ring | $50.00 – $90.00 | Protects blocks, easy install | Can rust over time |
| 2B Modified Gravel | $6.00 per bag | Excellent drainage | Requires heavy tamping |
| Masonry Adhesive | $8.00 per tube | Prevents block shifting | Permanent |
Do not buy the cheapest blocks at the big-box store without checking for cracks. Inspect every single stone. Look for consistent coloring and sharp edges. If you see a hairline crack, leave it on the pallet. It will only get worse when the fire gets hot. You also need high-temperature polyurethane masonry adhesive. This isn’t wood glue. This stuff is designed to handle the expansion and contraction of the stone as it heats up and cools down. Without it, your kids or guests could kick a block loose, causing the whole structure to collapse while it is full of hot embers. That is a liability you do not want.
Step-by-Step Installation Protocol
The assembly of a $300 fire pit must follow a strict hardscaping sequence: excavate, backfill with gravel, compact, level the first course, stack subsequent layers with adhesive, and install the heat shield. Every layer must be checked with a 4-foot level to prevent leaning walls.
- Mark a circle 6 inches wider than your intended fire pit diameter.
- Excavate to a depth of 8 inches, removing all roots and organic debris.
- Fill with 6 inches of modified gravel in 2-inch lifts, tamping each lift until firm.
- Set the first course of blocks below grade to lock the structure into the ground.
- Apply two beads of masonry adhesive between each subsequent layer.
- Insert the steel ring to create a 1-inch air gap between the metal and the stone.
The air gap is critical. It acts as an insulator. Without it, the heat transfers directly into the concrete. Concrete expands when hot. If the blocks have nowhere to go, they will crack. I have seen guys build beautiful pits that lasted one season because they didn’t understand coefficient of thermal expansion. Don’t be that guy. Leave the gap. Fill that gap with lava rock or fire-rated stones if you don’t like the look of the metal, but do not let the flame touch the wall blocks directly. It will fail. I guarantee it.
“Concrete units used in fire pits must be protected from direct flame impingement to avoid spalling and structural degradation.” – ICPI Tech Manual
The Maintenance Phase and Year One Expectations
After the first year, your landscaping project will settle; you must inspect the polymeric sand or gravel joints for washouts and ensure the blocks remain adhered. Maintaining proper lawn care around the perimeter, including keeping grass short and clearing debris, prevents accidental fires and keeps the base stable.
Check the bottom of the pit after heavy rains. If you see standing water, your drainage is clogged. You might need to drill small weep holes in the bottom course or clear out the center. Standing water is the enemy of any stone structure. In the winter, the water freezes, expands, and pushes your blocks out of alignment. If you notice a block has shifted more than half an inch, it is time to pop it off, scrape the old glue, and reset it. Hardwork doesn’t end when the last block is placed. It just changes. Keep it clean. Keep it dry. It will last twenty years. Treat it like a toy, and it won’t last until Christmas.
![Build a $500 Modern Kitchen Island for 2026 [DIY]](https://lawnmajesty.com/wp-content/uploads/2026/06/Build-a-500-Modern-Kitchen-Island-for-2026-DIY.jpeg)
![7 2026 Pergola Designs for Under $600 [Modern]](https://lawnmajesty.com/wp-content/uploads/2026/06/7-2026-Pergola-Designs-for-Under-600-Modern.jpeg)