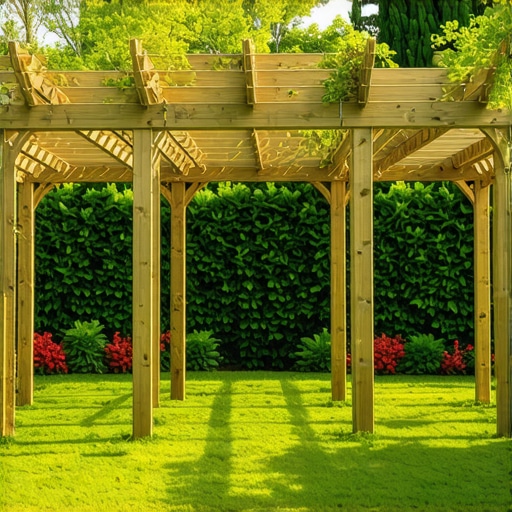
How to Build a Simple Pergola for Extra Backyard Shade
Engineering Your Shade: A Professional Guide to Building a Structural Pergola
I have spent over two decades with dirt under my fingernails, and if there is one thing I have learned, it is that homeowners underestimate the physics of the backyard. I always drill into my new crew members: if you do not fix the soil grading first and respect the structural load, every plant you put in the ground or structure you bolt down is just expensive compost. I have seen too many DIY pergolas that were essentially $5,000 kites because the builder did not understand lateral force or the bearing capacity of their soil. A pergola is not just a weekend craft project; it is a structural assembly that must withstand wind shear, snow loads, and the relentless expansion and contraction of the earth. We do not do ‘mow-and-blow’ work here, and we do not build structures that will lean in three years.
The Engineering Phase: Understanding Site Mechanics
Engineering a simple pergola requires calculating wind load, soil bearing capacity, and precise footing depth below the local frost line to prevent structural racking or uplift during high-wind events or seasonal freeze-thaw cycles. Before you even look at a piece of cedar, you must evaluate the topography. Is the ground sloping toward the house? If so, your footings will act as dams for subsurface water, leading to hydrostatic pressure that can shift your posts. You must ensure the grade falls away from the structural points at a minimum of 2 percent. We use laser levels, not ‘eyeballing it.’ If your base is not level to the millimeter, the top of your 10-foot post will be off by inches.
“A retaining wall or structural post does not fail because of the material; it fails because of the water trapped behind or beneath it.” – Hardscape Engineering Axiom
How deep should pergola posts be in the ground?
In most jurisdictions, your post footings must reach at least 12 inches below the frost line to prevent ‘frost heave.’ For a standard 10-foot tall pergola, this usually means digging a 36-inch to 42-inch deep hole with a diameter of at least 12 inches to allow for a proper concrete collar. In sandy soils, you need more surface area for friction; in heavy clay, you need a gravel base to prevent the post from sitting in a ‘clay pot’ of water. We always use 6×6 posts for structural integrity. 4x4s are for fences, not for supporting the overhead mass of 2×8 headers and 2×6 joists. The moment arm on a 10-foot post is significant; any lateral wind pressure will snap a 4×4 at the base over time.
Material Science: Selecting Timber and Hardware
Selecting the right lumber for a pergola build involves analyzing moisture content, rot resistance, and the chemical compatibility of fasteners with pressure-treated chemicals like ACQ or copper azole. Do not buy your wood from a big-box store’s outdoor pile. That wood is often ‘wet’ and will warp, twist, and check as it dries in the sun. We source ‘KDAT’ (Kiln Dried After Treatment) lumber or Grade A Western Red Cedar. Cedar contains natural thujaplicins and oils that repel rot, whereas pressure-treated pine relies on chemical salts that can be highly corrosive to standard steel screws. You must use 304 or 316-grade stainless steel or hot-dipped galvanized hardware to prevent structural failure due to fastener degradation.
| Material Type | Expected Lifespan | Maintenance Requirement | Structural Stability |
|---|---|---|---|
| Pressure Treated (KDAT) | 15-20 Years | Annual Sealing | Moderate (Prone to warping) |
| Western Red Cedar | 20-25 Years | Staining every 2 years | High (Dimensional stability) |
| Rough Sawn Redwood | 25+ Years | Oil-based sealers | Superior (Tight grain) |
The Installation Protocol: From Footing to Header
The installation of a structural backyard pergola begins with excavation, followed by aggregate compaction and the precision plumbing of posts using a 4-foot level or transit. We do not bury the wood directly in the concrete if we can avoid it. Even ‘ground contact’ rated lumber will eventually rot. Instead, we pour concrete footings with a heavy-duty galvanized post base (like a Simpson Strong-Tie) bolted into the cured concrete. This keeps the wood 1 inch above the grade, allowing for drainage and airflow. When it comes to the headers, do not just butt-joint them. We notch the 6×6 posts so the 2×10 headers sit directly on the wood ‘shoulder,’ transferring the weight downward through the timber rather than relying solely on the shear strength of a bolt.
- Call 811 to mark underground utility lines before digging.
- Excavate holes to a minimum depth of 36 inches.
- Add 4 inches of compacted 21A or 57 stone for drainage at the bottom.
- Use Sonotubes to ensure a clean, consistent concrete pour.
- Verify post-plumb on two adjacent sides during the pour.
- Wait 72 hours for concrete to reach 75% of its 3000 PSI design strength.
What is the best wood for an outdoor pergola?
Western Red Cedar is the industry standard for high-end landscaping because of its high ‘tannin’ content and low ‘shrinkage coefficient.’ While redwood is superior in terms of rot resistance, its availability is limited and the cost is often 40% higher. If you are on a budget, use Grade #1 Pressure Treated Pine, but ensure it is KDAT. If you install wet, ‘green’ lumber, your 12-foot spans will look like potato chips within six months of summer sun. Always apply a paraffin-based wood sealer to the end-cuts of every board to prevent ‘wicking’ of moisture into the grain, which leads to internal rot.
“Timber structures in outdoor environments must be designed for 100% moisture saturation, accounting for the reduction in fiber stress values.” – Agronomy and Structural Wood Manual
The Finishing Details: Lateral Bracing and Rafter Tails
The final stage of a pergola installation focuses on lateral stability through the use of knee braces and the aesthetic profile cutting of rafter tails to match the architectural style of the home. Without diagonal knee braces, your pergola will ‘rack’ or lean. These should be 45-degree cuts of 4×4 or 4×6 material, through-bolted to both the post and the header. This creates a rigid triangle, the strongest shape in engineering. For the top ‘purlins,’ we space them 12 inches on center. This provides actual shade. Many hacks space them 24 inches apart, which does nothing but look like a skeleton. By spacing them tighter, you create a cooling effect through the ‘slat’ shadow-casting, which can drop the temperature on a patio by 10 to 15 degrees in the peak of July.
Maintenance is not optional. Every year, inspect the post bases for any movement. Check the bolts for tightness, as wood naturally shrinks over time, loosening your connections. Apply a high-quality oil-based stain with UV inhibitors. Do not use ‘film-forming’ paints; they will peel and trap moisture against the wood, accelerating decay. A well-built pergola is an asset that increases property value, but a poorly built one is a liability that a home inspector will flag immediately. Build it right. Build it once.