How to Turn a Muddy Side Yard into a Gravel Path
The Structural Reality of the Muddy Side Yard
I always drill into my new crew members: if you don’t fix the soil grading first, every plant you put in the ground is just expensive compost. The same logic applies to hardscaping. A muddy side yard isn’t just an eyesore; it is a symptom of hydraulic failure. Most homeowners think they can just throw a few bags of pea gravel over the muck and call it a day. Within six months, that gravel has been swallowed by the earth, leaving a soup of stone and silt. This happens because they ignored the base layer and the hydrostatic pressure. When we step onto a side yard, we are looking at soil mechanics, not just aesthetics. If the soil is saturated, it loses its load-bearing capacity. You have to stabilize the subgrade before you even think about the top layer.
Why Side Yards Become Mud Pits
A muddy side yard is caused by poor drainage, heavy soil compaction, and low sunlight. To fix it, you must remove the organic topsoil, establish a 2% slope away from the home, and install a permeable sub-base of crushed angular stone that allows water to move without displacing soil particles.
The root cause is usually a combination of roof runoff and the ‘canyon effect’ between houses. Side yards often have poor airflow and limited sunlight, meaning evaporation rates are near zero. If your soil has a high clay content, the tiny flat particles stack together like wet playing cards, preventing vertical drainage. You are left with a bathtub effect. We measure soil moisture using a tensiometer in high-end projects, but for a path, the ‘thumb test’ works: if you can push your thumb an inch into the soil with moderate pressure, the subgrade is too weak to support a path without significant excavation. You need to get down to the ‘B horizon’ of the soil, which is the mineral layer below the organic topsoil.
“A retaining wall doesn’t fail because of the stone; it fails because of the water trapped behind it.” – Hardscape Engineering Axiom
How much modified gravel do I need for a path base?
To calculate your base material, multiply the path length by the width and the depth (usually 4 inches or 0.33 feet) to get total cubic feet. Divide by 27 to get cubic yards. For a standard 3 foot wide, 20 foot long path, you need roughly 1.5 tons of 21A or 3/4 inch minus crushed stone to account for compaction factors.
The Excavation Protocol: Establishing the Subgrade
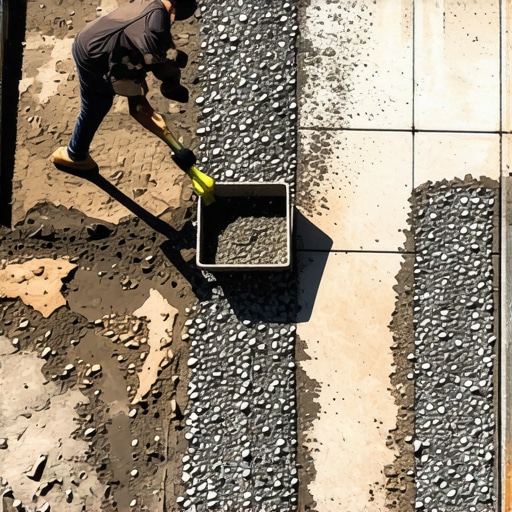
The first step is excavation. You aren’t just digging a hole; you are creating a drainage channel. We dig down at least 5 to 6 inches. This allows for 4 inches of compacted base and 2 inches of decorative surfacing. [image_1] During this phase, you must verify the pitch. Use a line level or a transit to ensure the path slopes away from the foundation at a rate of 1/4 inch per foot. If you skip this, you are effectively funnelling water into your basement or crawlspace. I have seen $100,000 foundations cracked because a ‘mow-and-blow’ guy installed a path that held water against the masonry.
What is the best gravel for a walking path?
The best gravel for a stable walking path is crushed angular stone such as 3/4-inch minus or decomposed granite with fines. Unlike rounded pea gravel, angular stones lock together under pressure, creating a firm, non-shifting surface that is easy to walk on and supports wheelbarrow traffic.
| Material Type | Stability Rating | Drainage Capacity | Recommended Use |
|---|---|---|---|
| Pea Gravel (Round) | Low | High | Decorative borders only |
| #57 Crushed Stone | Medium | Very High | Base layer or drainage trenches |
| 21A / Crusher Run | Very High | Medium | Primary structural base |
| Decomposed Granite | High | Medium | Top surface for ‘natural’ look |
Geotextiles: The Invisible Barrier
Once the subgrade is graded and tamped, we lay down a non-woven geotextile fabric. Do not use the cheap, thin plastic ‘weed barrier’ from big-box stores. That stuff is garbage. You need a Class 2 non-woven fabric. This acts as a separation layer. It allows water to pass through but prevents the heavy gravel from sinking into the soft soil. Without this, your gravel will eventually mix with the mud, and you will be back to square one. Overlap your seams by at least 12 inches and pin them down with 6-inch steel staples. This is the engineering step that separates a pro install from a DIY failure.
The Compaction Cycle: 3000 PSI of Stability
You cannot compact stone by walking on it. You need a vibratory plate compactor. We install the base in 2-inch ‘lifts.’ This means we put down 2 inches of stone, wet it slightly to lubricate the particles, and run the compactor over it until it ‘rings.’ You will know it is compacted when the machine starts to bounce off the surface rather than sinking in. Repeat this for the second 2-inch lift. This creates a solid ‘pavement’ that still allows water to percolate through. If you don’t compact, the path will develop ruts the first time it rains.
- Remove Organic Matter: Strip all grass, roots, and mulch.
- Define the Edge: Use heavy-duty steel or composite edging to keep gravel contained.
- Correct the Grade: Ensure a 2% minimum slope away from structures.
- Lay Geotextile: Use 4-ounce non-woven fabric for separation.
- Install Base: 4 inches of 3/4-inch angular crushed stone.
- Mechanical Compaction: Use a plate compactor on every 2-inch layer.
- Top Layer: Apply 1-2 inches of your chosen decorative aggregate.
Maintaining the Hydraulic Flow
A gravel path is a living system. Over time, organic matter like leaves and grass clippings will blow onto the path. If left there, they break down into compost, providing a medium for weeds to grow. Blow your path off once a week. Every two years, you might need to add a ‘refresh’ layer of half an inch of stone. If you see water pooling, it means your fines have migrated and clogged the pores. You may need to rake the surface to break the crust. Remember: a path is only as good as the dirt beneath it. Keep the water moving, and the mud will never return.