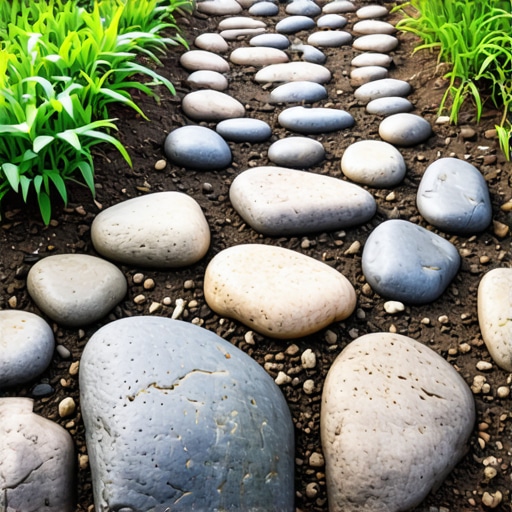
Build a $150 River Rock Path for 2026 Wet Areas
The Ground-Up Philosophy of Wet Area Management
Building a successful river rock path in a wet area requires 80 percent planning and 20 percent labor. A $150 river rock path serves as a functional drainage solution that redirects surface runoff while providing a stable walking surface in saturated zones. By using non-woven geotextile fabric and angular base stone, you create a system that manages hydrostatic pressure and prevents the path from sinking into the subgrade. Most DIY attempts fail because they ignore the civil engineering principles of soil stabilization.
I recently got called out to tear up a $30,000 patio that was sinking because the previous contractor skipped the most basic step: they didn’t account for the water table. The stones were literally swimming in mud after three months. It was a $30,000 mistake that could have been avoided with $200 worth of proper drainage pipe and 57-stone. I see this every day. Homeowners spend a fortune on the ‘pretty’ stuff but ignore the dirt. In my firm, we don’t even look at the stone until we’ve mastered the grade. If your yard feels like a sponge in March, you don’t have a landscaping problem; you have a drainage failure. This path is your first step toward fixing it.
Selecting the Right Aggregates and Fabric
The materials you choose for a river rock path must be selected based on their hydraulic conductivity and durability. For a $150 budget, you must prioritize bulk deliveries of 1-3 inch variegated river stone and non-woven filter fabric over expensive big-box store bags. Avoid the thin, woven plastic liners sold at hardware stores. They will clog with silt in six months. You need 4oz non-woven geotextile that allows water to pass while keeping the soil and stone separate.
“A retaining wall doesn’t fail because of the stone; it fails because of the water trapped behind it.” – Hardscape Engineering Axiom
How deep should a river rock path be?
A professional-grade river rock path should be excavated to a depth of 4 to 6 inches to allow for a proper base and surface layer. You need 2 inches of compacted angular stone (like #57 stone) to provide structural integrity, followed by 2-3 inches of river rock for the aesthetic and drainage surface. Anything shallower will result in the stone spreading into the surrounding lawn.
| Material Item | Estimated Cost (Bulk) | Functional Purpose |
|---|---|---|
| Non-woven Geotextile | $35 | Soil separation and filtration |
| #57 Angular Stone (Base) | $45 | Structural stability and drainage |
| 1-3″ River Rock (Top) | $60 | Aesthetic finish and water slowing |
| Steel Landscape Edging | $10 | Containment and edge definition |
The Installation Process: Defeating Hydrostatic Pressure
To install a path that lasts until 2026 and beyond, you must manage the hydrostatic pressure that builds up in wet areas. Start by calling 811 to mark your utilities. This is not optional. Once clear, excavate the path with a slight 2% pitch away from any foundations. This ensures that when the 2026 spring rains hit, the water moves where you want it, not into your crawlspace.
- Excavation: Remove all organic matter (grass, roots, and thatch).
- Fabric Layering: Lay the geotextile fabric with 6-inch overlaps at the seams.
- Base Compaction: Tamp down the angular stone until it no longer shifts under your weight.
- Edging Installation: Secure the edges to prevent lateral migration of the river rock.
- Final Pour: Spread the river rock evenly, ensuring it sits slightly below the edging height.
“Proper surface drainage is the first line of defense against subgrade saturation and subsequent structural failure of hardscape installations.” – University of Minnesota Extension Service
What is the best base for a stone walkway in wet soil?
The best base for wet soil is #57 crushed stone or modified gravel because the angular edges lock together to create a rigid platform. Unlike rounded stones, angular gravel does not shift under pressure, which prevents the pumping effect where mud is forced upward through the stone layers. This base layer acts as a mini-reservoir for excess water during heavy downpours.
Year-One Expectations and Maintenance
Your path will settle. It is a natural part of the compaction cycle. In the first year, you might see small areas where the stone has shifted. Don’t panic. Just rake it back into place. Avoid using a leaf blower on high power near the path, or you will displace the smaller stones. If you notice standing water on top of the stones, your base is likely clogged with fine sediment. This usually happens if you didn’t use a high-quality filter fabric. You can’t skip the fabric. It will rot. Well, the path won’t rot, but it will disappear into the earth.
How do I prevent weeds in a river rock path?
Weed prevention in garden design starts with the fabric, but airborne seeds will eventually land in the rocks. Use a pre-emergent herbicide in early spring and late fall to prevent germination. Avoid thick layers of mulch nearby, as organic matter will blow into the rocks and create a growing medium for weeds. Keep the rocks clean. A quick blast with a garden hose once a month will clear out the dust that weeds love. Maintenance is the difference between a path and a weed patch.
![Build a $350 Flagstone Path in One Weekend [DIY 2026]](https://lawnmajesty.com/wp-content/uploads/2026/05/Build-a-350-Flagstone-Path-in-One-Weekend-DIY-2026.jpeg)
![Why Your 2026 Concrete Driveway is Cracking [Fix]](https://lawnmajesty.com/wp-content/uploads/2026/06/Why-Your-2026-Concrete-Driveway-is-Cracking-Fix.jpeg)