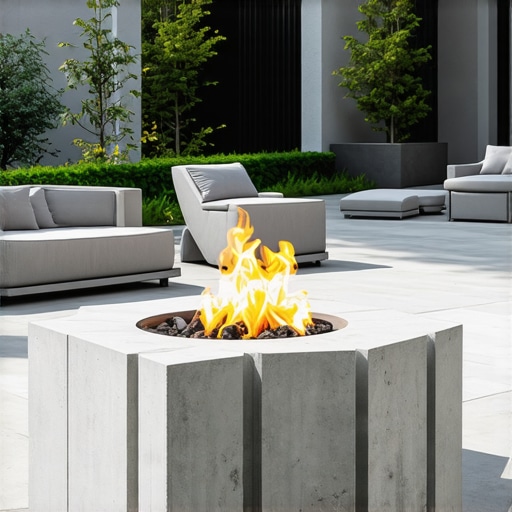
Build a $250 2026 Stone Fire Pit Ring [DIY]
Why Most DIY Fire Pits Fail Before the Second Season
Building a stone fire pit ring for under $250 requires more than just stacking blocks in a circle; it demands a fundamental understanding of soil compaction, thermal expansion, and hydrostatic drainage. I recently got called out to tear up a $30,000 patio that was sinking because the previous contractor failed to account for a high water table and used a standard sand base instead of a modified gravel sub-base. The same physics apply to your small fire pit. If you do not prep the ground, the freeze-thaw cycle will heave your stones, turning your weekend project into a pile of rubble within twelve months. We are building this for 2026 and beyond. This is not a ‘mow-and-blow’ hack job. We are engineering a localized heat-containment system that respects the biology of your lawn and the geology of your backyard.
“A retaining wall doesn’t fail because of the stone; it fails because of the water trapped behind it.” – Hardscape Engineering Axiom
The Engineering Blueprint: Why 80% of the Work is Underground
To build a durable stone fire pit, you must focus on the excavation depth and the aggregate base to prevent settling and stone cracking. Most homeowners think they can just scrape the grass away and start stacking. Wrong. You need to dig at least 8 inches down to create a compacted gravel foundation that allows water to move away from the structure. This prevents the stone from ‘wicking’ moisture which leads to spalling when that moisture turns to steam during your first big fire. We use 411 modified gravel because the ‘fines’ (dust) lock the larger stones together. It should be so hard that a hand tamper literally bounces off the surface when you hit it. If the base moves, the fire pit fails. It is that simple.
| Material | Estimated Cost | Purpose |
|---|---|---|
| Concrete Wall Blocks | $120 | Structural Ring |
| Steel Fire Ring Insert | $60 | Heat Shield |
| 411 Modified Gravel | $40 | Load Bearing Base |
| High-Heat Adhesive | $15 | Bonding Units |
| Lava Rock | $15 | Drainage/Heat Floor |
Phase 1: Siting and the Law of 811
Before you touch a shovel, you must call 811 to mark your utility lines. Hitting a gas line while digging a fire pit is a fast way to turn a DIY project into a local news story. Your pit should be at least 10 to 15 feet away from any structure, overhanging trees, or low-hanging power lines. Look at the prevailing winds in your yard. You do not want the smoke path heading directly into your bedroom window or your neighbor’s porch. Check your local HOA regulations and municipal fire codes. Some cities require a spark arrestor or a specific minimum diameter for open flames. Do not skip this. Ignorance of the law is not a defense when the fire marshal shows up.
Phase 2: Excavation and Base Stabilization
The excavation process starts by marking a circle 6 inches wider than your intended fire pit diameter. Use a flat-head spade to cut a clean edge through the turf grass. You are looking for subsoil, not topsoil. Topsoil is full of organic matter that will rot and compress over time, leading to a lopsided pit. Once you reach 8 inches deep, use a level across the entire span. A common mistake is eyeballing the level. Gravity always wins. Add your modified gravel in 2-inch ‘lifts,’ wetting each layer slightly with a hose and packing it down with a 10×10 manual tamper. This creates a non-frost-heaving base. If your soil is heavy clay, you might need a layer of geotextile fabric at the bottom to prevent the gravel from sinking into the mud over time.
“Proper base compaction is the single most important factor in the longevity of any hardscape installation.” – Interlocking Concrete Pavement Institute (ICPI) Standards
Phase 3: Setting the First Course
The first ring of stones is the most critical. If the first course is not perfectly level, every subsequent layer will be increasingly unstable. Place your steel fire ring in the center to use as a guide, but do not set the stones tight against it. You need a 1-inch air gap between the steel and the stone. This gap acts as thermal insulation, protecting the concrete blocks from direct heat transfer which causes calcination and crumbling. Use a rubber mallet to tap each block into place. Check for level across the circle and from front to back on each individual stone. If a stone is high, tap it down. If it is low, add a pinch of screeding sand or fine gravel. This is where patience pays off.
How much modified gravel do I need for a fire pit base?
To calculate the gravel volume, multiply the area of your excavation circle by the depth (0.5 feet for 6 inches) to get cubic feet, then divide by 27 for cubic yards. For a standard 4-foot diameter pit with 6 inches of base, you will typically need about 0.3 cubic yards or roughly 10 to 12 bags of leveling paver base. Always buy 10% more than you think you need. You do not want to stop mid-project because you ran out of aggregate. Compaction will reduce the volume significantly, so ‘fluff’ calculations will always leave you short.
Phase 4: Vertical Construction and Heat Management
Once the first course is set, use a polyurethane-based construction adhesive rated for exterior use. Apply two beads of glue to each stone, then stagger the joints of the second course. This ‘running bond’ pattern provides lateral stability. Do not use standard wood glue or cheap silicone. It will fail under the thermal stress. As you build up, ensure you leave two small gaps in the bottom course for oxygen intake. Fire needs air. Without ventilation holes, your fire will be smoky and struggle to stay lit. Fill the center of the pit with 2 inches of lava rock or crushed fire brick. Never use smooth river stones or pea gravel inside the pit; moisture trapped inside these stones can cause them to explode when heated.
Is it safe to use standard concrete blocks for a fire pit?
While standard concrete blocks are often used in budget builds, they are not technically fire-rated and can crack over time due to thermal shock. Using a steel fire ring insert is mandatory to create a barrier between the flame and the concrete. The steel absorbs the direct heat, while the air gap we discussed earlier prevents that heat from transferring into the alkaline structure of the concrete. For a $250 budget, this hybrid method is the gold standard for safety and 2026-ready durability. If you have extra room in the budget, lining the interior with split fire bricks and refractory mortar is the professional upgrade.
- Call 811 before digging.
- Excavate 8 inches deep.
- Compact gravel in layers.
- Maintain air gap between steel and stone.
- Level every course with a 4-foot level.
- Use high-heat adhesive for bonding.
Maintaining the Structure for Longevity
Your fire pit is a living engineering project. Every spring, check the vertical alignment. If you notice the pit is leaning, it means your drainage is failing or your base was not wide enough. Keep the ash level low. Wet ash is highly acidic and can eat away at the steel ring and the mortar joints over several seasons. If you live in a region with heavy snow, cover the pit in the winter to prevent the freeze-thaw cycle from saturating the stones. This is not about aesthetics; it is about protecting your hardscape investment. A well-built $250 pit can easily outlast a $2,000 kit if the underground physics are handled correctly from day one. Stop listening to the hacks who say you can build this on top of the grass. Do the work. Dig the hole. Build it to last.
![Build a $300 Modern Pergola for 2026 Shade [DIY]](https://lawnmajesty.com/wp-content/uploads/2026/06/Build-a-300-Modern-Pergola-for-2026-Shade-DIY.jpeg)