Build a $400 2026 Stone Fire Pit Area for Small Backyard Patio
Building a professional-grade stone fire pit for under $400 in 2026 requires a shift from decorative thinking to structural engineering. Most homeowners fail because they prioritize the look of the stone over the physics of the base, leading to a sunken, lopsided mess within two seasons. Success depends on soil compaction and heat management. Stop looking at glossy magazines and start looking at your soil drainage.
The Hardscape Autopsy: Why Cheap Patios Fail
I recently got called out to tear up a $30,000 patio that was sinking because the previous contractor ignored the subgrade and used a thin layer of stone dust instead of a true modified gravel base. The weight of the stones combined with hydrostatic pressure from a poorly graded yard turned the entire area into a mud pit after one heavy rain. If you do not fix the soil grading first, every plant or stone you put in the ground is just expensive compost. You cannot cheat the dirt. For a $400 project, you must be the labor, and you must be precise with your measurements. A single inch of pitch can be the difference between a dry entertaining space and a swamp. We see this constantly with DIY fire pits where the heat causes the stones to expand and crack because there was no thermal gap or fire-rated liner. It is a structural failure waiting to happen.
“A retaining wall doesn’t fail because of the stone; it fails because of the water trapped behind it.” – Hardscape Engineering Axiom
Planning Your $400 Fire Pit Zone
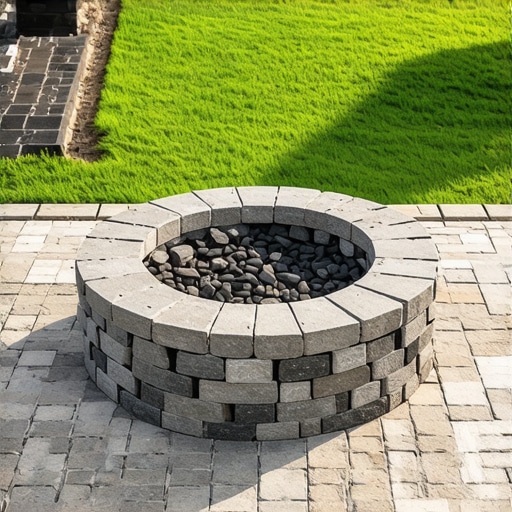
To build a $400 fire pit area, you must focus on excavation depth, compacted aggregate bases, and heat-resistant masonry. By selecting local wall blocks and utilizing a circular layout, you minimize waste and ensure the structural integrity of the hardscape without requiring expensive professional equipment or heavy machinery.
Before you strike the ground, you need to call 811. Utility lines like gas, water, and fiber optics are often buried shallower than you think. In a small backyard, your footprint is limited. Aim for a 10-foot diameter area. This allows for a 3-foot fire pit and 3.5 feet of clearance on all sides for chairs. Anything smaller is a fire hazard; anything larger will blow your $400 budget. You are looking for a flat spot, but “flat” in landscaping means a 1 percent to 2 percent slope away from your home’s foundation. Use a line level and stakes to verify this. If you miss this step, you are essentially building a basin that will flood your basement or crawlspace.
The Engineering of the Base
The base is the most critical component of any hardscaping project. For a fire pit, you need to excavate at least 6 to 8 inches down. Most of your $400 will go toward Modified 2A gravel and levelling sand. You are looking for a compaction rate that feels like concrete. Use a hand tamper. If your arms aren’t sore, you haven’t compacted enough. The gravel should be slightly damp when you hit it; this allows the fines to lock the larger stones in place, creating a solid platform that resists the freeze-thaw cycle. Standard soil has a high plasticity index in many regions, meaning it expands when wet. Your gravel base acts as a buffer to prevent this movement from cracking your fire pit stones.
How much modified gravel do I need for a patio base?
For a 10-foot circular area with a 4-inch deep base, you will need approximately 1.25 cubic yards of modified gravel. This equates to about 3,500 pounds of material. Buying this in bulk from a local quarry is 70 percent cheaper than buying individual bags at a big-box store. Transporting it yourself in a truck bed is the only way to stay under the $400 limit. If you use bags, you will spend $200 just on the base, leaving nothing for the actual stones.
| Material | Quantity | Estimated Cost (2026) |
|---|---|---|
| Modified 2A Gravel (Bulk) | 1.5 Tons | $65 |
| Levelling Sand (Bulk) | 0.5 Tons | $40 |
| Trapezoidal Wall Blocks | 36-42 Units | $180 |
| Steel Fire Ring (30-inch) | 1 Unit | $75 |
| Lava Rock / Paver Base | 3 Bags | $40 |
The Build: Assembly and Heat Logic
Layout your first course of stones on the sand. This is the most important row. If the first course is not level, every subsequent row will be crooked. Use a 4-foot level. Use a rubber mallet to seat the blocks. Do not use a metal hammer; you will fracture the concrete. Leave a 1/4-inch gap between a few stones in the bottom row to allow oxygen to feed the fire. Without airflow, your fire will be smoky and inefficient. This is basic combustion science that most DIYers ignore. You want the fire to breathe from the bottom up.
Heat is the enemy of standard concrete. Standard concrete blocks contain moisture. When that moisture turns to steam inside the block, it expands. This causes “spalling” or explosive cracking. This is why you must use a steel fire ring. The ring acts as a heat shield, preventing the direct flame from touching the concrete. If you want to go the extra mile, line the inside of the blocks with fire bricks and refractory mortar. However, for a $400 budget, a heavy-duty steel insert is your best protection. Fill the bottom of the pit with 2 inches of lava rock to protect the base and provide drainage for rainwater.
What is the safest distance for a backyard fire pit?
In most municipal codes, a fire pit must be at least 10 to 25 feet away from any combustible structure, including your house, deck, or overhanging trees. Check your local fire Marshal’s office for specific 2026 regulations. Small backyard patios often struggle with these clearances, so consider a low-profile design to keep heat directed upward rather than outward. Never build a fire pit under a low canopy or near a neighbor’s wooden fence.
The Finish: Polymeric Sand and Grading
Once your stones are stacked, do not use regular sand to fill the joints in the surrounding patio area. Use polymeric sand. This is a high-tech mix of sand and polymers that hardens when misted with water. It prevents weed growth and, more importantly, keeps ants from excavating the sand under your stones. It acts like a flexible grout. Sweep it in, vibrate the stones slightly to settle the sand, and then blow off the excess before wetting it. If you leave residue on top of the stones, it will stain them permanently. Detail matters here. It will rot if you don’t use the right materials. Precision is the difference between a professional look and a hack job.
“Standard landscape adhesives will fail at 400 degrees Fahrenheit; always ensure your fire pit design relies on gravity and mechanical interlocking rather than glue alone.” – Modern Masonry Manual
Maintenance and 2026 Trends
In 2026, we are seeing a shift toward “naturalistic hardscaping.” This means using stones that mimic local geology rather than perfectly squared-off pavers. For your $400 project, this works in your favor. Imperfect stones are often cheaper at the yard. Once the pit is built, your maintenance schedule involves clearing out ash after every three burns. Ash is alkaline and, when mixed with rainwater, creates a caustic lye that can eat away at your stone’s finish. Keep it clean. Check the level of your stones every spring. If you built the base correctly, they won’t move. If you cheated, you will see the “heave” from the winter frost. Fix it early before the whole structure shifts.
- Excavate 8 inches deep for the base.
- Use Modified 2A gravel, not pea gravel.
- Compact in 2-inch lifts.
- Install a steel heat shield.
- Apply polymeric sand to the surround.
- Maintain a 10-foot safety buffer.