How to build a retaining wall with dry stack stone
Understanding the Physics of Dry Stack Stone Walls
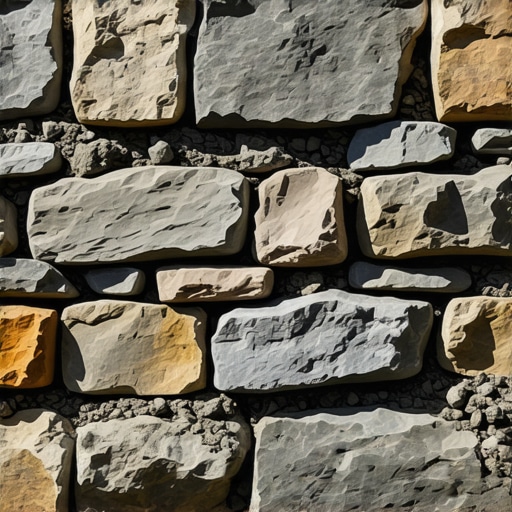
A dry stack stone retaining wall is a gravity-based structure that relies on the weight of the stone, friction between surfaces, and a slight backward lean called batter to resist lateral earth pressure. Unlike mortared walls, these systems allow water to flow freely through joints, effectively eliminating the hydrostatic pressure that causes most wall failures.
Building with stone is not just an aesthetic choice; it is a commitment to civil engineering on a micro-scale. You are managing the weight of the earth. Soil is heavy. Wet clay can weigh over 100 pounds per cubic foot. If you don’t respect the physics of the slope, the earth will eventually win. You aren’t just stacking rocks; you are creating a structural filter. This guide focuses on the technical reality of stone placement and soil mechanics. No fluff. Just the physics of dirt and rock.
The Hardscape Autopsy: Why Most DIY Walls Fail
To build a wall that lasts a century, you must understand why most fail within three years: poor drainage and inadequate base compaction. I recently got called out to tear up a $30,000 patio that was sinking because the previous contractor used ‘dirt’ as backfill behind a fieldstone wall.
When I arrived, the wall was bowing out like a beer belly. The homeowner thought they needed more mortar. I told them mortar was the problem. The previous ‘mow-and-blow’ crew had used fine-screened topsoil behind the wall. When the spring rains hit, that soil turned into a heavy slurry, exerting massive pressure. Since there were no weep holes or drainage stone, the water stayed trapped. The frost-heave cycle finished the job. We spent four days just excavating the mess before we could even look at the stone. It was a textbook case of ignoring the hydrostatic reality of the site. Every dollar spent on the stone was wasted because they skipped the $500 worth of clean 3/4-inch gravel needed for the drainage column. Don’t be that guy. Fix the drainage first.
“A retaining wall doesn’t fail because of the stone; it fails because of the water trapped behind it.” – Hardscape Engineering Axiom
The Blueprint: Selecting the Right Stone and Materials
Stone selection determines the friction coefficient and ease of installation, with flat-surfaced stones like flagstone or dimensional limestone offering the best stability. Avoid rounded river rocks for structural walls, as their lack of flat surface area prevents the mechanical interlocking required to resist soil movement.
You need to differentiate between ‘wall stone’ and ‘veneer stone.’ Wall stone has depth. For a wall two feet high, you want stones that are at least 8 to 12 inches deep. This depth provides the ‘tail’ that anchors the stone into the drainage gravel. Fieldstone is popular for its rustic look, but it is much harder to stack securely than dimensional stone. Use a high-quality modified gravel for the base—specifically something like 2A modified or a 3/4-inch crushed stone with fines. This material packs down into a concrete-like surface that still allows for microscopic drainage. Avoid ‘pea gravel’ for the base; it acts like ball bearings and will shift under the weight of the wall.
| Wall Height | Base Trench Depth | Base Gravel Width | Batter Angle |
|---|---|---|---|
| 12-18 inches | 6 inches | 18 inches | 1 inch |
| 18-36 inches | 10 inches | 24 inches | 2-3 inches |
| Over 36 inches | Consult Engineer | 30+ inches | 4+ inches |
Step 1: Excavation and the Foundation Trench
The foundation of a dry stack wall must be set below the frost line or at a minimum depth of 6 inches in well-drained soil to prevent shifting. Excavate a trench that is twice as wide as the wall’s thickness to accommodate both the stone and the critical drainage gravel behind it.
Check for utilities. Call 811. Do not skip this. Once clear, dig your trench. The bottom of the trench must be compacted. Use a plate compactor. If you use a hand tamper, your shoulders should hurt by the time you are done. The soil needs to be ‘dead.’ If it bounces, it isn’t compacted. Pour your modified gravel in 2-inch lifts. Compact each lift. Level the gravel perfectly. If your base is 1 percent off, your top row will be 10 percent off. The math of gravity is unforgiving. Use a transit level for longer runs. A 4-foot bubble level is the bare minimum for small walls.
How deep should a dry stack wall base be?
A professional-grade dry stack wall requires a base trench at least 6 to 12 inches deep, depending on local soil type and wall height. In areas with heavy clay or severe freeze-thaw cycles, the trench must reach below the frost line or include a thicker layer of compacted aggregate to prevent heaving.
Step 2: Setting the First Course (The Heart of the Wall)
The first course of stone must be the largest, heaviest units in your inventory and should be partially buried to provide ‘toe-in’ stability. These stones serve as the anchor for the entire structure, distributing the weight of the upper courses into the compacted gravel base.
Select stones with flat bottoms. Set them firmly into the base gravel. Use a dead-blow hammer to seat them. Do not use a metal sledgehammer; you will shatter the grain of the stone. Each stone must be level front-to-back and side-to-side. Space the stones closely, but leave small gaps for drainage. As you finish the first row, fill the space behind the stone with clean, crushed 3/4-inch stone (no fines). This is your drainage column. It should be at least 12 inches wide. Do not use dirt here. Dirt is the enemy.
Step 3: Stacking with Batter and Friction
Stacking dry stone requires a ‘one-over-two, two-over-one’ pattern to ensure that vertical joints never align, which would create a weak point or ‘running bond’ in the wall. Every layer must be set back slightly toward the hillside—usually 1 inch for every foot of height—to create a structural batter.
This batter shifts the center of gravity of the wall toward the soil it is retaining. It uses the weight of the earth to hold the wall in place. As you stack, ensure each stone has three points of contact with the stones below it. If a stone wobbles, use a small ‘shim’ or ‘pinner’ stone to stabilize it. However, the shim should be placed at the back of the wall, never the front. If a shim at the front falls out, the wall will tilt. The ‘hearting’ or ‘filling’ of the wall with smaller stones in the center is where the strength lives. Pack these tight. It should feel like a solid mass, not a loose pile of rocks.
“Dry-stone masonry is a craft of patience; the strength is found in the contact between faces, not the chemistry of a mortar bag.” – International Masonry Institute Standard
What is the best stone for a DIY retaining wall?
Limestone and weathered flagstone are the best choices for beginners because they naturally occur in flat, stackable layers with high surface friction. These ‘dimensional’ stones require less shaping with a chisel and provide more surface-to-surface contact, which is the primary driver of wall longevity in dry-stacking.
Step 4: Drainage Engineering and Backfilling
Effective drainage is achieved by maintaining a continuous column of clean, angular gravel behind the stone, separated from the native soil by a heavy-duty non-woven geotextile fabric. This fabric prevents fine soil particles from clogging the gravel, ensuring that water can always exit through the wall’s face.
Many hacks will tell you to just throw the dirt back in behind the stone. Ignore them. Use a non-woven geotextile against the cut bank of the earth. Then, place your 12-inch column of #57 stone (clean gravel). Finally, fold the fabric over the top of the gravel before adding your final layer of topsoil. This creates a ‘filter’ that keeps the gravel clean for decades. If the gravel gets clogged with silt, the wall will fail. It is that simple. For walls over 3 feet, consider installing a perforated 4-inch SDR-35 drain pipe at the base of the gravel column, daylighting it at the ends of the wall.
The Foreman’s Final Inspection Checklist
- Base Compaction: Does the base feel like concrete when struck?
- Batter: Is there a consistent 1-inch-per-foot lean toward the slope?
- Staggered Joints: Are there any ‘running bonds’ where vertical seams line up?
- Drainage Column: Is there at least 12 inches of clean gravel behind every stone?
- Shimming: Are all shims placed at the rear of the wall?
- Capping: Are the top stones heavy enough to prevent movement from foot traffic?
Maintenance and the 100-Year Vision
Dry stack walls are living structures. They move. They breathe. In the first year, expect minor settling. If you built the base correctly, this settling will be uniform. Every spring, walk the wall. Look for ‘belly’ or ‘bulging.’ If you see a bulge, it means the drainage is clogged or the batter was insufficient. Unlike a concrete wall, you can remediate a dry stack wall by carefully removing the affected stones and resetting them. No jackhammers required. This is the beauty of the craft. Respect the stone, manage the water, and the wall will outlast your mortgage. Treat the soil like a hydraulic force, and you will never have to build the same wall twice.

![Repairing 2026 Cracked Concrete Patios [DIY Fix]](https://lawnmajesty.com/wp-content/uploads/2026/06/Repairing-2026-Cracked-Concrete-Patios-DIY-Fix.jpeg)