4 Mistakes to Avoid with 2026 Automatic Yard Lighting
4 Engineering Mistakes to Avoid with 2026 Automatic Yard Lighting
I recently got called out to tear up a $30,000 patio that was sinking because the previous contractor failed to account for basic hydrostatic pressure and conduit placement. The homeowner wanted integrated LED lighting in the seat walls and under the stair treads. The original crew, a group of mow and blow hacks who wouldn’t know a transit level from a garden rake, simply buried the low voltage wire directly into the bedding sand without a sleeve. Over two winters, the freeze-thaw cycles shifted the pavers, the sharp edge of a concrete unit pinched the wire, and a short circuit fried the entire $4,000 transformer. To fix it, we had to excavate thirty linear feet of finished hardscaping just to find the break. It was a total failure of engineering. This is the reality of modern outdoor electrical work. If you treat lighting as an afterthought, your investment will fail. This guide focuses on the technical precision required for 2026 smart systems where soil chemistry, electrical resistance, and structural integrity intersect.
Mistake 1: Ignoring Voltage Drop and Improper Wire Gauge Ratios
To prevent dimming and flickering in your yard lighting, you must calculate voltage drop using the specific resistance of your copper wire gauge. Using thin 16-gauge wire for 2026 smart LED systems creates excessive resistance that leads to heat buildup, shortened diode life, and inconsistent color temperatures across the landscaping circuit.
Voltage drop is a physical law, not a suggestion. In a 12V or 24V system, the electricity loses pressure as it travels away from the transformer. Most DIY installers buy a spool of 16/2 wire from a big box store and wonder why the lights at the end of the run look orange while the ones at the start are bright white. You need 12-gauge or even 10-gauge wire for runs exceeding 50 feet. For 2026 systems, we are seeing a shift toward 24V DC power to combat this, but the math remains critical. If you start with 12.5 volts at the transformer and end up with 10.8 volts at the last fixture, that LED driver is working twice as hard. It will burn out. Use a multi-meter. Test at the furthest lead. If you don’t see at least 11.5 volts, your wire is too thin or your run is too long. Don’t skip the math. It matters.
How deep should I bury low-voltage lighting wire?
According to the National Electrical Code (NEC) for low-voltage lighting, you should bury wire at least 6 inches deep. However, in professional hardscaping, I recommend 12 inches inside a Schedule 40 PVC conduit when crossing under paths or patios. This prevents accidental cuts from lawn care tools like aerators or edgers.
Mistake 2: Failing to Account for Hydrostatic Pressure and Drainage
Improperly installed low-voltage lighting often fails because contractors ignore soil drainage and hydrostatic pressure in the fixture housing. When fixtures are placed in low spots without a 1/2-inch crushed stone drainage sump, water pressure forces moisture through the seals via capillary action, destroying the garden design.
“A retaining wall doesn’t fail because of the stone; it fails because of the water trapped behind it. The same logic applies to in-grade lighting fixtures buried in heavy clay soils.” – Hardscape Engineering Axiom
I see this constantly in regions with heavy clay. A contractor drops a well-light into a hole, backfills with dirt, and walks away. When it rains, that hole becomes a bucket. Even an IP67 rated fixture, which is technically submersible, isn’t meant to sit in a pressurized mud bath for three weeks. The moisture will eventually find a way in through the wire entrance. We install every in-ground fixture with a minimum of 6 inches of clean, washed gravel underneath it. This allows water to migrate away from the fixture body. We also use heat-shrink waterproof connectors filled with dielectric grease. Wire nuts with electrical tape are for amateurs. They will rot in six months.
| System Component | 12V Standard | 24V Smart System (2026) | Impact on Longevity |
|---|---|---|---|
| Wire Gauge (100ft) | 10 AWG | 12 AWG | Thinner wire possible with 24V |
| Max Fixtures/Run | 8-10 | 15-20 | Higher efficiency with 24V |
| Heat Generation | Medium | Low | 24V runs cooler, longer life |
| Connectivity | Analog | Digital (Matter/Zigbee) | Smart systems require stable voltage |
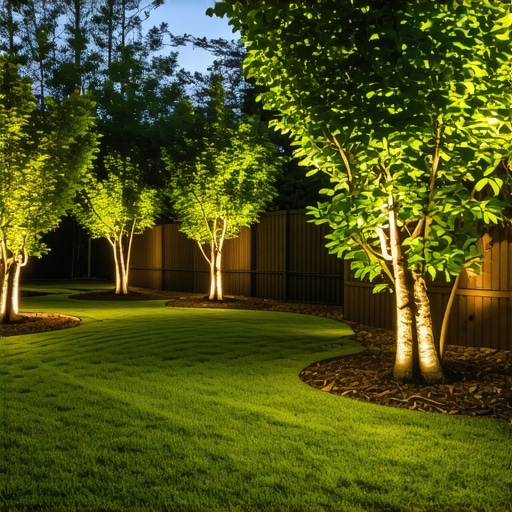
Mistake 3: Over-Illumination and the Light Pollution Trap
Excessive lumens destroy the nocturnal ecosystem and cause glare that ruins the professional aesthetic of your landscaping. Professional 2026 systems focus on layered lighting and specific color temperatures between 2700K and 3000K to highlight textures without creating a harsh, industrial environment.
More light is not better light. I see homeowners installing 500-lumen floodlights that make their backyard look like a prison yard. In 2026, we utilize micro-LEDs with high Color Rendering Index (CRI) ratings. You want to see the effect, not the source. If you can see the bare bulb from your patio chair, the design is a failure. Use glare shields. Use honeycombed louvers. Focus on grazing the bark of an Oak tree or silhouetting a Japanese Maple. This is where biology meets engineering. Plants have a circadian rhythm too. Blasting them with high-intensity blue light 24/7 disrupts their phenology. Use warm tones. Keep the light on the ground where it belongs. Protect the dark sky.
Do I need a permit for outdoor lighting?
In most jurisdictions, low-voltage (12V-24V) systems do not require a permit, but any line-voltage (120V) work for the transformer outlet must be performed by a licensed electrician and permitted. Always call 811 before digging to mark utility lines, even for shallow lighting trenches.
Mistake 4: Neglecting the Smart Controller Physical Environment
Mounting a smart lighting controller in direct sunlight or poorly ventilated areas leads to thermal throttling and Wi-Fi connectivity drops. In lawn care environments, controllers must be shielded from irrigation spray and high humidity to prevent internal board oxidation and software glitches.
“Electronic components in outdoor controllers are subject to accelerated degradation due to ionic contamination and thermal cycling.” – Agronomy Systems Manual
The 2026 controllers are essentially small computers. They run hot. If you bolt that plastic box to a south-facing brick wall in July, the internal temperature will exceed 140 degrees Fahrenheit. The capacitors will bulge. The Wi-Fi radio will fail. We mount controllers in shaded, well-ventilated areas, often inside a secondary weather-shielded enclosure. Also, consider the signal. A smart system is useless if it can’t talk to your router through three layers of brick and a steel door. We often install dedicated outdoor access points specifically for the lighting and irrigation mesh networks. Reliability is the hallmark of a pro install. Don’t bury the transformer behind a bush where it gets hit by the sprinkler every morning. It will fail.
- Check all wire connections for oxidation every spring.
- Clean fixture lenses with a calcium-lime remover to maintain lumen output.
- Inspect wire burial depths near high-traffic lawn areas.
- Update controller firmware to patch security vulnerabilities in smart protocols.
- Verify transformer load is not exceeding 80% of rated capacity.
Precision matters. If you want a lighting system that lasts twenty years instead of two, stop thinking like a decorator and start thinking like an engineer. Calculate your loads. Manage your drainage. Protect your electronics. Dig deep. Use the right materials. Your yard is a living system; treat it with the technical respect it deserves.
![How to Build a $500 Flagstone Fire Pit Area [DIY 2026]](https://lawnmajesty.com/wp-content/uploads/2026/05/How-to-Build-a-500-Flagstone-Fire-Pit-Area-DIY-2026.jpeg)
![Build a $500 Outdoor Kitchen Frame with Steel Studs [DIY]](https://lawnmajesty.com/wp-content/uploads/2026/05/Build-a-500-Outdoor-Kitchen-Frame-with-Steel-Studs-DIY.jpeg)