Stop 2026 Boxwood Dieback with This $15 Pruning Hack
The Forensic Autopsy of a Dying Boxwood Hedge
You see it every spring: a wall of expensive English Boxwoods that looked green in November but now resembles a skeletal, graying mess. Most homeowners assume it is winter burn or a lack of water. They are usually wrong. When I walk onto a property and see boxwoods ‘ghosting’ out from the center, I know exactly what I am looking at: a failure of the internal microclimate caused by poor pruning. This is a structural and biological collapse. The exterior of the plant is a dense, sheared wall of foliage that prevents any light or air from reaching the interior. Inside that shell, the humidity spikes. The leaves drop. The wood rots. It is a slow-motion execution of a premium landscape feature.
I always drill into my new crew members: if you don’t fix the soil grading first, every plant you put in the ground is just expensive compost. I remember an apprentice years ago who spent four hours shearing a client’s 50-foot hedge into a perfect rectangle. It looked like a green velvet sofa. I made him go back and cut 20% of it out. He thought I was crazy. A year later, that hedge was the only one in the neighborhood that survived a record-breaking humid summer. The others were eaten alive by fungal pathogens. Soil isn’t just dirt. Airflow isn’t just a breeze. They are the engineering foundations of horticulture.
The Critical Mechanism Behind 2026 Boxwood Dieback
To stop 2026 boxwood dieback, you must use a thinning hack that involves removing select 6-inch stems to improve internal airflow. This $15 manual hand-pruner technique prevents fungal pathogens like Cylindrocladium buxicola from thriving in the stagnant, humid microclimate created by traditional hedge shearing. By manually removing approximately 10 percent of the outer growth, you allow solar radiation to penetrate the interior canopy, which significantly reduces the leaf-wetness period that fungi require for infection.
“A boxwood hedge that is sheared annually without thinning is a biological ticking time bomb; the lack of interior light leads to a hollow center that cannot recover from pathogen stress.” – Agricultural Extension Agronomy Manual
We are currently seeing a massive surge in Boxwood Blight across the USDA Hardiness Zones 6 through 9. This isn’t just bad luck. It is the result of decades of ‘mow-and-blow’ crews using gas-powered shears. Gas shears are for speed, not for the health of the plant. They create a wound on every single leaf tip they touch. Those ragged wounds are the front door for spores. In 2026, the changing humidity patterns are making these wounds more dangerous than ever. You need a clean, surgical cut. You need a $15 pair of bypass pruners, not a $400 Stihl hedge trimmer.
The Engineering of Internal Airflow
Proper boxwood health requires a specific internal microclimate where relative humidity remains below the threshold for fungal germination. When you ‘pluck’ or ‘thin’ a boxwood, you are essentially installing a natural ventilation system. I call it ‘opening the windows.’ If you reach into the center of your boxwood and it is full of dead, brown leaves and brittle wood, your plant is suffocating. It cannot photosynthesize if the light never reaches the wood. It will rot. Don’t skip this. You are looking for a specific density: you should be able to see the branch structure inside the plant when standing three feet away.
| Feature | Traditional Shearing | The $15 Thinning Hack |
|---|---|---|
| Tools Used | Electric/Gas Shears | Manual Bypass Pruners |
| Foliage Health | Dense, exterior shell only | Deep interior growth |
| Fungal Risk | Extremely High | Low to Moderate |
| Sunlight Depth | 0 to 2 inches | 8 to 12 inches |
| Labor Level | Fast / Low Skill | Slow / High Precision |
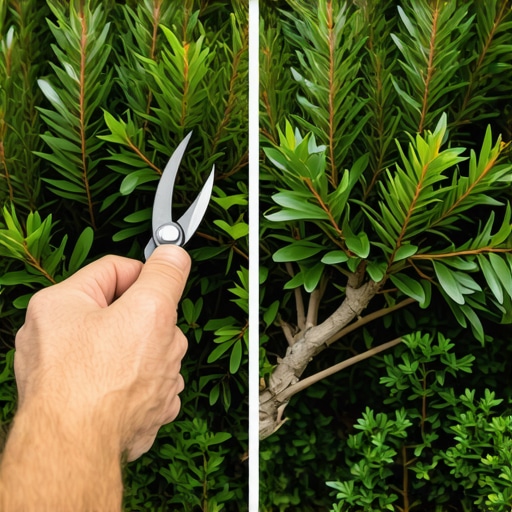
How to Execute the $15 Pruning Hack
The process is simple but requires a methodical approach. You aren’t cutting the whole plant; you are selective harvesting stems. Start by identifying the thickest areas of the canopy. Use your bypass pruners to reach in and remove a stem about 6 to 8 inches long. Repeat this every 6 to 10 inches across the surface of the plant. You want to create small ‘holes’ or windows. This feels counterintuitive to people who want a solid wall of green, but these holes will be invisible within two weeks as the plant pushes new, healthy growth from the interior nodes.
- Sterilize your tools: Use 70 percent isopropyl alcohol between every single plant to prevent spore transfer.
- Angle the cut: Always cut at a 45-degree angle just above a leaf node to ensure proper healing and water runoff.
- Timing is vital: Perform this hack in early spring before the first flush of growth or in late autumn.
- Monitor the base: Ensure no mulch is touching the root flare; boxwoods are shallow-rooted and prone to crown rot.
- Clean the interior: Reach in and manually shake out any dead leaves caught in the crotches of the branches.
“Pathogen dispersal in Buxus species is significantly mitigated when canopy density is reduced by 10 to 15 percent, allowing for rapid desiccation of the leaf surface.” – Horticultural Engineering Standards (ICPI)
How do I know if my boxwood has blight?
Check the stems for dark, black, diamond-shaped cankers and look for rapid leaf drop that starts at the bottom and moves upward. If the leaves have circular brown spots with a dark border, you are likely dealing with Calonectria pseudonaviculata. If the wood is still green under the bark when you scratch it, there is hope. If it is brown and brittle, that section is dead. Cut it out immediately. Discard the clippings in a sealed bag; never compost them. Boxwood blight spores can live in the soil for years.
What is the best time of year to prune boxwoods?
For the thinning hack, the window of late winter to early spring is optimal because the plant is dormant, and you can clearly see the branching structure without being obscured by new growth. Avoid pruning in the heat of mid-summer, as the exposed interior leaves are susceptible to sunscald. Late fall is acceptable, but ensure you finish at least six weeks before the first hard freeze to allow the cuts to callous over. Do not prune in the rain. Moisture spreads disease. Wait for a dry, sunny day.
Soil Chemistry and Root Flare Management
You can prune perfectly, but if your soil pH is sitting at 5.0, your boxwoods will die regardless. Boxwoods are calciphiles; they thrive in slightly alkaline soil, ideally between 6.5 and 7.2. Most homeowners keep piling on acidic hardwood mulch year after year, which slowly poisons the root zone. I’ve seen $50,000 landscapes fail because the contractor didn’t check the pH of the soil against the concrete foundation of the house, which leaches lime and changes the chemistry. You need to test your soil. If it is too acidic, apply pelletized lime. If the root flare is buried under four inches of mulch, dig it out. The flare needs to breathe. Planting too deep is a death sentence. It is that simple.
The 5-Step Boxwood Health Checklist
- Verify the root flare is visible and not buried by mulch or soil.
- Check soil pH and adjust with lime if it falls below 6.5.
- Perform the $15 thinning hack to remove 10 percent of the canopy.
- Apply a slow-release, low-nitrogen fertilizer (10-10-10) in early spring.
- Sterilize all pruning equipment before and after use.
![Stop 2026 Rust on Garden Tools [Maintenance Tips]](https://lawnmajesty.com/wp-content/uploads/2026/07/Stop-2026-Rust-on-Garden-Tools-Maintenance-Tips.jpeg)