How to Build a Floating Deck Over an Old Concrete Patio
The Hardscape Autopsy: Why Concrete-Contact Decks Fail
Building a floating deck over an old concrete patio requires precise moisture management and structural spacing to ensure the new timber framework does not succumb to rot or instability. By using sleeper systems or adjustable pedestals, you create a ventilation cavity that protects the substructure from standing water and alkaline corrosion.
I recently got called out to tear up a $30,000 patio that was sinking because the previous contractor thought he could just lay pressure-treated 2x4s flat against the slab without a drainage plan. Within three years, the wood was spongy, the fasteners had sheared off due to expansion cycles, and the homeowners were looking at a total loss. They called it a ‘floating deck,’ but it was really just a massive sponge. When we ripped it up, the smell of anaerobic bacteria and wood rot was overwhelming. This happens because concrete is porous; it sucks up water and holds it against the wood, creating a perfect petri dish for fungal growth. If you don’t respect the physics of moisture migration, your deck is just expensive compost in the making.
“A retaining wall doesn’t fail because of the stone; it fails because of the water trapped behind it.” – Hardscape Engineering Axiom
The Engineering Reality of Sleeper Systems
To build this right, you have to think like a drainage engineer. You aren’t just building a platform; you are building a ventilated micro-climate. The most critical mistake DIYers make is failing to check the pitch of the existing slab. If your concrete is dead-level or pitched toward the house, you’re dead in the water. Literally. Every deck board creates a seam where water enters. That water has to have a clear, unobstructed path to leave the concrete surface. We use a modified sleeper system, typically 2×4 or 4×4 pressure-treated lumber rated for Ground Contact (UC4A). Do not buy the ‘Above Ground’ (UC3B) stuff from a big-box store. It will rot. Period.
| Material Choice | Lifespan (Years) | Pros | Cons |
|---|---|---|---|
| Pressure Treated (UC4A) | 15-20 | Cost-effective, durable | Prone to warping |
| Composite (PVC-based) | 25-30+ | Zero rot, low maintenance | Expensive, retains heat |
| Ipe / Tropical Hardwood | 40+ | Extreme density, fire resistant | Hard to drill, high cost |
| Aluminum Joists | 50+ | Non-combustible, perfectly straight | Highest price point |
How much modified gravel do I need for a patio base?
While this project focuses on an existing slab, if you are extending the deck beyond the concrete, you need a sub-base of 4 to 6 inches of crushed stone or modified gravel. This ensures proper drainage and prevents frost heave from shifting your floating deck joists or support piers. If the slab is cracked, you must remediate the structural cracks before proceeding.
“The longevity of a timber structure in proximity to masonry is dictated by the rate of moisture evaporation versus the rate of absorption.” – USDA Forest Products Laboratory Manual
Step 1: The Slab Forensic Audit
Before you buy a single board, clean that slab. Get a pressure washer and remove all the algae and dirt. You need to see the ‘bones.’ Check for ‘bird baths’ (low spots where water pools). If you find them, you need to fill them with a self-leveling masonry compound or an epoxy-based patch. If the concrete is scaling or spalling, it’s a sign that the rebar inside is rusting and expanding. You can’t build a deck on a crumbling foundation. Check the pitch with a 6-foot level; you want at least a 1/8-inch drop per foot away from the house structure.
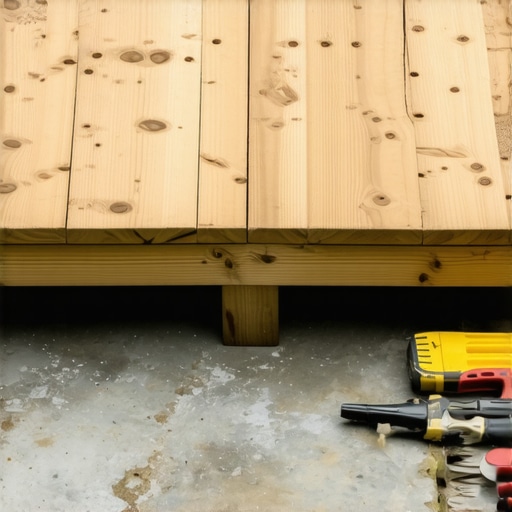
Step 2: The Layout and Sleeper Installation
We don’t nail into the concrete if we can help it. Every hole you drill is a path for water to enter the slab and freeze. Instead, use a ‘floating’ sleeper grid or use heavy-duty plastic pedestals. If you use wood sleepers, shim them with composite shims or plastic spacers. This keeps the wood 1/4 inch off the concrete, allowing water to flow underneath the joists. Space your sleepers 12 inches on-center for composite decking or 16 inches for wood. Composite is flexible; it needs more support to prevent that ‘spongy’ feel underfoot.
- Inspection: Verify slab pitch and structural integrity.
- Preparation: Patch low spots and clear debris.
- Moisture Barrier: Install joist tape on the top of all sleepers.
- Spacing: Maintain 1/8-inch gaps between deck boards for drainage.
- Fasteners: Use 304 or 316-grade stainless steel screws only.
How do I stop my deck from smelling like mold?
To prevent mold growth and mildew under a low-profile deck, you must maintain a cross-ventilation gap of at least 1.5 inches at the perimeter. This allows airflow to dry the substructure after rain, preventing anaerobic decay and the musty odors associated with trapped moisture. Don’t wrap the deck in solid fascia; use a decorative lattice or leave a gap at the bottom.
The Chemical Interaction: Concrete and PT Wood
Newer pressure-treated wood uses high concentrations of copper (ACQ or MCQ). When this copper gets wet, it becomes an electrolyte. If it touches aluminum flashing or certain types of galvanized nails, it creates a galvanic cell. It literally eats the metal. Always use joist tape (butyl-based) over the top of your sleepers. This acts as a gasket, sealing the screw holes and preventing the wood and metal from reacting. It also prevents water from sitting on the top of the joist, which is where most rot starts. Don’t skip this. It’s the difference between a 10-year deck and a 30-year deck.
The Installation Finish
When laying your deck boards, start from the outside and work toward the house. This ensures that the most visible edge is a full board. Use hidden fasteners if you’re using composite, but for wood, I prefer face-screwing with stainless steel trim-head screws. They have more ‘bite’ and keep the boards from cupping over time. If you use cedar or redwood, remember that these species are naturally rot-resistant but structurally softer. They will require a UV-inhibiting stain every 2 years to prevent silvering and checking.
![Repair 2026 Cracked Concrete Walkways for $40 [Fast]](https://lawnmajesty.com/wp-content/uploads/2026/05/Repair-2026-Cracked-Concrete-Walkways-for-40-Fast.jpeg)