![Build a $500 Modern Kitchen Island for 2026 [DIY]](https://lawnmajesty.com/wp-content/uploads/2026/06/Build-a-500-Modern-Kitchen-Island-for-2026-DIY.jpeg)
Build a $500 Modern Kitchen Island for 2026 [DIY]
The $500 Outdoor Kitchen Reality: Engineering Over Aesthetics
Building a modern kitchen island for 2026 requires a shift from cosmetic DIY trends toward structural hardscape engineering that survives thermal expansion and soil movement. Most homeowners waste hundreds on ‘mow-and-blow’ contractor advice that ignores the hydrostatic pressure and soil compaction necessary to support a 400-pound masonry unit. I recently got called out to tear up a $30,000 patio that was sinking because the previous contractor used a ‘standard’ sand base for a heavy pizza oven and kitchen island without calculating the point load. The pavers had shifted nearly three inches, shearing the gas line and creating a localized swamp where the drainage failed. It was a $15,000 mistake that could have been avoided with $200 worth of modified gravel and a rental power tamper. We had to excavate the entire subgrade, re-establish a 2% slope for drainage, and install a geotextile fabric to separate the native clay from the aggregate. If you are building for 2026, you build for the soil first, the stone second. Use ASTM D1557 standards for compaction or your $500 project will be a pile of cracked concrete by 2027. This isn’t about making it look pretty; it’s about civil engineering at a residential scale. Stop looking at Pinterest and start looking at your soil’s load-bearing capacity. A kitchen island is a dead weight that doesn’t move, and the earth beneath it is constantly breathing. If you don’t account for that breath, the island dies. Period.
“A retaining wall doesn’t fail because of the stone; it fails because of the water trapped behind it.” – Hardscape Engineering Axiom
The Physics of the Base: Why Your Island Will Sink
To build a DIY outdoor kitchen island, you must first excavate to a depth of at least 8 inches to create a compacted aggregate base that prevents settling and frost heave. The biggest failure point in DIY hardscaping is the assumption that ‘dirt is dirt.’ It isn’t. You are likely dealing with heavy clay, sandy loam, or silt, each with a different angle of repose and drainage coefficient. For a 2026-ready build, you need a Type 1 or 21A modified gravel. This material contains a mix of crushed stone and ‘fines’ that lock together under pressure.
“Properly compacted soil must reach 95% of its maximum dry density to prevent structural failure in residential hardscapes.” – Penn State Agricultural Extension
Don’t use pea gravel. Pea gravel is round and acts like ball bearings; it will never compact. You need angular stone. I tell my crew: if you can’t bounce a sledgehammer off the base, it isn’t ready. You need a vibratory plate compactor. Manual hand tamping is for flower beds, not structural islands. We are aiming for a CBR (California Bearing Ratio) that can handle the specific gravity of concrete and steel. Dig deep. Use a string level. Every 1-inch deviation at the base becomes a 3-inch lean at the countertop level. Check your levels every 2 inches of lift. It’s tedious. Do it anyway.
How deep should a concrete pad be for an outdoor kitchen?
An outdoor kitchen island requires a reinforced concrete pad at least 4 to 6 inches thick, poured over a 6-inch compacted gravel sub-base. For 2026 designs that utilize sintered stone or heavy masonry veneers, adding #3 rebar in a 12-inch grid pattern is mandatory to prevent tensile stress cracks. The pad must be slightly sloped (1/8 inch per foot) away from your home’s foundation to manage stormwater runoff. Never pour concrete directly on topsoil. Topsoil contains organic matter that rots, creating voids. Voids lead to cracks. Cracks lead to failure. We use 4000 PSI concrete for these builds. Anything less is asking for trouble in freeze-thaw climates. If you live in an area with high shrink-swell clay, increase your gravel depth. It’s cheaper than a new island.
Material Science for 2026: Sintered Stone and CMU Blocks
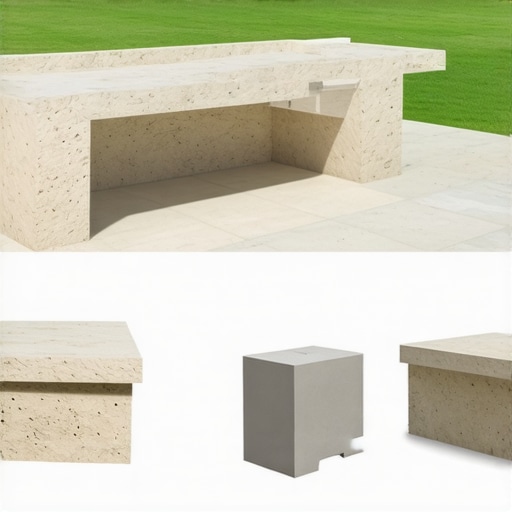
The $500 kitchen island budget is achievable in 2026 by using CMU (Concrete Masonry Units) as the internal skeleton and applying a thin-set porcelain veneer rather than expensive natural stone slabs. CMU blocks provide the structural integrity required for outdoor environments while remaining fireproof and rot-resistant. Wood framing is for indoors; even pressure-treated lumber will warp over five years of humidity cycles. For the countertop, 2026 trends move toward poured-in-place concrete or oversized porcelain pavers. These materials offer high UV resistance and zero porosity, meaning they won’t stain when you drop grill grease on them. Look for ASTM C90 compliant blocks. They are the workhorses of the hardscape world. Use a Type S mortar—it has higher lateral strength than Type N, which is critical for free-standing islands. Your veneer choice should be rated for exterior use with a water absorption rate of less than 0.5%.
| Material Component | Estimated Cost (2026) | Quantity/Unit | Performance Metric |
|---|---|---|---|
| CMU Blocks (8x8x16) | $120 | 40 Blocks | 1900 PSI Strength |
| Type S Mortar Mix | $45 | 6 Bags | 1800 PSI Bond |
| Modified Gravel Base | $60 | 0.5 Cubic Yard | 95% Compaction |
| Concrete Countertop Mix | $85 | 10 Bags | 5000 PSI Finish |
| Porcelain Veneer/Tile | $140 | 30 Sq Ft | <0.5% Absorption |
| Rebar and Hardware | $50 | Various | Grade 60 Steel |
The Assembly Protocol: Step-by-Step Structural Build
Success in hardscaping is 90% preparation and 10% stacking blocks; if your first course isn’t perfectly level in both directions, the rest of the build is garbage. [IMAGE_PLACEHOLDER] Follow this checklist strictly:
- Site Marking: Use white marking paint (811 call-out first) to outline the footprint 6 inches wider than the island.
- Excavation: Remove 10 inches of soil. If you hit organic peat, keep digging until you hit mineral soil.
- Geotextile Layer: Lay down non-woven fabric to prevent the gravel from migrating into the clay.
- Aggregate Lift: Add 3 inches of 21A gravel, spray with water, and compact. Repeat until you have 6 inches of stone ‘pavement.’
- The Pad: Frame with 2x4s and pour your reinforced concrete. Screed it flat. Let it cure for 7 days. No shortcuts.
- Block Laying: Butter the ears of the CMU blocks. Use a level and a dead-blow hammer. Check for square using the 3-4-5 triangle method.
- Countertop Form: Build a melamine form for the concrete top. Include fiberglass mesh for reinforcement.
- Finishing: Apply a penetrating sealer. Do not use topical acrylics; they peel in the sun.
What is the best base material for heavy pavers or kitchen islands?
The gold standard for any hardscape base is crushed stone sub-base (often called 3/4″ minus or modified) because it provides both structural stability and capillary break properties. Unlike sand, which can wash away or shift under hydrostatic pressure, crushed stone interlocks to form a rigid platform. For outdoor kitchen islands, this base must be at least 6 inches deep and mechanically compacted in 2-inch ‘lifts.’ This prevents the settling that causes grout lines to crack and doors to misalign. If you use dirt or plain sand, the island will move. It’s physics. Don’t fight it.
The Critical 2026 Update: Drainage and Utilities
In 2026, municipal drainage codes are becoming stricter regarding impervious surfaces, so your kitchen island project must account for permeable perimeter drainage. Don’t just let rain fall off the counter and pool at the base; this leads to efflorescence (that white salty crust) on your stone. Install a simple French drain or a wicking layer of clean #57 stone around the island’s footprint. If you are running gas or electric, use Schedule 40 PVC conduit and bury it 18 inches deep (check local codes). Never ‘direct bury’ wires under a structural slab. If a wire shorts, you don’t want to jackhammer your $500 island to fix a $10 wire. Use a sweeping 90-degree elbow for the conduit to make pulling wire easier. This is the difference between a pro job and a hack job. It will rot if you trap moisture. Keep the air moving. Keep the water moving. Your island should be a fortress, not a sponge. Every joint should be sealed with polymeric sand or a high-grade exterior silicone at the transition points. This prevents ice wedging in the winter. If you skip the sealer, you’re just building expensive compost. Build it right, or don’t build it at all. The soil wins every time if you don’t respect it. Logic, physics, and a lot of sweat are the only ways to get a 2026-ready kitchen island for five bills.