
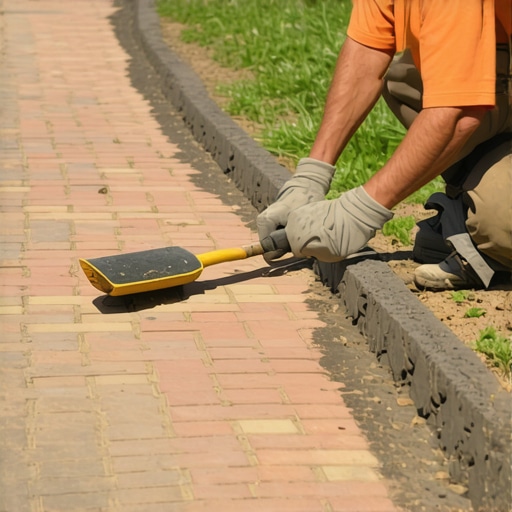
Fix Sinking 2026 Paver Edging for $20 with Poly-Sand
The Autopsy of a Sinking Paver Edge: Why Your Hardscape is Failing
To fix sinking paver edging, you must address the loss of lateral restraint and base erosion caused by water ingress. By using polymeric sand to create a rigid, weather-resistant joint, you lock pavers in place and prevent the $20 fix from becoming a $2,000 excavation project. I recently got called out to tear up a $30,000 patio that was sinking because the previous contractor thought he could save $150 by using play sand instead of a proper ASTM C144 graded aggregate with polymer additives. Within two seasons, the rain washed the sand out, the hydrostatic pressure from the clay subgrade pushed the edging stones out, and the whole installation unraveled like a cheap sweater. This is not just an aesthetic issue; it is a structural failure of the pavement system. When the edge restraint fails, the entire interlock of the paver system is compromised. You lose the friction that holds the blocks together. It is a slow-motion disaster. Most homeowners ignore the first half-inch of settlement. Don’t. If you see a gap, the clock is ticking. You are one heavy rainstorm away from a total collapse of the bedding layer. It will rot the subgrade. Fix it now or pay me ten times more to fix it later. This guide focuses on the technical remediation of these failures using high-grade poly-sand.
“A retaining wall doesn’t fail because of the stone; it fails because of the water trapped behind it.” – Hardscape Engineering Axiom
The Science of Vertical Displacement and Lateral Shift
Paver edging sinks because of capillary action and inadequate compaction of the modified gravel base. When water enters the joints, it softens the bedding sand, allowing the pavers to migrate downward under the weight of foot traffic or freeze-thaw cycles. In 2026, we are seeing more extreme weather patterns that accelerate this erosion. Most DIY jobs fail because they don’t understand the ‘angle of repose’ for their base materials. If your base isn’t 6 inches of 2A modified stone compacted to 98% Proctor density, your edge will move. Polymeric sand acts as a mechanical bond. It’s a mix of fine sands and binders (polymers) that harden when triggered by water. This creates a semi-rigid joint that resists washout. But it isn’t magic. If the base below is soup, the sand won’t save you. You have to stabilize the edge first. We use a 1-inch screed layer of concrete sand over the compacted gravel. Any deviation in this thickness leads to uneven settling. It is physics. You cannot argue with gravity. Most people think they can just pour more sand on top. They are wrong. You must excavate the failure point. Clean the joints. Reset the stone. Only then do you apply the polymer.
How much modified gravel do I need for a patio base?
To calculate the required modified gravel volume, multiply the square footage of your project by the desired depth (typically 4-6 inches for walkways, 8-12 inches for driveways) and divide by 324 to convert to cubic yards. For a standard 100-square-foot patio with a 6-inch base, you need approximately 1.85 cubic yards of 2A modified stone. Always factor in a 20% compaction loss. If you don’t over-order, you will run short. Compaction is non-negotiable. Use a plate compactor. A hand tamper is a toy. You need the centrifugal force of a machine to lock those stones together. If the base doesn’t ring like an anvil when you hit it, it is not ready. I tell my crew: if you can leave a footprint, you aren’t done. We see too many ‘contractors’ skipping the vibratory plate. That is why your patio looks like a roller coaster after three years.
| Material | Purpose | Estimated Cost |
|---|---|---|
| High-Polymer Sand | Joint stabilization and weed prevention | $20 – $25 per bag |
| 2A Modified Stone | Structural sub-base for drainage | $35 per ton |
| Concrete Sand | Leveling/Screed layer (ASTM C33) | $5 per bag |
| Edge Restraint (PVC) | Lateral support to prevent spreading | $15 per 8ft piece |
The $20 Fix: Step-by-Step Remediation
The following process outlines the technical restoration of a failing paver edge using polymeric sand to re-establish the interlocking mechanism.
- Step 1: Remove the sunken pavers and the old, contaminated bedding sand.
- Step 2: Inspect the sub-base for soft spots or organic debris.
- Step 3: Add and compact new modified stone to reach the proper grade minus the paver thickness and screed layer.
- Step 4: Screed a fresh 1-inch layer of clean concrete sand.
- Step 5: Re-install pavers, ensuring they sit 1/8 inch above the desired final grade to allow for final compaction.
- Step 6: Sweep polymeric sand into the dry joints until full.
- Step 7: Vibrate the pavers to settle the sand, then refill to 1/8 inch below the chamfer edge.
- Step 8: Mist the sand with water to activate the polymers, following the manufacturer’s specific timing.
Do not over-water. If you flood the joint, you wash out the binders. You end up with a sticky mess that never hardens. It’s a delicate balance. Read the bag. Every brand is different. Some require three passes of mist; others just one heavy soak. Don’t guess.
“Joint sand loss is the leading cause of segmental pavement failure, as it allows for moisture penetration into the bedding layer and subgrade.” – ICPI Tech Spec No. 5
Why polymeric sand beats traditional joint sand
Polymeric sand provides hydrophobic properties and structural rigidity that traditional masonry sand lacks, effectively preventing formicidae colonization (ant hills) and seed germination within the joints. Traditional sand is just a filler. It moves. It washes. It grows weeds. Polymeric sand, when cured, is like a flexible grout. It handles the expansion and contraction of the seasons without cracking like mortar would. If you live in a freeze-thaw climate, mortar is your enemy. It will shatter. Polymers have ‘memory’ and can take the flex. But you have to clean the paver surface perfectly before wetting. If you leave a film of sand on top of the pavers, it will create a white haze called ‘poly-haze’ that is a nightmare to remove. Use a leaf blower on low idle to clear the surface before the water hits it. Accuracy is everything. One mistake here ruins the look of the whole project.
How do I prevent weeds from growing in my pavers?
To prevent weed growth in pavers, you must eliminate the organic growth medium by using high-quality polymeric sand and ensuring the joints are completely sealed from the surface to the bedding layer. Weeds don’t usually grow from the bottom up; they grow from seeds that land in the dirt trapped in your joints. If your joints are filled with hardened polymer, the seeds can’t take root. Keep the area clean. Power wash it once a year, but be careful not to blast out the sand. If you see the sand receding, top it off immediately. Maintenance is a habit, not a chore. Neglect is the fastest way to kill a landscape. You spent the money on the stone; spend the time on the joints. A well-maintained paver system can last 50 years. A neglected one will look like a ruins in five.
The Maintenance Schedule: Year One and Beyond
After the repair, the first 48 hours are critical for the polymer cross-linking process. Keep all traffic off the pavers. If it rains before the sand sets, cover it with a tarp, but prop the tarp up to allow airflow. If the sand stays wet too long, the chemicals won’t bond. Check the joints every spring. Look for cracks. Look for washouts. If you see a gap, clean it with a stiff brush and add a little more sand. It is like changing the oil in your truck. Do it regularly, and the machine keeps running. Skip it, and you’re looking at a total engine failure. This $20 fix works, but only if you respect the materials. Don’t be a hack. Follow the science. Get the grade right. Compact the base. Seal the joints. That is how you build a legacy in stone. No shortcuts. Just physics and hard work. Your yard deserves that much. Stop buying the cheap bags at the big-box store. Go to a landscape supply yard. Get the professional-grade stuff. Your back and your wallet will thank you in five years when the edge is still straight and true.
![Build a $400 Flagstone Walkway in One Weekend [DIY]](https://lawnmajesty.com/wp-content/uploads/2026/06/Build-a-400-Flagstone-Walkway-in-One-Weekend-DIY.jpeg)