Build a $200 2026 Gravel Path for Modern Yard Entryways
Build a $200 2026 Gravel Path for Modern Yard Entryways
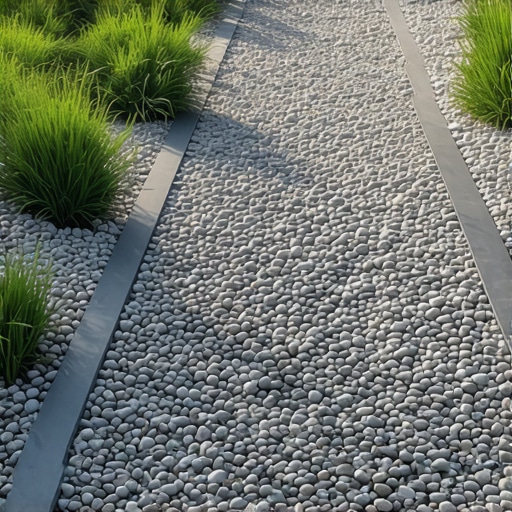
Most homeowners approach a front entryway path as an aesthetic choice, but to a professional, it is a problem of hydraulic engineering and soil stabilization. If you treat your walkway like a decoration, the frost heave cycle of the first winter will turn your investment into a disjointed mess of stone and mud. A proper gravel path in 2026 requires a focus on angular aggregate interlock and sub-grade compaction to ensure longevity on a strict $200 budget. You are not just laying stones; you are creating a permeable pavement system that manages runoff and prevents soil erosion.
The Hardscape Autopsy: Why Cheap Paths Fail
To build a $200 2026 gravel path, you must understand that site preparation and material selection are the primary drivers of success, not just the top layer of stone. I recently got called out to tear up a $30,000 patio that was sinking because the previous contractor ignored the hydrostatic pressure building up in the sub-soil; they used rounded pea gravel as a base, which acts like ball bearings under load. For your $200 path, we will avoid this by using crushed angular stone that locks together under mechanical pressure, creating a rigid surface that remains porous. Forget the big-box store bags; we are going to the local quarry or landscape supply yard where your dollar has actual leverage. Any path without a non-woven geotextile fabric layer is destined to be swallowed by the earth within 24 months. Don’t skip the fabric.
“A retaining wall doesn’t fail because of the stone; it fails because of the water trapped behind it.” – Hardscape Engineering Axiom
How much modified gravel do I need for a path base?
Calculating the volume of aggregate involves multiplying the length by the width by the depth (in feet) and dividing by 27 to get cubic yards. For a 20-foot path that is 3 feet wide with a 4-inch depth, you need approximately 0.75 cubic yards of CR-6 or 3/4-inch minus stone. Always add a 10% compaction factor to your final estimate to account for the reduction in volume during the tamping process. If you under-buy, you lose structural integrity. If you over-buy, you waste your $200 budget. Measure twice, or you will be making a second trip to the quarry in a borrowed pickup truck.
The Engineering Phase: Excavation and Grading
Excavation is where the E-E-A-T of a landscaper truly shows; you must dig deep enough to remove the organic horizon of the soil. Grass, roots, and topsoil are compressible and will rot, leading to void spaces and path failure. You need to strip at least 4 to 6 inches of material until you hit the mineral sub-soil. If you are dealing with heavy clay, your grading must be precise—aim for a 2% cross-slope to ensure water moves away from your home’s foundation and into the surrounding landscape. Water is the enemy of any hardscape. If it sits, it destroys. We use a transit level or a simple string line to verify these slopes before a single stone is dropped. [image placeholder]
What is the best base for a gravel path?
The best base for a modern gravel path is a 2-inch layer of dense-graded aggregate (DGA), also known as crusher run or 3/4-inch minus. This material contains both angular stones and fines (stone dust) which, when moistened and compacted, create a concrete-like sub-base that prevents the decorative top stone from migrating into the soil. Without this mechanical bond, your path will shift underfoot. In 2026, we are seeing higher costs for premium stones, so focusing your budget on the structural base rather than the expensive decorative topping is the mark of a seasoned foreman. Use #57 stone only if you have severe drainage issues, otherwise, stick to DGA for maximum stability.
| Material Item | Estimated Quantity (20’x3′) | Estimated Cost (Bulk) |
|---|---|---|
| 3/4″ Minus (Base) | 0.5 Cubic Yards | $45.00 |
| Decorative 3/8″ Stone | 0.3 Cubic Yards | $65.00 |
| Non-Woven Geotextile | 65 Square Feet | $35.00 |
| Steel Edging (Low-Profile) | 40 Linear Feet | $55.00 |
| Total Project Cost | — | $200.00 |
The Art of Mechanical Compaction
Proper compaction is the difference between a path and a pile of rocks. You must use a plate compactor or, at the very least, a heavy-duty hand tamper on 2-inch lifts. If you throw 4 inches of stone into a trench and hit the top, only the upper inch gets compacted; the bottom stays loose, leading to differential settlement. As I tell my crew: the tamper should literally bounce off the compacted base once it’s locked. This is the Proctor density test in its simplest form. You are looking for a surface that doesn’t yield when you heel into it. If it moves, keep tamping. The sound will change from a dull thud to a sharp ring when you’ve hit 95% compaction. Don’t be lazy here. Your linear entryway depends on this rigidity.
- Clear the footprint: Remove all sod and roots to a depth of 5 inches.
- Grade for drainage: Ensure a 1/4 inch drop per foot away from structures.
- Lay the fabric: Use 4oz non-woven geotextile, overlapping seams by 12 inches.
- Install edging: Secure steel or heavy-duty poly edging with 10-inch spikes.
- Base Layer: Add 2 inches of DGA, spray with a fine mist, and compact.
- Surface Layer: Add 2 inches of decorative angular stone (e.g., California Gold or Granite).
- Final Set: Walk the path to check for soft spots and add stone as needed.
“Soil moisture at the time of compaction is the most critical variable in achieving specified density.” – USDA Soil Mechanics Manual
The Year-One Settlement and Maintenance
Every path will have a settling-in period where the stones find their final orientation. In 2026, with increasing weather volatility, you must monitor your edging stability after the first heavy rain. If you see “fines” washing out, your permeability is clogged or your grading is off. A simple rake-over once every three months will keep the path looking sharp. Avoid using glyphosate-heavy weed killers; instead, rely on the physical barrier of your geotextile and the high pH environment of certain limestone-based gravels which naturally inhibits growth. If a weed does pop up, it’s likely growing in the organic debris that has settled on top of the stones, not coming from the soil below. Pull it early. Keep it clean. This $200 investment, if built with these horticultural engineering principles, will outlast any “pro” job that skips the prep work.
![Building a $100 2026 Natural Stone Path [DIY]](https://lawnmajesty.com/wp-content/uploads/2026/07/Building-a-100-2026-Natural-Stone-Path-DIY.jpeg)
![Build a $600 Flagstone Patio on a Sand Base [2026 DIY]](https://lawnmajesty.com/wp-content/uploads/2026/05/Build-a-600-Flagstone-Patio-on-a-Sand-Base-2026-DIY.jpeg)