Stop Your Retaining Wall From Leaning with This $40 Drainage Fix
The Forensic Autopsy of a Leaning Retaining Wall
A leaning retaining wall is almost always the result of hydrostatic pressure building up behind the blocks due to poor drainage. When water cannot escape the soil, it increases the weight and pressure against the structure, eventually exceeding the soil’s angle of repose and pushing the stone or timber forward. If you see a bulge, the physics of your backyard have already shifted against you.
I recently got called out to tear up a $30,000 patio and wall system that was sinking and leaning at a precarious 15-degree angle. The previous contractor, a classic ‘mow-and-blow’ guy who thought he could play engineer, had used the existing heavy clay soil as backfill directly behind the blocks. He didn’t use a single inch of clean aggregate. Within two seasons of freeze-thaw cycles, that clay expanded like a sponge, and the sheer weight of the water-logged earth snapped the concrete lip of the wall units. It was a structural catastrophe that could have been avoided with forty dollars’ worth of perforated pipe and a few bags of clean stone. I had to tell the homeowner the truth: the wall wasn’t the problem; the water was the weapon.
“A retaining wall doesn’t fail because of the stone; it fails because of the water trapped behind it.” – Hardscape Engineering Axiom
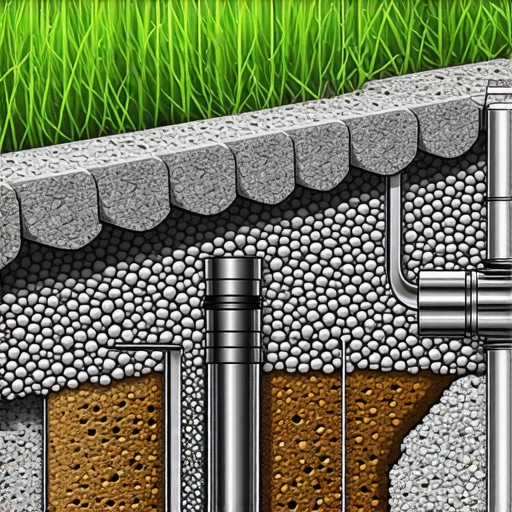
The core of the issue is the weight of water. Soil is heavy, but saturated soil is a hydraulic ram. In a standard 4-foot wall, the pressure from water alone can double the load the wall was designed to hold. You aren’t just holding back dirt; you are holding back a dam that doesn’t have a spillway. This is where the $40 fix comes into play. It focuses on the critical drainage zone—the 12 inches of space directly behind your wall units.
The Anatomy of the $40 Drainage Fix
To stop a wall from leaning, you must provide a path of least resistance for subsurface water using a French drain system and clean 3/4-inch crushed stone. By spending $15 on a 10-foot length of 4-inch perforated HDPE pipe and $25 on several bags of ASTM #57 stone, you create a vacuum that pulls water away from the soil and dumps it through a ‘daylight’ exit point. This relieves the PSI (pounds per square inch) against the block face instantly.
[image_placeholder]
How much modified gravel do I need for a wall base?
For a standard retaining wall, you need a base of compacted 2A modified gravel that is at least 6 inches deep and 12 inches wider than the block itself. This base must be vibratory-plate compacted to a 95% Proctor density to ensure that the vertical load of the wall is distributed evenly across the subgrade, preventing the differential settlement that leads to leaning. Don’t use pea gravel; it acts like ball bearings and will never lock into place.
| Material Type | Function in Wall Drainage | Estimated Cost (Small Section) |
|---|---|---|
| Perforated HDPE Pipe | Conveys water away from the backfill zone | $12.00 – $18.00 |
| #57 Clean Crushed Stone | Provides 40% void space for water movement | $15.00 – $25.00 |
| Non-Woven Geotextile | Prevents soil fines from clogging the stone | $10.00 – $15.00 |
| Daylight Outlet Cover | Prevents rodents from nesting in the drain | $5.00 |
Why is water leaking through my retaining wall?
Water leaking through the face of a retaining wall is actually a sign that your weep holes or drainage layers are partially functioning, but it indicates a lack of filter fabric. If the water is muddy, it means the soil is migrating into your stone drainage column, which will eventually clog the system and lead to wall failure through piping erosion. You need to separate your ‘clean’ stone from the ‘dirty’ backfill with a professional-grade geotextile fabric.
The Science of Soil and Surcharge
In the world of professional landscaping, we look at the coefficient of friction between the soil and the wall. If you have heavy red clay, your drainage requirements triple. Clay particles are microscopic and flat; they hold water through capillary action. When that water freezes, it expands by 9%. If that expansion happens behind a rigid wall, the wall moves. Every time. To prevent this, you must over-excavate. I tell my crew: if the wall is three feet high, I want at least two feet of gravel behind it. This is called the drainage chimney. It ensures that the ‘surcharge’—the extra weight from cars or slopes above the wall—is handled by the stone, not the hydrostatic pressure of wet clay.
“Hydrostatic pressure is the primary cause of wall rotation and sliding failure in segmental retaining wall systems.” – National Concrete Masonry Association (NCMA)
- Step 1: Excavate the area behind the leaning section at least 12 inches deep.
- Step 2: Lay down a strip of non-woven filter fabric to keep the system clean.
- Step 3: Install your 4-inch perforated pipe with the ‘holes facing down’—this is a common rookie mistake; holes face down so water enters from the bottom as the water table rises.
- Step 4: Backfill with clean #57 stone. No fines. No dirt.
- Step 5: ‘Daylight’ the pipe to a lower grade or through the wall face using a 4-inch wall drain kit.
It will rot. That is what happens when you use cheap timber or skip the drainage. If you are building with wood, even pressure-treated 6x6s will fail in 7 years if they are sitting in a bath of wet soil. By installing this $40 drainage solution, you dry out the environment. Dry wood lasts. Dry walls stay straight. It is basic biology and civil engineering. Don’t be the homeowner who spends $30,000 twice because they were too lazy to spend $40 once. Soil pH and moisture levels are the silent killers of hardscaping. Manage them, or they will manage your bank account.
![Fix Your 2026 Sinking Deck Post for Under $100 [DIY]](https://lawnmajesty.com/wp-content/uploads/2026/05/Fix-Your-2026-Sinking-Deck-Post-for-Under-100-DIY.jpeg)
![Build a $150 2026 Gravel Parking Pad [Weekend Fix]](https://lawnmajesty.com/wp-content/uploads/2026/05/Build-a-150-2026-Gravel-Parking-Pad-Weekend-Fix.jpeg)
![Why Your 2026 Retaining Wall is Leaning [3 Fixes]](https://lawnmajesty.com/wp-content/uploads/2026/06/Why-Your-2026-Retaining-Wall-is-Leaning-3-Fixes.jpeg)