Build a $250 DIY Brick Fire Pit in One Weekend
Why Most DIY Fire Pits Fail Before the First Burn
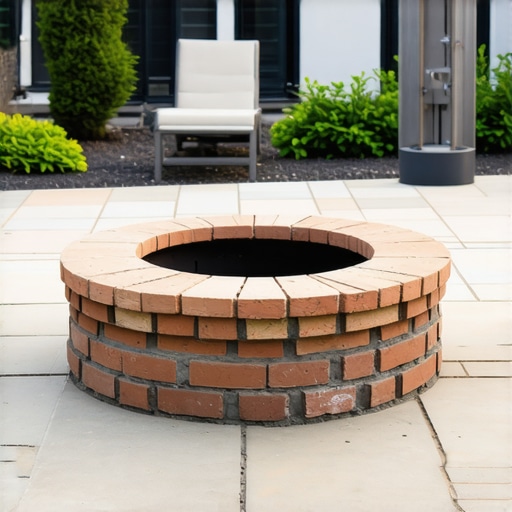
Building a DIY brick fire pit for under $250 requires a shift from cosmetic thinking to structural engineering, focusing on soil compaction, base depth, and thermal expansion to prevent structural collapse or stone spalling. Most homeowners fail because they ignore the invisible forces of hydrostatic pressure and freeze-thaw cycles that turn a weekend project into a pile of loose rubble within two seasons.
I recently got called out to tear up a $30,000 patio that was sinking because the previous contractor thought he could skip the compaction phase on a slope. It was a Hardscape Autopsy that revealed three inches of uncompacted limestone screenings sitting on top of organic topsoil. The result? A catastrophic failure where the pavers shifted like tectonic plates. When you build a fire pit, even a small one, you are dealing with the same physics. If you don’t excavate the organic material—the grass and the dark, spongy topsoil—you are building on a foundation of future compost. It will fail. Every time.
“A retaining wall doesn’t fail because of the stone; it fails because of the water trapped behind it.” – Hardscape Engineering Axiom
The Planning Phase: Site Physics and Material Sourcing
Before you touch a shovel, you must identify your soil type. Heavy clay requires a deeper base than sandy loam because clay retains water, leading to massive heaving during winter. For a $250 budget, your primary expenses will be refractory fire bricks, 411 crushed limestone, and landscape adhesive. Avoid big-box store “decorative stones” for the interior; standard clay bricks can contain trapped moisture that expands when heated, causing the brick to literally explode. This is called spalling, and it is a safety hazard you cannot ignore.
| Material | Purpose | Estimated Cost |
|---|---|---|
| 411 Crushed Limestone | Structural Base | $45 |
| Refractory Fire Bricks | Heat Protection | $90 |
| Exterior Concrete Pavers | Outer Facade | $80 |
| Landscape Adhesive | Binding Layers | $25 |
| Drainage Gravel (1B) | Internal Drainage | $10 |
How deep should a fire pit base be for stability?
A professional-grade fire pit base should be excavated to a depth of 8 to 12 inches, allowing for 6 inches of compacted aggregate and 2 inches of leveling sand. This depth ensures that the structure sits below the organic layer and distributes the weight of the masonry across a stable, non-shifting foundation of crushed stone.
- Mark out a 60-inch diameter: This allows for a 36-inch interior pit and 12-inch walls.
- Excavate to 10 inches: Remove all roots. Roots rot, creating air pockets. Air pockets lead to settling.
- Layered Compaction: Add 2 inches of 411 stone at a time and use a hand tamper. The tamper should literally bounce off the ground when you hit it. That is the sound of 95% Proctor density.
- Leveling the Screed: Use a 4-foot level. If your base is 1/8th of an inch off at the bottom, it will be 2 inches off at the top.
Choosing Between Fire Bricks and Standard Masonry
Information gain: Most online tutorials tell you to use whatever brick is on sale. This is dangerous advice. You must use refractory fire bricks for the inner lining. These are kiln-fired at much higher temperatures and are designed to handle the 1,500-degree heat of a wood fire without cracking. Use the standard pavers for the outside aesthetic, but keep a 1-inch air gap between the fire bricks and the outer wall. This gap acts as a thermal break, preventing the exterior stones from cracking due to heat stress.
“Thermal shock in masonry occurs when the temperature gradient between the hot face and the cold face exceeds the material’s elastic limit.” – Masonry Construction Manual
How much modified gravel do I need for a patio base?
To calculate modified gravel needs, multiply your square footage by the desired depth in feet, then divide by 27 to get cubic yards; for a standard 5-foot fire pit area at 6 inches deep, you will need approximately 0.4 cubic yards of stone. Always order 10% extra to account for compaction shrinkage.
The Installation Process: Sensory Checks and Safety
When you start laying your first course of stone, don’t just trust the level. Walk on it. If there is even a hint of a wobble, the stone isn’t seated. Use a rubber mallet to seat each block into the aggregate. For the $250 build, we are using polymeric sand in the joints of the base stones to prevent ants and weeds from undermining the work. Once you reach the third course, ensure you leave two “weep holes” at the bottom. These are gaps in the vertical mortar or stone joints that allow rainwater to escape the pit. Without them, your fire pit becomes a bowl of stagnant water, which will ruin the base through hydrostatic pressure during the first freeze.
What kind of bricks are best for a fire pit?
The best bricks for a durable fire pit are ASTM C64-compliant refractory bricks for the interior and high-density concrete pavers for the exterior. This combination ensures the structure can withstand both the intense heat of the fire and the moisture-rich environment of the soil without crumbling or exploding.
The first year is the settling period. You might notice the stones shift slightly as the ground adjusts to the new weight. This is normal, provided you built a solid limestone base. If you skipped the base and put bricks on dirt? It will rot. The moisture in the soil will wick into the brick, and the first hard freeze will shatter them from the inside out. Do the work now, or do it again next year. Spend the bulk of your $250 on what goes *under* the ground, not what sits on top of it. Landscape design is 10% what you see and 90% what you don’t. Build it right.
![Build a $150 2026 Cedar Planter for Patios [Easy Project]](https://lawnmajesty.com/wp-content/uploads/2026/07/Build-a-150-2026-Cedar-Planter-for-Patios-Easy-Project.jpeg)