How to Build a Floating Wood Deck over an Old Concrete Pad
Why the Planning Phase Dictates Decades of Structural Success
Building a floating wood deck over an existing concrete pad is a high-stakes engineering task that most DIYers underestimate by treating it like furniture assembly. Successful floating deck installation requires a deep understanding of hydrostatic pressure, timber ventilation, and fastener corrosion resistance to prevent the new structure from becoming a rot-prone moisture trap. You aren’t just covering up ugly concrete; you are building a secondary drainage system that must allow for 100% moisture evaporation beneath the boards. Fail to plan for airflow, and you are simply building an expensive petri dish for wood-decay fungi. If the concrete is cracked or pitched toward the house, your deck is already doomed before you buy the first joist.
The Hardscape Autopsy: Lessons from Failed Overlays
I recently got called out to tear up a $30,000 patio project that was sinking because the previous contractor ignored the fundamental rules of sub-base compaction and drainage. The homeowner thought they could just lay 2×4 sleepers directly onto an old, cracked slab. Within three years, the trapped water had turned the sleepers into mush, and the expansion of the freezing water underneath had cracked the slab further, pitching the entire mess toward the home’s foundation. It was a disaster. I had to bring in a jackhammer and start from the dirt up. This is the reality of hardscaping: if you don’t account for how water moves, the water will eventually move you. In this case, the lack of a 1/4-inch drainage gap and the use of standard zinc-plated screws led to a total structural collapse. We don’t build like that. We build for the next thirty years, not the next thirty days.
Evaluating Your Existing Concrete Pad for Structural Viability
To determine if your slab can support a deck, you must assess its load-bearing capacity, surface pitch, and moisture migration patterns. Any pad with cracks wider than 1/4 inch or signs of vertical heaving must be stabilized or ground down before the first sleeper is laid. Testing the slope is non-negotiable; you need a minimum 1-inch drop for every 8 feet of run to ensure water sheds away from the structure. If you have a flat slab, you will need to utilize adjustable pedestal systems or composite shims to create an artificial pitch. Standing water is the enemy of garden design and long-term hardscaping. It will rot. Don’t skip this.
“Wood-plastic composites and pressure-treated lumber used in ground-contact applications must maintain a minimum clearance to allow for transverse ventilation and the prevention of moisture accumulation.” – International Residential Code (IRC) Section R507
How much modified gravel do I need for a patio base?
While this project uses an existing slab, if you find the concrete is too far gone, you will need 4 to 6 inches of compacted 21A modified gravel as a new base. This material provides the structural stability and capillary break necessary to prevent frost heave from pushing your deck out of alignment. Do not use pea gravel; it acts like ball bearings and will never compact. You need the angular edges of crushed stone to lock together under the force of a plate compactor. A vibrating tamper should literally bounce off the surface once you’ve hit maximum density.
| Material Choice | Service Life | Drainage Requirement | Maintenance Level |
|---|---|---|---|
| Pressure-Treated Pine | 15-20 Years | High (Needs Joist Tape) | Annual Sealing |
| Ipe / Hardwood | 40+ Years | Moderate (High Density) | Periodic Oil |
| Composite (PVC) | 25-30 Years | Critical (Ventilation) | Low (Wash only) |
The Engineering of Sleeper Joists and Airflow
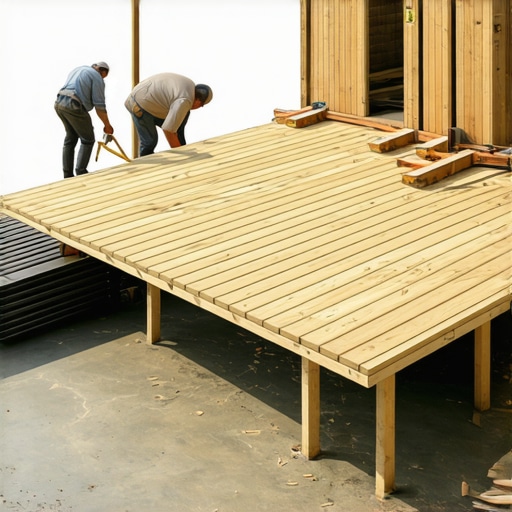
The core of a floating deck is the sleeper system, which consists of low-profile joists that sit directly or nearly directly on the concrete. To avoid capillary action—where the wood sucks water up from the concrete—you must use butyl joist tape on the top of every joist and plastic stand-offs on the bottom. I prefer using adjustable pedestals because they allow for precision leveling and create a massive 1-inch to 4-inch air gap. This gap is the secret to longevity. It allows the wind to pull moisture out from under the deck. Without it, the humidity under the deck will stay at 100%, and your fasteners will undergo galvanic corrosion at twice the normal rate. Use 305 or 316-grade stainless steel screws. Anything else is a gamble you will lose.
The Installation Checklist for Floating Decks
- Check slab pitch using a transit or laser level.
- Grind down high spots in the concrete using a diamond cup wheel.
- Layout joist positions at 12-inch or 16-inch centers.
- Apply butyl rubber tape to the crown of all pressure-treated joists.
- Install sleepers using tapcon anchors or let them float on pedestals.
- Verify 1/8-inch gaps between deck boards for drainage and expansion.
- Edge-grain orientation: bark-side up to prevent cupping.
Does a floating deck over concrete require a permit?
In most jurisdictions, a floating deck that is not attached to the house and is under 30 inches in height does not require a structural permit, but zoning setbacks and lot coverage ratios still apply. Always call your local building department to verify municipal drainage codes; some cities count decks as impermeable surfaces, which can affect your stormwater runoff taxes. Ignoring 811/Dig Safe is a fool’s errand, even on a concrete pad, as shallow electrical conduits for patio lighting often run right beneath the slab. Check twice. Drill once.
“The primary cause of fastener failure in exterior wood structures is the electrochemical reaction between wood preservatives and non-stainless steel alloys.” – Hardscape Engineering Axiom
The Maintenance Schedule for Year One and Beyond
Once the deck is down, the job isn’t over. In the first year, the wood will go through several wet-dry cycles. You will see some checking and minor twisting; this is normal for organic material. However, if you see the boards cupping, your under-deck ventilation is failing. You must keep the perimeter of the deck clear of debris and mulch. Avoid the “mulch volcano” against the side of the deck. Keep the gaps between the boards clear of pine needles and dirt so water can fall through freely. In lawn care, we talk about thatch; in decking, we talk about organic buildup. Both will kill your project if left unchecked. Use a leaf blower once a week to clear the gaps. It takes five minutes. It saves five thousand dollars.