How to Install a Simple Drip Irrigation System for Raised Beds
The Engineering Behind the Hydration: Why Surface Watering Fails
Installing a drip irrigation system for raised beds requires a technical transition from high-pressure municipal water to a low-volume micro-irrigation network using pressure regulators and emitters designed to maintain field capacity within the soil profile. This approach eliminates the hydrostatic shock associated with overhead watering and prevents fungal pathogens by keeping the foliage dry while targeting the rhizosphere directly.
I always drill into my new crew members: if you don’t fix the soil grading and understand the capillary fringe, every plant you put in the ground is just expensive compost. I’ve spent twenty years digging up ‘professional’ installs where the contractor just threw some 1/4-inch vinyl line on top of the mulch and called it a day. Within six months, those lines are brittle, clogged with mineral deposits, or sliced by a garden spade. Real irrigation is an engineering discipline. It’s about calculating flow rates, understanding friction loss, and ensuring that every plant from the first bed to the last receives the exact same milliliters per hour. Anything less is just making a mud hole.
“Drip irrigation is the frequent, slow application of water to the soil through mechanical devices called emitters. It is more efficient than other types of irrigation because water is applied directly to the root zone, reducing loss from evaporation and runoff.” – Texas A&M AgriLife Extension
The Components of a High-Performance System
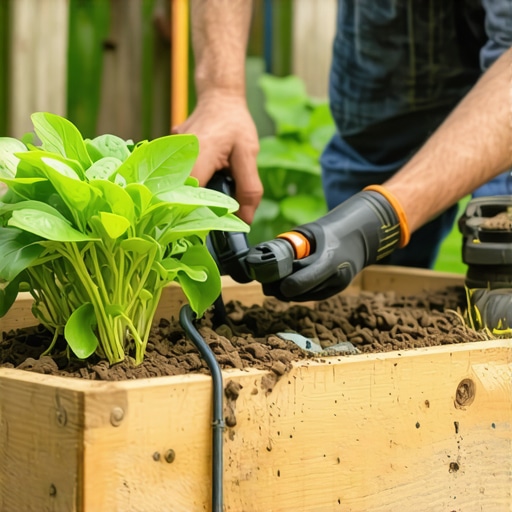
A professional-grade setup starts at the point of connection (POC). You aren’t just hooking up a garden hose. You need a backflow preventer (vacuum breaker) to keep non-potable garden water out of your house pipes. Follow this with a 155-mesh filter. Even if your water looks clean, micro-particulates will seize up a pressure-compensating (PC) emitter in one season. Finally, the pressure regulator is non-negotiable. Most drip components are rated for 25 to 30 PSI; your home’s 60-80 PSI will literally blow the emitters out of the tubing.
[image_placeholder]
How much pressure do I need for a raised bed drip system?
Most residential raised bed drip systems function optimally at 25 PSI (pounds per square inch), which provides enough force to move water through polyethylene tubing while preventing the 1/4-inch distribution lines from popping off their barbed fittings. If your pressure is too low, the check valves in PC emitters won’t open; if it’s too high, you’ll experience system fatigue and frequent leaks at the junctions.
| Material Type | Durability Rating | Application | Lifespan |
|---|---|---|---|
| LDPE Poly Tubing (1/2″) | High | Mainline distribution / Header pipes | 10-15 Years |
| Vinyl Micro-tubing (1/4″) | Low | Short runs to individual plants | 2-3 Years |
| In-line Emitter Tubing | Medium | Dense plantings / Grid patterns | 5-7 Years |
| Pressure Regulators | Critical | Required for all drip zones | Indefinite |
Phase 1: The Header and Sub-Main Layout
We use low-density polyethylene (LDPE) for the main headers. Don’t buy the thin-walled junk from the big-box stores. You want 700 series poly. Lay your 1/2-inch mainline along the spine of your raised beds. Use compression fittings rather than cheap insert barbs if you want the system to last through a freeze-thaw cycle. When you turn a corner, use a 90-degree elbow. Don’t kink the pipe. A kink is a pressure bottleneck that will starve the downstream emitters. Every bed should have its own shut-off valve. This allows you to take a bed offline for soil solarization or replanting without killing the rest of the garden.
Phase 2: Emitter Selection and Root Zone Targeting
Stop using generic sprayers. They are inefficient. For raised beds, use Pressure Compensating (PC) emitters or In-line emitter tubing. In-line tubing has emitters built into the pipe every 6 to 12 inches. This creates a continuous wetted strip of soil. For larger architectural plants or heavy feeders like tomatoes, we use individual 2 GPH (gallons per hour) emitters on 1/4-inch distribution tubing. Position the emitter at the drip line of the plant, not against the stem. Water against the stem invites crown rot. It will rot. Don’t skip this. You want the roots to move outward, chasing the moisture gradient. This builds a robust root architecture that can survive the heat of July.
“Uniformity of water application is the primary goal of any irrigation design. In drip systems, this is achieved by matching the emission rate to the soil’s infiltration rate to avoid saturation and anaerobic conditions.” – ICPI Hardscape & Irrigation Standards
How do I calculate the run time for my drip zone?
To calculate drip irrigation run time, determine the precipitation rate of your emitters and the evapotranspiration (ET) rate of your region; generally, a bed with 1 GPH emitters spaced 12 inches apart requires 45 to 60 minutes of run time, two to three times per week, to reach a 6-inch soil saturation depth. Use a soil probe. If the soil is muddy at the surface but bone dry 4 inches down, your run time is too short. Deep, infrequent watering is the law.
The Maintenance Protocol: Preventing System Failure
- Monthly Flush: Open the end caps of your 1/2-inch headers and run the water for 30 seconds to clear out sediment buildup.
- Filter Cleaning: Unscrew the 155-mesh filter and scrub the stainless steel screen with a soft brush.
- Emitter Check: Walk the lines. If a plant looks wilted, the emitter is likely clogged with calcium or an ant colony.
- Winterization: If you live in a freeze zone, use an air compressor to blow out the lines or ensure the system is sloped to a low-point drain. Residual water will shatter a plastic valve.
Optimizing the Soil Matrix for Drip Efficacy
The best irrigation system in the world won’t save you if your soil is hydrophobic or lacks organic matter. In raised beds, the soil dries out faster due to increased surface area exposure. We incorporate leaf compost and vermiculite to increase the cation exchange capacity and water-holding potential. If your water just beads up and rolls off the surface, you have a surface tension issue. Apply a organic wetting agent or mulch heavily with arborist wood chips to break the impact of the water and facilitate capillary action. Drip irrigation relies on the soil to move the water horizontally. In sandy soils, the water goes straight down like a straw. In high-clay soils, it pools. You must know your soil texture before you set your timer.
Forget the ‘smart’ controllers that just guess based on the weather. Use a tensiometer or a capacitance-based soil moisture sensor buried in the root zone. This allows the system to talk to the soil. If the soil is at 80% of its water-holding capacity, the system shouldn’t fire. This isn’t just about saving water; it’s about preventing nutrient leaching. Over-watering washes your nitrogen and potassium right out of the bottom of the bed. It’s a waste of money. Precision is the only way forward.