How to Install No-Dig Edging for a Clean Mulch Line
The Hard Truth About No-Dig Edging
I always drill into my new crew members: if you don’t fix the soil grading first, every plant you put in the ground is just expensive compost. Most homeowners see ‘no-dig’ edging as a shortcut. They think it is a way to bypass the sweat equity of a spade-cut trench. That is a mistake. No-dig edging is an engineering choice, not a lazy man’s out. When we are designing a high-end landscape, we use no-dig systems when we need to protect shallow root systems of specimen trees or when the soil is so packed with shale that a traditional trench would compromise the structural integrity of the surrounding turf. I have seen guys spend thousands on nursery stock only to suffocate the root flares because they didn’t understand how their edging affected the hydrology of the bed. You have to think about the physics of the site. If your edging is too high, it creates a dam. If it is too low, the mulch washes out during the first summer thunderstorm. It is about balance and precision.
Choosing the Right No-Dig Edging Material
Professional no-dig edging relies on high-density polyethylene (HDPE) or heavy-duty composite materials that resist UV degradation and thermal expansion. Unlike cheap big-box alternatives, pro-grade edging maintains a 3-inch vertical profile to effectively contain mulch and deflect string trimmer impact without cracking or warping over time. Material choice is everything. If you buy the thin, flimsy plastic rolls, the sun will turn them into brittle shards in two seasons. I have seen it a hundred times. We use L-shaped profiles because they utilize the weight of the mulch itself to stay anchored. This is basic civil engineering applied to a flower bed. The downward force of your mulch layer acts as a ballast, pressing the horizontal flange of the edging into the earth. This prevents the dreaded ‘frost heave’ where your edging pops out of the ground like a spring when the temperature fluctuates.
| Material Type | Durability Rating | Flexibility | Best Use Case |
|---|---|---|---|
| High-Density Polyethylene | High | Moderate | Curved beds, heavy mulch loads |
| Recycled Rubber | Medium | High | Tight radiuses, soft-scape safety |
| Aluminum (L-Shape) | Extreme | Low | Modern clean lines, architectural edges |
| Composite Timber | High | None | Straight runs, vegetable gardens |
“A retaining wall or edging system doesn’t fail because of the material; it fails because of the water trapped behind it or the lack of proper anchorage against hydrostatic pressure.” Hardscape Engineering Axiom
How much modified gravel do I need for a patio base?
While this article focuses on edging, many ask about the foundation; for a standard patio, you need a six-inch base of compacted 21A or CR-6 modified gravel. This ensures that your no-dig edging has a stable substrate to butt against, preventing lateral shift during heavy rain cycles or soil expansion.
The Installation Protocol: Precision Over Speed
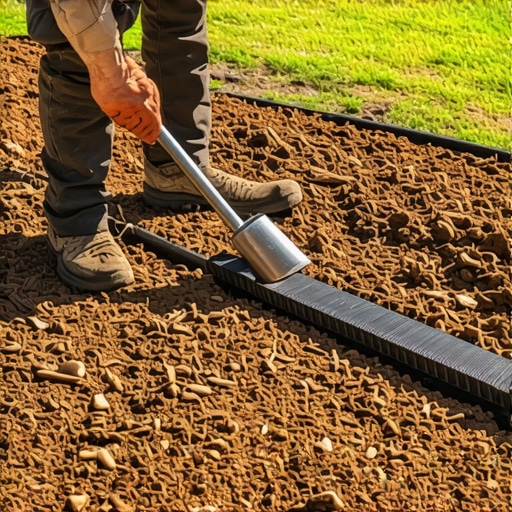
To install no-dig edging correctly, you must first clear a flat path of approximately four inches wide along your desired mulch line. Remove all turf, large rocks, and debris. This is not ‘digging’ in the traditional sense, but it is essential site prep. You are creating a level ‘shelf’ for the edging to sit on. If the shelf is uneven, the edging will look like a roller coaster. We use a line level or a laser level for longer runs. Even a quarter-inch deviation over ten feet is visible to the naked eye. Once the shelf is prepped, you lay the edging. The spikes are the most critical component. Do not use plastic stakes. They snap. We use 8-inch to 10-inch galvanized steel spikes. Drive them in at a slight angle toward the bed. This creates a mechanical wedge that resists the outward pressure of the turf. You want the top of the edging to sit about a half-inch above the finished mulch level. This prevents the grass from creeping over the top while keeping the profile low enough to avoid mower blades.
- Clear all vegetation from the path with a flat-head shovel.
- Lay out the edging to let it ‘relax’ in the sun; this makes it easier to shape.
- Hammer spikes every 12 to 18 inches, or every 8 inches on tight curves.
- Overlap sections by at least 2 inches to prevent gaps.
- Backfill with double-shredded hardwood mulch immediately.
The Biological Impact of Edging on Soil Health
Most people forget that an edge is a barrier for more than just mulch. It affects the O-Horizon of your soil. This is the organic layer where decomposition happens. When you install an impermeable plastic barrier, you are potentially disrupting the lateral movement of beneficial microbes and earthworms. This is why we prefer breathable or segmented systems for larger garden beds. Furthermore, you must consider the NPK ratios of your soil. Mulch is not just decoration; it is a slow-release carbon source. If your edging is improperly installed and traps too much moisture at the edge of the lawn, you will see a spike in fungal pathogens like Rhizoctonia solani (Brown Patch). The edging should define the space, not create a stagnant swamp. Deep, infrequent watering is the key. You want to force the roots of your turf grass to chase the water down past the edging line. If you surface water, the roots stay shallow and will eventually lift your edging right out of the ground.
“Effective soil management requires an understanding of both the physical structure and the chemical composition; any barrier introduced must not impede the natural drainage capacity of the land.” Penn State Agricultural Extension
How do I stop grass from growing under no-dig edging?
To prevent rhizomatous grass like Kentucky Bluegrass or Bermuda from creeping under your edging, you must install a physical weed barrier or a strip of heavy-duty landscape fabric that extends 2 inches under the turf and 2 inches into the mulch bed. This forces the roots to hit a dead end, preventing them from ‘tunneling’ through the loose soil at the surface.
Maintenance and Long-Term Stability
Landscape maintenance is a marathon, not a sprint. Every spring, you need to inspect your spikes. The freeze-thaw cycle is a powerful force. It will push steel spikes up. Take a heavy mallet and reset any spikes that have lifted. Check for ‘mulch volcanoes’—this is when people pile mulch too high against the edging and the base of trees. It will rot. Keep the mulch depth to a consistent 2 to 3 inches. If you see the edging bowing out, it means you have a drainage issue or the soil behind it is too saturated. You might need to pull the mulch back and check the grade. Remember, the edging is a tool. Use it to create clean, crisp lines that define your garden’s architecture. It is the difference between a yard and a landscape. Don’t skip the prep work. The dirt doesn’t lie. If you cheat the process, the environment will find out and punish your wallet. Keep your lines straight, your spikes deep, and your mulch level consistent. That is how you win the war against a messy yard.