How to install solar lights along a garden edge
The Planning Phase: Why 80% of Landscaping Success Happens Before Installation
To install solar lights along a garden edge, you must first establish a consistent offset from the edging material, typically 2 to 4 inches, to prevent mower damage. Dig 6-inch pilot holes to bypass soil compaction and ensure vertical alignment, then orient panels for maximum solar exposure. Planning prevents the common ‘runway’ look that amateur DIYers create. I always drill into my new crew members: if you don’t fix the soil grading first, every plant you put in the ground is just expensive compost. This applies to lighting too. If your garden edge sits in a low spot where water collects, your solar stakes will suffer from hydrostatic pressure and internal corrosion within months. We don’t build for today; we build for five years from now. You need to map out your light pools. High-end garden design isn’t about the fixture itself, but the shadows it casts and the safety it provides for the foot traffic. Most people grab a 12-pack of cheap plastic lights from a big-box store and wonder why their yard looks like a discount airport. It is about the Kelvin scale and the lumen output. Don’t buy anything under 10 lumens if you want to actually see where you are walking.
“Illumination levels for pathways must provide visual guidance without causing glare or light pollution that disrupts the local ecosystem.” – Agricultural Extension Lighting Standards
The Materials Breakdown: Defending Quality Investments
Standard big-box solar lights use nickel-cadmium (NiCd) batteries and thin plastic housings. They are trash. For a professional-grade install, you want monocrystalline solar panels and Lithium Iron Phosphate (LiFePO4) batteries. These hold a charge longer and handle the deep-cycle drain of winter nights far better. The housing should be die-cast aluminum or heavy-duty brass. Cheap plastic UV-degrades in 18 months. It becomes brittle and snaps. Use the table below to compare the technical specs of what you should be looking for versus the ‘mow-and-blow’ specials.
| Feature | Professional Grade | Big-Box Economy |
|---|---|---|
| Battery Chemistry | LiFePO4 | NiCd / NiMH |
| Panel Type | Monocrystalline | Polycrystalline / Amorphous |
| Lumen Output | 15 – 50 Lumens | 1 – 5 Lumens |
| Housing Material | Powder-coated Aluminum | Recycled Plastic |
| Color Temp | 2700K – 3000K (Warm) | 5000K+ (Blue-ish) |
How far apart should garden lights be spaced?
Spacing depends entirely on the beam angle of the fixture and the lumen output. For a standard 20-lumen path light, space them 6 to 8 feet apart. This creates overlapping pools of light rather than isolated spots. If you space them too close, you create light pollution; too far, and you create tripping hazards in the dark gaps. Use a tape measure. Don’t eyeball it. Consistent spacing is the hallmark of a professional hardscaping project. Measure from the edge of your pavers or your steel edging to ensure every stake is perfectly parallel to the border.
How much sunlight is needed for solar path lights?
Most high-efficiency monocrystalline panels require at least 6 hours of direct, unshaded sunlight to achieve a full charge. If your garden edge is under a heavy oak canopy or on the north side of a two-story home, solar is the wrong choice. You need low-voltage wired lighting. Shadows are the enemy of PV cells. Even a small branch casting a shadow over 10% of the panel can reduce power output by 50% due to the way the cells are wired in series. Check your site at 2:00 PM; that is your peak solar window. If it is shaded then, your lights will be dead by midnight.
The Installation Process: Precision over Force
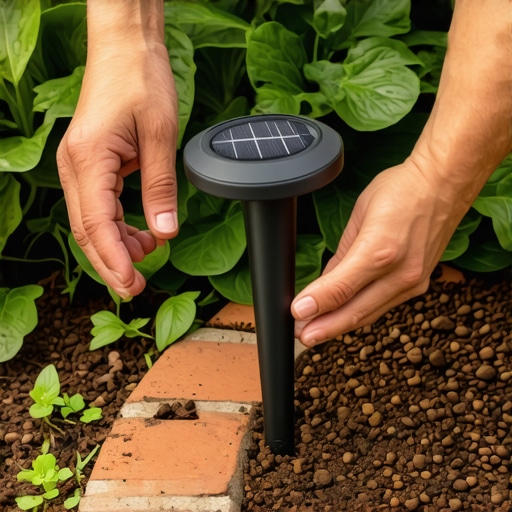
Never, under any circumstances, push a solar light stake directly into compacted soil. You will snap the neck of the fixture. I’ve seen homeowners ruin $500 worth of equipment in ten minutes because they were too lazy to prep the ground. Use a 1/2-inch rebar stake and a dead-blow hammer to create a pilot hole first. If the ground is bone-dry clay, soak it for an hour before you start. This reduces the friction and allows for a perfectly vertical placement. Use a torpedo level. A leaning light is the sign of a hack. The tamper should literally bounce off the compacted base if you’re working near a patio.
- Call 811 before digging, even for shallow stakes.
- Layout the fixtures during the day to check for spacing symmetry.
- Remove the battery pull-tab only after the stake is securely in the ground.
- Clean the solar panels with a microfiber cloth to remove manufacturing oils.
- Check the vertical alignment with a torpedo level on two axes.
“A retaining wall doesn’t fail because of the stone; it fails because of the water trapped behind it.” – Hardscape Engineering Axiom
The same engineering logic applies to garden lighting along those walls. If you are installing lights along a retaining wall edge, ensure they aren’t blocking the drainage weep holes. Water is a powerful force. It will heave your lights out of the ground during a freeze-thaw cycle if the drainage is poor. In regions with heavy frost, we set our stakes in a small 4-inch deep pocket of 2B modified gravel to allow for drainage and prevent the frost from ‘grabbing’ the stake and pulling it upward. This is the difference between a one-season job and a permanent installation.
Why do solar lights stop working after a year?
The primary failure point is the ‘clear’ plastic covering the solar cell. It undergoes a process called ‘clouding’ or ‘oxidation’ due to UV exposure. High-end units use tempered glass. If your lights have dimmed, check for oxidation. You can sometimes restore them with a headlight restoration kit, but it’s a temporary fix. The second failure point is the battery. Most solar lights use cheap batteries that only have a 300-cycle life. That means in less than a year, they lose the ability to hold a charge. Replace them with high-capacity NiMH or LiFePO4 batteries to give the fixtures a second life. Do not let the grass grow over the sensors. Keep your lawn care tight. A single blade of grass over the dusk-to-dawn sensor will keep the light on all day, killing the battery.
The ‘Settling In’ Period and Long-Term Maintenance
Expect some movement in the first month. As the soil settles from your pilot holes and the first few rains hit, some stakes may tilt. Go back through and firm them up. This is part of the job. Maintenance isn’t just for the plants. Wipe the panels twice a year. Dust, pollen, and bird droppings act as a filter, reducing the photons hitting the cells. It’s simple physics: less light in, less light out. In the winter, if you live in a region with heavy snow, pull the lights and store them. Snow plows and shovels are the natural predators of the garden light. If you leave them, the freeze-thaw cycles in the soil will likely push them out of alignment anyway. Professional landscaping is about discipline. It’s about measuring twice and digging once. Do it right, and your garden edge will look like a high-end estate. Do it wrong, and you’re just putting plastic junk in your dirt. [{“@context”:”https://schema.org”,”@type”:”HowTo”,”name”:”How to install solar lights along a garden edge”,”step”:[{“@type”:”HowToStep”,”text”:”Establish a consistent offset of 2-4 inches from the garden edge to prevent mower damage.”},{“@type”:”HowToStep”,”text”:”Map out light locations with 6-8 foot spacing to ensure overlapping light pools.”},{“@type”:”HowToStep”,”text”:”Create 6-inch pilot holes using a rebar stake to avoid damaging light fixtures.”},{“@type”:”HowToStep”,”text”:”Insert light stakes and use a torpedo level to ensure they are perfectly vertical.”},{“@type”:”HowToStep”,”text”:”Clean the solar panels of any debris and remove the battery activation pull-tab.”}]}]