
How to Layout a Flagstone Path Without Heavy Equipment
The Engineering Logic of Manual Flagstone Layout
Success in hardscaping is not found in the beauty of the stone, but in the structural integrity of the sub-grade. A flagstone path layout requires a minimum 4-inch compacted sub-base of 21A or 3/4-inch modified gravel to prevent lateral shifting and frost heaving. Without heavy equipment, you must rely on hand-tamping, mechanical leverage, and precise soil physics to manage the 150-pound-per-cubic-foot density of natural stone. Eighty percent of your labor occurs before the first stone touches the dirt. If you skip the prep, your path is just expensive trash in three years. It will sink. It will trip your guests. It will fail.
I recently got called out to tear up a $30,000 patio that was sinking because the previous contractor thought they could skip the compaction phase on a heavy clay site. The hydrostatic pressure from trapped water literally lifted the flagstone and snapped the mortar joints like dry twigs. It was a forensic disaster. They didn’t understand that soil is a living, breathing structural material that reacts to moisture and load. We had to excavate the entire mess by hand because the backyard was too tight for a skid-steer. That experience reinforced one truth: manual labor requires more brainpower than machine labor because you cannot brute-force your mistakes.
Site Survey and Sub-Surface Dynamics
Site preparation for a flagstone path begins with a rigorous assessment of the existing soil plasticity and drainage patterns. You need to identify the soil type—sandy loam, silty clay, or heavy muck—to determine the excavation depth. In most temperate climates, a 6-inch total excavation depth is the minimum requirement for a pedestrian path. This allows for 4 inches of compacted aggregate and 2 inches for the stone and setting bed. Use a transit level or a high-quality string level to establish a 2 percent slope away from any residential foundations. Water is the primary enemy of hardscaping. It must move. If it sits, the path fails.
“A retaining wall or paved surface doesn’t fail because of the stone; it fails because of the water trapped behind or beneath it. Proper drainage is the first law of hardscape engineering.” – Hardscape Engineering Axiom
How much modified gravel do I need for a patio base?
Calculating your aggregate needs is a matter of volume and density. For a 4-inch deep base, multiply the square footage of your path by 0.33 to get the cubic footage, then divide by 27 to find the cubic yardage. Standard 21A modified gravel weighs approximately 2,800 to 3,000 pounds per cubic yard. For a path that is 50 feet long and 3 feet wide, you will need approximately 2.5 cubic yards of material. Manually moving this requires a heavy-duty wheelbarrow with a pneumatic tire. Do not buy the cheap plastic ones. They will buckle under the weight of the stone dust and aggregate.
The Anatomy of Base Materials
When you are working without a plate compactor, you must use materials that facilitate manual densification. We use ‘crushed run’ or ‘modified gravel’ which contains a mix of sizes from 3/4-inch stone down to fines. This creates a locking mechanism. The angular edges of the crushed stone wedge together under pressure, unlike rounded pea gravel which acts like ball bearings. Manual compaction must be done in 2-inch lifts. If you dump 4 inches at once and try to tamp it by hand, the bottom 2 inches will remain loose. This leads to future settling. Use a 10×10-inch steel hand tamp. Hit it hard. Your shoulders should feel the bounce of the earth when it reaches maximum density.
| Material Type | Function | Compaction Rating | Drainage Capability |
|---|---|---|---|
| 3/4″ Modified Gravel | Structural Base | High (95% Proctor) | Moderate |
| Clean #57 Stone | Drainage Layer | Self-compacting | High |
| Coarse Bedding Sand | Leveling Layer | Moderate | Low |
| Polymeric Sand | Joint Stabilizer | N/A | Low (Waterproof) |
Avoid the big-box stores for your aggregate. Their bags of ‘leveling sand’ are often too fine and hold too much moisture, which leads to algae growth in your joints. Visit a local quarry or a dedicated landscape supply yard. You want sharp, angular concrete sand for your setting bed. This provides the friction necessary to keep the flagstones from sliding horizontally. The physics of the ‘interlock’ is what keeps the path stable under foot traffic.
Selecting and Sizing Natural Flagstone
Flagstone is a generic term for various sedimentary and metamorphic stones like sandstone, slate, or limestone. For a manual install, you want stones that are 1.5 to 2 inches thick. Anything thinner will crack under a point load if there is even a tiny void in the base. Anything thicker is a nightmare to move without a bobcat. Select ‘stand-up’ grade stone rather than ‘palletized’ if you can, so you can inspect the edges. You are looking for a consistent thickness. If one side of the stone is 1 inch and the other is 3 inches, you will spend all day digging out or filling in your bedding sand. It is a waste of time.
What is the best material to put between flagstones?
The choice of joint filler depends on the desired permeability and the gap width. For gaps smaller than 1 inch, polymeric sand is the industry standard because it hardens into a flexible mastic that resists weed growth and ants. For larger ‘steppable’ paths where you want creeping thyme or moss, use a mix of 70 percent topsoil and 30 percent coarse sand. This provides the drainage and aeration needed for root systems to survive the heat of the stone. If you want a zero-maintenance path, go with a stabilized stone dust that matches the color of your primary material.
“Soil compaction is the intentional increase in soil bulk density by the expulsion of air from the voids between soil particles. In pedestrian hardscaping, failing to reach 95 percent proctor density results in inevitable displacement.” – Agronomy Field Manual v.4
The Installation Process: A Step-by-Step Manual Approach
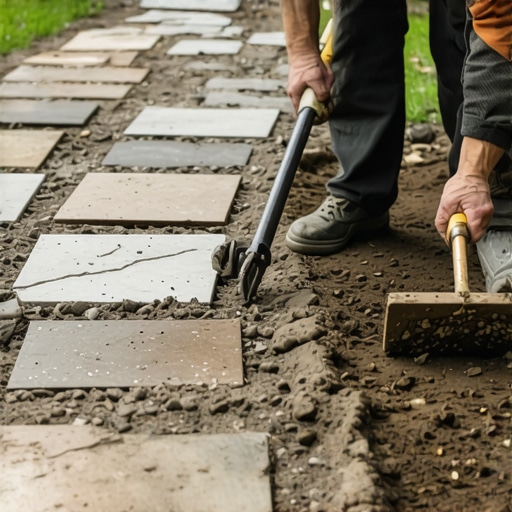
Start by marking your path with marking paint or a garden hose to establish the curves. Excavate the area to the required depth, making sure to cut clean vertical edges. This keeps the surrounding turf from encroaching on your base material. Once excavated, lay down a non-woven geotextile fabric. This is not ‘weed fabric.’ It is a structural separator that prevents the heavy gravel from sinking into the soft subsoil. It is the most important $50 you will spend on this project. Don’t skip it.
Spread your first 2-inch lift of modified gravel. Use a garden rake to level it. Now, use the hand tamp. You must overlap your strikes. If the tamp sinks into the gravel, it is not compacted. Keep going until the tool rings when it hits the surface. Add the second lift and repeat. Your final base should be as hard as a paved road. On top of this, spread 1 inch of coarse sand. Use a straight piece of lumber—a ‘screed board’—to smooth the sand. Do not walk on the sand once it is screed. Work from the outside in or from the finished stone back toward the raw base.
Fitting flagstone is like a giant, heavy puzzle. Start with your largest, heaviest stones at the entry and exit points. These ‘anchor stones’ provide the most stability. Leave 1 to 2 inches between stones for joints. If a stone wobbles, do not just shove dirt under it. Remove the stone, add more sand to the low spot, and reset it. Use a rubber mallet to ‘set’ the stone into the sand. You are not trying to drive it down; you are trying to remove any air pockets. Check each stone with a 4-foot level to ensure it maintains the 2 percent grade.
The Finishing Touches and Long-Term Stability
Once the stones are set, fill the joints. If using polymeric sand, the stone surface must be 100 percent dry. If the stone is damp, the polymers will activate on the surface and leave a white haze that is nearly impossible to remove. Sweep the sand into the joints, then use a leaf blower on its lowest setting to clear any dust from the top of the stones. Mist the joints with a garden hose—do not flood them. The water triggers the chemical bond. Let it cure for 24 hours before walking on it. The path will feel like a single solid unit once the sand sets up.
- Check for utility lines by calling 811 before any excavation.
- Ensure the geotextile fabric extends up the sides of the trench.
- Use a dead-blow hammer for fine adjustments on thick stones.
- Maintain a 2 percent slope to prevent ice patches in winter.
- Seal the stone every 3 years to prevent salt damage and spalling.
Within the first year, you may see minor settling in one or two stones. This is normal. Since you didn’t use concrete or mortar, the fix is simple. Lift the offending stone, add a handful of sand, and reset it. This ‘floating’ system is far more durable than a rigid system because it can flex with the freeze-thaw cycles of the earth. Your calloused hands and a bit of engineering logic have built something that will outlast any ‘mow-and-blow’ contractor’s work. Respect the soil, manage the water, and the stone will take care of itself.
![Building a $100 2026 Natural Stone Path [DIY]](https://lawnmajesty.com/wp-content/uploads/2026/07/Building-a-100-2026-Natural-Stone-Path-DIY.jpeg)
![Why Your 2026 Concrete Driveway is Cracking [Fix]](https://lawnmajesty.com/wp-content/uploads/2026/06/Why-Your-2026-Concrete-Driveway-is-Cracking-Fix.jpeg)