![Build a $350 Flagstone Path in One Weekend [DIY 2026]](https://lawnmajesty.com/wp-content/uploads/2026/05/Build-a-350-Flagstone-Path-in-One-Weekend-DIY-2026.jpeg)
Build a $350 Flagstone Path in One Weekend [DIY 2026]
The Hardscape Autopsy: Why Most DIY Paths Fail
I recently got called out to tear up a $30,000 patio that was sinking because the previous contractor decided that a light dusting of stone dust was enough of a base for heavy pavers. Within two years, the frost heave in our local clay soil turned that expensive investment into a dangerous, trippy mess of uneven stones and pooling water. This is why I tell every homeowner that a flagstone path is not a weekend craft project; it is a civil engineering task on a micro scale. If you ignore the hydrostatic pressure and soil compaction, you are just throwing money into a hole. To build a $350 flagstone path that lasts for decades, you must prioritize the sub-grade preparation and base-layer mechanics over the visual aesthetics of the stone itself.
“A retaining wall doesn’t fail because of the stone; it fails because of the water trapped behind it.” – Hardscape Engineering Axiom
The Science of a Permanent Flagstone Base
To build a durable flagstone path for $350, you must excavate at least 6 inches deep to accommodate a 4-inch compacted aggregate base and 1 inch of bedding sand. This structure prevents lateral shifting and frost heaving by providing a stable platform that allows water infiltration while maintaining load-bearing capacity. Most hacks will tell you to lay stone on dirt. Don’t listen. Dirt expands when wet and shrinks when dry. Your path will move. You need 2A modified stone or CR-6 gravel. This material has a variety of sizes that lock together under mechanical compaction to create a solid mass that still breathes.
How deep should a flagstone path base be?
For a standard pedestrian flagstone walkway, you need a minimum of 4 inches of compacted gravel topped with 1 to 2 inches of coarse sand. In areas with heavy clay soil, increase the gravel base to 6 inches to ensure proper drainage. This depth ensures that the compressive strength of the path can handle foot traffic without the stones sinking into the sub-grade. I have seen paths fail in a single season because the installer thought 2 inches was enough. It never is. The physics of soil mechanics dictates that the load must be distributed across a wider area, and only a thick, compacted base achieves this.
The $350 Material Breakdown and Budget Logic
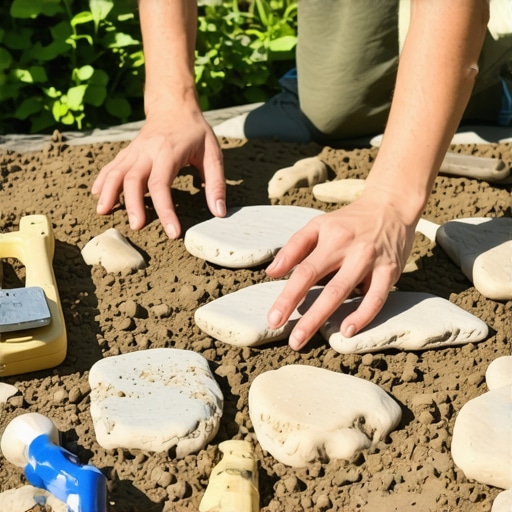
Achieving a professional result on a $350 budget requires sourcing materials from a local landscape supply yard rather than a big-box retailer. Buying flagstone by the pallet and bulk aggregate by the ton significantly reduces costs compared to buying individual bags or stones. Use Pennsylvania Blue Stone or local fieldstone for the best price-to-durability ratio. Avoid thin steppers under 1.5 inches thick; they will crack under the weight of a wheelbarrow. You want stand-up flagstone with a consistent density and mineral composition that resists spalling in freezing temperatures.
| Material Item | Estimated Quantity (50 sq ft) | Estimated Cost (Bulk) |
|---|---|---|
| 2A Modified Stone Base | 1.5 Tons | $45 – $60 |
| Coarse Bedding Sand | 0.5 Tons | $20 – $30 |
| Natural Flagstone (1.5-2″ thick) | ~600 lbs | $180 – $220 |
| Non-Woven Geotextile Fabric | 50 sq ft | $25 – $35 |
| Polymeric Sand (Joint Filler) | 1 Bag | $35 – $45 |
Total Estimated Cost: $305 – $390. Note that prices fluctuate based on your geographic location and proximity to the quarry. I always tell my crew that geotextile fabric is the cheapest insurance policy you can buy. It separates the sub-grade soil from your clean aggregate, preventing the stone from sinking into the mud over time. Skip the fabric and you will be rebuilding this path in five years.
Step-by-Step Installation: The Forensic Approach
Before you touch a shovel, call 811 to mark your utility lines. I have seen guys hit gas lines for a simple garden path. It is not worth the risk. Once clear, follow this hardscape installation checklist to ensure structural integrity:
- Excavation: Dig 6-8 inches deep. Ensure the bottom is smooth and sloped 1/8 inch per foot away from foundations.
- Compaction: Use a plate compactor on the raw soil. If the soil is wet, wait. Compacting mud is useless.
- Fabric Laydown: Use non-woven geotextile. Overlap seams by 12 inches. This stops capillary action from pulling fines into your base.
- Base Layer: Add 2 inches of modified stone, wet it slightly, and compact. Add another 2 inches and compact again. The tamper should literally bounce off the surface when it is ready.
- Screeding: Lay 1 inch of coarse sand. Use PVC pipes as guides to keep the surface perfectly level or slightly sloped for drainage.
- Stone Setting: Place stones like a puzzle. Keep joints between 1/2 inch and 2 inches wide for polymeric sand stability.
Can I lay flagstone directly on dirt?
Technically yes, but it is a guaranteed failure. Laying flagstone on soil leads to tripping hazards, stone breakage, and weed infestation within months. The organic matter in soil decays, creating voids that cause stones to tilt. Always use a layered aggregate system to ensure the structural longevity of your garden design. If you are too lazy to dig a base, don’t bother buying the stone. You are just creating a future demolition project.
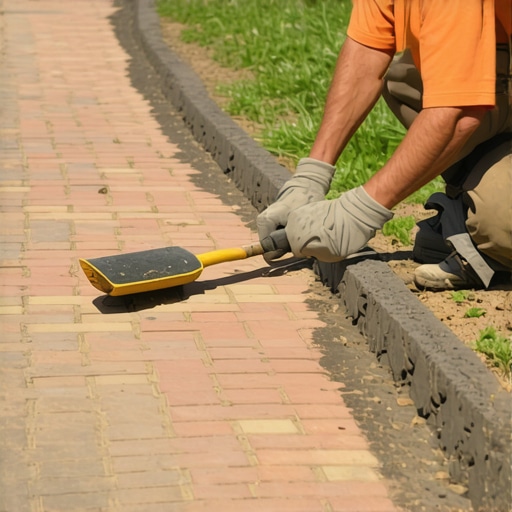
The Finishing Touch: Polymeric Sand and Joint Stabilization
Do not use stone dust or regular sand to fill your joints. Polymeric sand contains binders that turn into a firm but flexible elastomeric material when activated with water. This prevents ant hills and seed germination in your path. When applying, use a leaf blower to remove every speck of dust from the stone surface before wetting. If you leave residue, it will haze the stone permanently. It is a chemical bond that requires precision.
“Properly installed jointing sand is the difference between a path that stays put and one that drifts into the lawn.” – ICPI Installation Standards
The Long-Term Maintenance Cycle
In year one, your path will settle. This is normal. If a stone wobbles, lift it, add a tablespoon of sand, and reset it. Check the pH level of any nearby runoff. Acidic rain or fertilizer overspray can degrade certain types of limestone-based flagstone. Keep your lawn mower discharge directed away from the path to prevent organic buildup in the joints. Landscaping is a biological process; nature is always trying to reclaim the space you cleared. A pressure wash every two years followed by a polymeric sand touch-up is all it takes to keep a professional-grade path looking sharp. Don’t be the homeowner who lets invasive weeds destroy the integrity of their hardscape.