How to Build a Natural Stone Fire Pit That Withstands Ozark Winters
How to Build a Natural Stone Fire Pit That Withstands Ozark Winters
There is nothing quite like a crisp October evening in the Ozarks. As the sun dips below the ridgeline in Reeds Spring or casts long shadows over Table Rock Lake, the air takes on a sharp, refreshing chill. For over 20 years, I’ve spent my career as a green industry professional, designing and building outdoor spaces that capture the essence of Missouri’s natural beauty. My name is Preston Reeves, and through my work with sharper edge landscaping, I have seen firsthand how the rugged terrain of Southwest Missouri can both inspire and challenge a homeowner’s vision.
When it comes to high-end outdoor living, a fire pit is often the centerpiece. However, the “standard” DIY fire pits you see in big-box store brochures often fail miserably in our region. Between the volatile freeze-thaw cycles and our notoriously rocky, clay-heavy soil, a poorly constructed fire pit will shift, crack, or even become a safety hazard within a few seasons. If you want a feature that lasts decades rather than months, you need a strategy rooted in professional landscape design services. In this guide, I’ll walk you through the technical precision required to build a natural stone fire pit that doesn’t just survive an Ozark winter – it thrives in it.
Why Natural Stone is the Superior Choice for the Ozarks
When planning a fire pit in areas like Branson West or Lampe, the first decision is material. While pre-cast concrete kits are popular for their ease of assembly, they often lack the character and resilience required for a truly high-end landscape. Natural stone is the gold standard for several reasons, particularly when considering the “10 Reasons Why Natural Stone Firepit is the Best Choice” research, which highlights durability and thermal mass as primary benefits.
Natural stone, such as local limestone or sandstone, possesses a thermal mass that concrete simply cannot match. This means the stone absorbs heat from the fire and radiates it back toward you long after the flames have died down. In the middle of a January cold snap, that radiant heat is the difference between a comfortable evening and a freezing one. Furthermore, natural stone is better equipped to handle the expansion and contraction caused by our temperature swings. Unlike concrete, which can develop hairline fractures that turn into structural failures when water enters and freezes, natural stone maintains its integrity.
From an aesthetic standpoint, natural stone integrates seamlessly into the Ozark landscape. Whether you are aiming for high end landscaping or a more rustic look, the organic textures of stone complement our natural bluffs and forests. For those considering the long-term value of their property, natural stone is an investment that matures. If you’ve ever wondered Why Flagstone Is Better Than Concrete for Your New Path, the same logic applies to your fire pit: longevity, beauty, and local resilience are paramount in hardscaping and landscaping.
Step 1: Site Selection and the “Lampe” Factor
Location is more than just a matter of where the view is best. In the Ozarks, topography plays a massive role in the success of your project. When we provide landscaping services in Lampe or the surrounding hills, we must account for the slope and the subsurface composition. You need a flat area, but you also need to ensure that the area isn’t a natural drainage basin for your entire backyard.
Safety is the first priority. Your fire pit should be at least 10 to 20 feet away from any structures, overhanging trees, or low-hanging power lines. In the Ozarks, we have a high density of Eastern Red Cedars, which are notoriously flammable due to their oil content; keep your fire pit well away from these.
The “Lampe factor” refers to the hidden complexities of our soil. Before you strike a shovel into the ground, you must conduct a site survey. Our region is filled with underground utilities, and in more rural areas, septic lines and lateral fields are a major concern. Digging in the wrong spot could result in a catastrophic and expensive mistake. I always tell my clients about The Hidden Cost of Skipping a Site Survey for Your Lampe Outdoor Kitchen, and the same principle applies here. Ensure the ground is stable, the drainage is managed, and you aren’t about to breach a utility line.
Step 2: Excavation and the Foundation (The Drainage Secret)
If you want your fire pit to withstand the Ozark winters, you have to stop thinking about what’s above the ground and start focusing on what’s beneath it. The biggest enemy of a fire pit in Reeds Spring or Branson West is water. When water gets trapped under your fire pit and freezes, the resulting “frost heave” can lift your entire structure, causing stones to shift and mortar to pop. This is why professional lawn care services always emphasize proper grading.
The process begins with excavating a circle approximately 12 inches wider than your intended fire pit diameter. You should dig down to a depth of at least 6 inches. However, here is the professional secret: the “drainage chimney.” In the very center of your excavated circle, dig a smaller, deeper hole – about 12 inches wide and 18 to 24 inches deep. Fill this center hole with clean, one-inch wash stone. This acts as a dry well, allowing rainwater and snowmelt to drain deep into the soil rather than pooling under your stone base.
For the main foundation, do not use sand or dirt. Use crusher run stone (also known as SB2 or 3/4-minus gravel). Crusher run contains both small stones and fine “fines” that, when compacted, create a surface nearly as hard as concrete but with the ability to breathe and drain. Level this base meticulously. If the base isn’t level, the entire structure will eventually lean. This attention to detail is why many homeowners eventually realize Why Your Retaining Wall Drainage Is Failing – it almost always comes back to the base and the drainage.
Step 3: Building the Inner Heat Shield
One of the most dangerous mistakes I see in DIY fire pits is the use of standard Ozark fieldstone for the interior of the pit. Our local stones are often porous and hold significant amounts of moisture. When subjected to the intense heat of a fire, that trapped moisture turns to steam. If the steam cannot escape fast enough, the rock can literally explode, sending shards of stone flying.
To build a safe, professional-grade pit, you must install an inner heat shield. This is typically done using fire brick (refractory brick) and specialized fire pit mortar. Fire bricks are designed to withstand extreme temperatures without expanding or cracking.
- The Ring: Lay your fire bricks in a circle on top of your compacted crusher run base.
- The Mortar: Use a high-temperature refractory mortar. Standard mortar will crumble under the heat.
- The Airflow: Leave two to four small gaps (weep holes) in the bottom layer of your brickwork. This allows oxygen to reach the base of your fire, leading to a cleaner, hotter burn with less smoke.
By creating this inner barrier, you protect your beautiful natural exterior stones from direct heat stress. This is a critical step that addresses The mistake people make when building fire pits, ensuring your installation is safe for your family and guests.
Step 4: Laying the Natural Stone Exterior
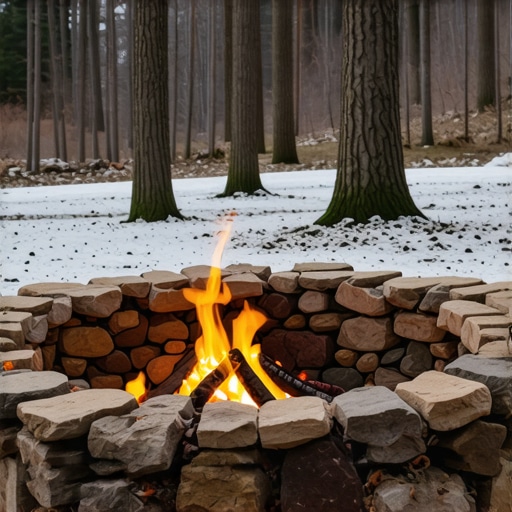
Now comes the part where your landscape design services really shine: the exterior stonework. You want the outside of the pit to look like it grew out of the Ozark hillside. Common choices in our area include weathered limestone, sandstone, or even large cobblestones.
When laying the exterior, you have two choices: dry stacking or mortaring. Dry stacking provides a more rustic look and allows for natural movement, which can be beneficial in high freeze-thaw areas. However, for a “sharp” and permanent look, mortaring the exterior stones is preferred. If you choose to mortar, ensure you are using a professional-grade masonry mix and that your joints are consistent.
As you build upward, stagger your joints – never have a vertical seam running through multiple layers. This “interlocking” technique provides the structural integrity needed to withstand the weight of the stone. To ensure your fire pit area remains easy to maintain, I recommend creating a “sharp lawn” edge around the perimeter. By installing a border of gravel or pavers around the base of the fire pit, you prevent your mower from hitting the stones and keep the grass from encroaching on your hardscape. For more on this, check out The Simple Trick for a Sharp Lawn Edge in Reeds Spring That Lasts. This small detail is the hallmark of sharper edge landscaping.
Step 5: Ozark-Specific Winterization and Maintenance
Building the pit is only half the battle; maintaining it through a Missouri winter is the other. Our winters are characterized by heavy ice storms followed by rapid thaws. To keep your pit ready for use, follow these maintenance steps:
- Clear the Debris: Before the first snow, clear out any ash or half-burnt logs. Ash holds moisture and can become acidic, which may degrade your mortar over time.
- Snow Removal: After a heavy snowfall, clear the snow from the interior and the immediate surround. As snow melts and refreezes, it can put pressure on the stone joints. In our lawncare and snow removal packages, we often include hardscape clearing to prevent this very issue.
- Use Seasoned Wood: Only burn dry, seasoned hardwood like oak or hickory, which are plentiful in the Ozarks. Wet wood creates excessive smoke and can cause soot buildup on your natural stone.
- Cover It: While natural stone is tough, a high-quality metal cover or a heavy-duty fabric cover will prevent the pit from filling with water and ice, making it much easier to start a fire on a whim.
By following these steps, you ensure that your investment is protected. Just as you would learn How to prep your lawn for a harsh winter, your hardscaping requires a proactive approach to seasonal care.
When to Call the Professionals
Building a natural stone fire pit is a rewarding project, but it is also back-breaking labor that requires a high degree of technical skill. Between the excavation of Ozark “flint rock” and the precision required for refractory masonry, many homeowners find that the DIY route is more than they bargained for.
If you want a fire pit that features a “sharp” look, perfect drainage, and a lifetime guarantee, it may be time to consult the experts. At Sharper Edge Landscaping, we specialize in creating sharp lawns and high-end outdoor environments that stand the test of time. We understand the unique geology of Reeds Spring, Branson West, and Lampe, and we bring over two decades of experience to every stone we lay.
Building a fire pit that lasts decades requires more than just stacking rocks; it requires an understanding of Ozark geology and climate. Whether you are looking for a simple stone ring or a full outdoor living suite, we are here to help you achieve the perfect outdoor sanctuary. Contact us today for a professional consultation and let’s build something that will keep your family warm for generations to come.