Level Your Sinking 2026 Flagstone Path Using Crushed Stone
The Forensic Autopsy of a Failed Flagstone Walkway
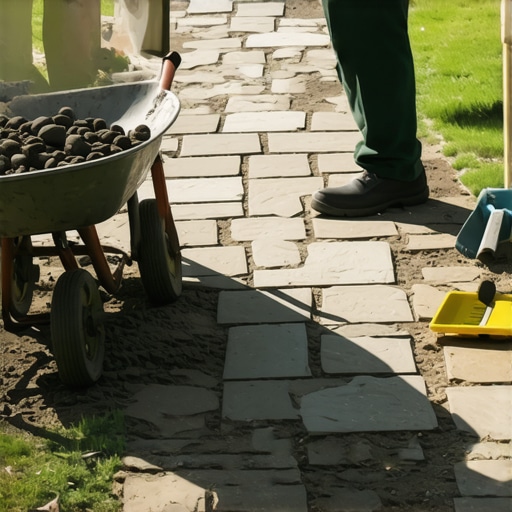
The visual of a failed flagstone path is unmistakable: cracked mortar joints, stones tilted at 15-degree angles, and the telltale squish of water-saturated subgrade beneath your boots. When you step on a 300-pound slab of Pennsylvania Bluestone and it teeters like a seesaw, you are looking at a fundamental engineering failure, not a cosmetic issue. Most DIY homeowners and ‘mow-and-blow’ contractors treat flagstone like tile, assuming a thin layer of sand is enough to hold the weight. It is not. I recently performed a hardscape autopsy on a $30,000 patio that was sinking into the earth only two years after installation. The previous contractor had used stone dust over uncompacted topsoil. When we excavated, we found a literal swamp of anaerobic mud trapped beneath the stone because there was nowhere for the water to drain. The hydrostatic pressure had nowhere to go, so it pushed the stones up during the freeze-thaw cycle and let them settle into the muck during the spring thaw. We had to rip out every single stone, excavate 8 inches deep, and start from the raw subgrade. If you do not fix the drainage and the base, you are just throwing money into a hole in the ground. This guide breaks down the physics of crushed stone and how to permanently level your path using professional engineering standards.
Why Flagstone Paths Sink Over Time
Subgrade failure, hydrostatic pressure, and insufficient compaction cause flagstone to settle into the earth. Without a properly graded crushed stone base, water creates voids under the pavers, leading to uneven surfaces and significant safety risks in hardscape design and long-term maintenance. When we talk about sinking, we are usually talking about the failure of the soil to support the load. In most residential settings, the soil is either heavy clay or silty loam. Clay expands when wet and shrinks when dry; silt washes away. Crushed stone acts as a bridge, distributing the load of the stone across a wider surface area while providing ‘void space’ for water to move through without eroding the structure. If your path is sinking, your base is either too thin, made of the wrong material, or was never compacted to the necessary 95% Proctor density.
“A retaining wall doesn’t fail because of the stone; it fails because of the water trapped behind it.” – Hardscape Engineering Axiom
The Physics of Crushed Stone Interlock
Not all gravel is created equal. If you use rounded pea gravel, your stones will never stay level. Round stones act like ball bearings; they roll over each other under pressure. You need angular, crushed stone. When you run a plate compactor over 3/4-inch minus (also known as ‘crush and run’ or ‘modified’ stone), the sharp edges of the rocks bite into each other. This creates a semi-rigid plate that is still permeable to water but can withstand thousands of pounds of vertical pressure. We call this ‘mechanical interlock.’ It is the difference between a path that lasts five years and one that lasts fifty. Don’t skip the fines—the dust-like particles in the crushed stone—because they fill the gaps between the larger rocks, creating a solid mass that resists settling.
How deep should a flagstone base be?
For a standard pedestrian flagstone path, you need a minimum of 4 to 6 inches of compacted crushed stone base. If you are dealing with heavy clay soil or a high water table, you should increase that depth to 8 inches to ensure adequate drainage and stability. In regions with deep frost lines, a thicker base acts as a buffer against frost heave, preventing the ground from pushing your stones out of alignment during the winter. We measure this depth after compaction, meaning you actually need to dump about 20% more material than the finished depth requires to account for the ‘fluff’ factor before the tamper hits it.
| Material Type | Drainage Rating | Compaction Strength | Best Use Case |
|---|---|---|---|
| Stone Dust | Poor | Medium | Fine leveling only (<1 inch) |
| 3/4″ Modified Gravel | Excellent | High | Primary structural base |
| Clean #57 Stone | Superior | Low (unbound) | French drains and drainage layers |
| Masonry Sand | Fair | Low | Joint filling between stones |
The Step-by-Step Leveling Remediation Process
Excavation depth, geotextile membrane installation, and mechanical compaction are the critical phases for leveling a sinking path. By removing the unstable soil and replacing it with a graded aggregate base, you create a permanent foundation that resists soil creep and heaving in all weather conditions. Here is how my crew handles a remediation job. First, remove the existing flagstones and set them aside. You must dig out the old, failed base. If I see dirt mixed with the old gravel, I know the subgrade was contaminated. You need to get down to ‘virgin soil’—the hard stuff that hasn’t been turned over in decades. Once the trench is clean, we lay down a non-woven geotextile fabric. This is a critical step that many hacks skip. The fabric keeps the expensive crushed stone from sinking into the soft mud over time. It lets water pass through but keeps the layers separate. Without it, your gravel will eventually disappear into the clay, and your path will sink again.
- Excavate to a depth of 8-10 inches (6 inches for base, 2-4 inches for stone).
- Install a 4-ounce non-woven geotextile fabric across the entire trench.
- Add 3/4-inch crushed stone in 2-inch ‘lifts.’
- Compact each lift with a mechanical plate compactor (do not use a hand tamper).
- Check for 1% to 2% slope to ensure water runs away from structures.
- Screed a 1-inch layer of bedding stone or coarse sand for final leveling.
Why does my flagstone path keep sinking?
Your path keeps sinking because the water has nowhere to go. If your yard has poor grading, the path acts as a literal trench that collects runoff. When the subsoil becomes saturated, it loses its load-bearing capacity, and the weight of the flagstone forces it down into the mud. You must address the grading around the path. I always ensure the surrounding soil is 1 inch lower than the path surface. This prevents water from pooling on the stones and soaking into the base. If you have a particularly wet spot, we might even install a ‘French drain’—a perforated pipe wrapped in stone—alongside the path to whisk that water away to a lower point in the yard.
“Base thickness and compaction are the primary factors in determining the long-term performance of any segmental pavement system.” – ICPI Tech Spec 2
Selecting the Right Aggregate: Modified vs. Clean Stone
Dense-graded aggregate (modified stone) provides the highest structural stability, while open-graded aggregate (#57 stone) offers maximum permeability. Choosing the correct stone gradation depends on your local soil drainage and the expected weight load of the flagstone walkway. For most residential paths, I prefer 2A modified. It contains a mix of stone sizes from 3/4-inch down to dust. This variety of sizes allows the material to pack down into a nearly rock-hard surface. However, in areas with extreme drainage issues, we might use an ‘open-graded’ system. This involves using #57 stone (which has no fines) and wrapping it entirely in geotextile. This creates a reservoir under your path where water can sit and slowly soak into the ground without destabilizing the stones. It is more technical to install because the stones don’t ‘lock’ as tightly, but it is a lifesaver in swampy backyards. You must understand the ‘angle of repose’ of your materials. If you pile up clean stone, it wants to slide. Modified stone, once compacted, stays put. Don’t let a supplier talk you into using ‘screenings’ or stone dust as a base. Stone dust holds water like a sponge, and in a freeze-thaw climate, it will turn your path into a roller coaster by February.
Compaction: The 95 Percent Rule
I tell my apprentices that if the plate compactor isn’t bouncing off the ground, the job isn’t done. We aim for 95% Standard Proctor Density. A hand tamper is fine for a single loose brick, but for a flagstone path, you need the centrifugal force of a gas-powered machine. The vibration of the machine reorients the stones, shaking the smaller pieces into the gaps between the larger ones. This eliminates the air pockets that would otherwise collapse over the next year as rain settles the dirt naturally. If you skip the machine rental, you are basically planning for failure. You should run the compactor over the base in at least three different directions. The base should feel like concrete when you are done. If you can push a screwdriver more than half an inch into the compacted gravel, it isn’t tight enough. Keep at it. Add a little water to the stone—moisture acts as a lubricant, helping the stones slide into their tightest possible configuration. This is basic soil mechanics, but it is the difference between a professional result and a DIY disaster.
![Build a $200 2026 Gravel Path with Brick Edging [Quick Fix]](https://lawnmajesty.com/wp-content/uploads/2026/07/Build-a-200-2026-Gravel-Path-with-Brick-Edging-Quick-Fix.jpeg)