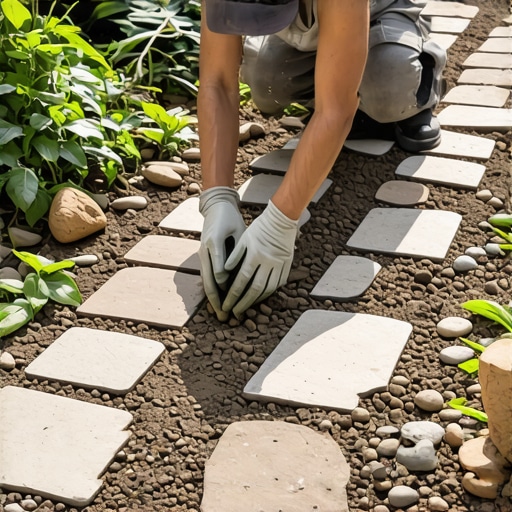
![Build a 2026 Stone Path for $200 [No-Dig Weekend Project]](https://lawnmajesty.com/wp-content/uploads/2026/04/Build-a-2026-Stone-Path-for-200-No-Dig-Weekend-Project.jpeg)
The Hardscape Autopsy: Why Most DIY Paths Fail by Year Two
Building a no-dig stone path for under $200 is an exercise in engineering rather than just aesthetics. I recently got called out to tear up a $30,000 patio that was sinking because the previous contractor failed to account for hydrostatic pressure and subgrade saturation. It was a mess. The pavers were literally floating in a soup of silt and clay. This happens because most people think stone is permanent, but stone is only as stable as the soil beneath it. In a no-dig scenario, you are skipping the traditional 4 inch excavation, which means you must overcompensate with material science and physics. If you do not understand how water moves through your specific soil profile, your $200 weekend project will become an ankle-turning hazard by next spring. It is about managing the interface between the stone and the organic matter. Don’t be a hack. Follow the science of soil compaction and aggregate friction.
“A retaining wall doesn’t fail because of the stone; it fails because of the water trapped behind it.” – Hardscape Engineering Axiom
How much does a 20 foot stone walkway cost?
A 20 foot stone walkway typically costs between $150 and $250 when using local bulk flagstone or stepped pavers and high-tensile geotextile fabric. The primary expenses are the stone itself, which should be sourced from a local quarry to avoid retail markups, and the stabilization layer that prevents the stone from migrating into the turf.
The Science of the No-Dig Strategy
The no-dig method utilizes the existing bulk density of your soil rather than disrupting it with a shovel. When you dig, you introduce oxygen into the soil, which wakes up dormant weed seeds and breaks the natural compaction that has occurred over years. By staying on top of the turf, you leverage the existing structural integrity of the ground. However, you cannot just throw rocks on grass. You must address the biological decomposition of the grass underneath. As the grass dies, it creates a layer of organic mulch that will eventually compress and rot, causing your stones to tilt. To fix this, we use the scalp-and-starve method. We are not digging, but we are removing the vertical height of the vegetation to get as close to the mineral soil as possible without breaking the crust. This is where the physics of friction comes into play. You need a non-woven geotextile with a high CBR (CBR – California Bearing Ratio) to spread the load of your footsteps across a wider surface area.
| Material | Estimated Cost | Purpose | Durability |
|---|---|---|---|
| Natural Fieldstone | $110.00 | Walking surface | High |
| Non-Woven Geotextile | $45.00 | Soil separation | Critical |
| Polymeric Stone Dust | $30.00 | Joint stabilization | Moderate |
| Steel Stakes (12pk) | $15.00 | Edge restraint | Low |
Do I need landscape fabric under stepping stones?
You absolutely need heavy-duty non-woven geotextile fabric under stepping stones to prevent fines migration. Without a barrier, the soil particles will eventually work their way up around the stone, while the stone sinks deeper into the earth through a process called soil pumping. Fabric provides the necessary tensile strength to keep the path level.
Step-by-Step Installation Protocol
First, mark your path using a garden hose to find the natural flow of traffic. Do not make sharp 90 degree turns. Humans don’t walk like that. Once the path is marked, set your mower to the lowest possible setting. Scalp the grass until you see the crowns of the plants. This reduces the amount of organic material that will decay under your fabric. Next, lay down your geotextile. This is not the cheap plastic stuff from big-box stores. You want a fabric that allows water to pass through but keeps soil particles out. Secure it with 6 inch landscape staples every 12 inches. If the fabric is loose, the stones will shift. It must be drum-tight. Now, place your stones. For a $200 budget, you are looking for irregular flagstone or concrete stepping stones. Ensure each stone is at least 1.5 inches thick. Anything thinner will snap under the weight of a grown adult. Place them about 18 inches apart, center to center. This matches the average human gait. Once placed, use a rubber mallet to set them. Don’t hit them with a hammer. You will crack the stone. If a stone wobbles, don’t add more dirt. Add washed screenings or decomposed granite under the low side. Finally, fill the gaps with creeping thyme or a polymeric sand if you want a zero-weed finish. It will look professional because it is built on a foundation of logic.
- Select stones with a minimum thickness of 1.5 inches.
- Scalp grass to the lowest possible mower setting.
- Use 4-ounce non-woven geotextile for separation.
- Space stones 18 to 22 inches apart for natural walking.
- Check each stone for wobble with a three-point pressure test.
“Proper subgrade preparation is 90 percent of the work in any hardscape installation, regardless of the budget.” – Penn State Agricultural Extension
Addressing the Enemies: Water and Weeds
The two things that will kill your path are hydrostatic pressure and phototropism. Hydrostatic pressure is the weight of water in the soil. If your path sits in a low spot, the water will push the fabric and stones up. You must ensure the path has a 1 percent cross-slope to shed water. Even a no-dig path needs to respect the topography of the yard. As for weeds, they don’t usually grow from the bottom up through the fabric. They grow from seeds that blow into the cracks from the top. This is why I advocate for a dense in-fill material. If you use polymeric sand, the chemical binders will harden and prevent seeds from reaching the soil below. If you choose a biological approach, plant Stepables or no-mow grass in the gaps to out-compete the weeds. If you leave bare dirt in the gaps, you are inviting a maintenance nightmare. Don’t skip the joint filler. It is the glue that holds the engineering together. A path without joint stabilization is just a collection of loose rocks waiting to move. It will rot if you leave organic debris in the joints. Keep it clean. Keep it dry. That is how you make a $200 path last for a decade.

![5 Non-Slip Stone Finishes for Safe 2026 Pool Decks [Tested]](https://lawnmajesty.com/wp-content/uploads/2026/02/5-Non-Slip-Stone-Finishes-for-Safe-2026-Pool-Decks-Tested.jpeg)
![Stop Paver Sinking: 5 New 2026 Sub-Base Tactics [Tested]](https://lawnmajesty.com/wp-content/uploads/2026/03/Stop-Paver-Sinking-5-New-2026-Sub-Base-Tactics-Tested.jpeg)