Fix Loose Paver Edges with This $20 Stake Hack
The Anatomy of a Failing Paver Edge: Why Your Hardscape is Shifting
Loose paver edges occur when the lateral restraint system fails, allowing the bedding sand to migrate and the structural units to drift into the surrounding soil. This mechanical failure is usually caused by inadequate base compaction, the use of plastic ‘big-box’ edging that lacks rigidity, or using 10-inch spikes that are spaced too far apart to resist the hydrostatic pressure of the soil. When your perimeter goes, the entire field of pavers follows.
I recently got called out to tear up a $30,000 patio that was sinking because the previous contractor thought he could skip the edge restraints and just ‘mud’ the borders in with a thin layer of concrete. Within two winters, that concrete cracked, water seeped into the bedding layer, and the pavers started drifting like ice floes. The homeowner was tripping over one-inch gaps that shouldn’t have existed. It was a total structural collapse hidden under a premium stone facade. We had to excavate 24 inches of saturated clay, replace it with modified gravel (CR6), and install industrial-grade aluminum restraints. It was an expensive lesson in engineering basics. If you do not lock the edge, you do not have a patio; you have a pile of expensive rocks waiting to move.
“A retaining wall or paver edge doesn’t fail because of the stone; it fails because of the water trapped behind it and the lack of structural resistance against lateral loads.” Hardscape Engineering Axiom
How do I stop pavers from shifting on the edges?
To stop pavers from shifting, you must establish a rigid perimeter restraint using professional-grade edging secured by 10-inch galvanized steel spikes driven into a compacted aggregate base. This creates a physical barrier that prevents the bedding sand from washing out and keeps the paver units locked in a tight interlock through friction and polymeric sand.
The $20 Stake Hack: Securing Your Hardscape Perimeter
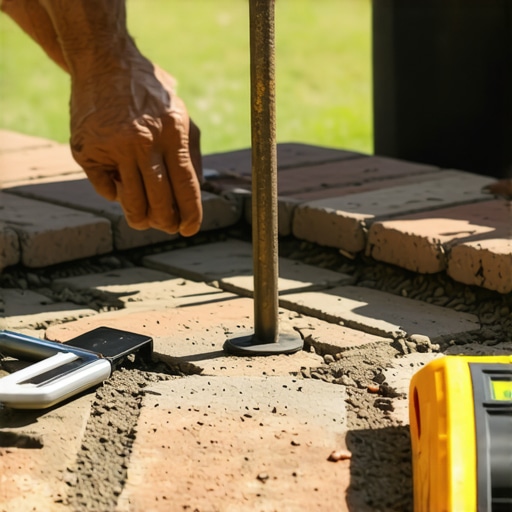
The $20 stake hack involves retrofitting heavy-duty 10-inch galvanized spikes and high-density polyethylene (HDPE) edging to an existing, failing border. Most DIYers and ‘mow-and-blow’ hacks use 6-inch plastic stakes that barely penetrate the frost line. By switching to 10-inch spikes driven at a slight 15-degree angle toward the patio, you engage the compacted sub-base rather than just the topsoil. This creates a ‘deadman’ anchor effect. For under $20 in materials for a standard 10-foot run, you can stabilize a drifting edge before it ruins the entire installation. You need to pull back the mulch, expose the paver shoulder, and drive those spikes every 12 inches. No excuses. If you see a gap, the interlock is already compromised.
| Material Type | Structural Rigidity | Longevity (Years) | Estimated Cost per 10ft |
|---|---|---|---|
| PVC/Plastic Edging | Low | 3 to 5 | $12 |
| High-Density Polyethylene | Medium | 10 to 15 | $18 |
| Aluminum Commercial Grade | High | 25 plus | $35 |
| Steel (Heavy Gauge) | Maximum | 30 plus | $45 |
The Physics of Lateral Displacement in Hardscaping
When we talk about pavers moving, we are talking about lateral displacement. Every time you walk on a paver, you exert downward force that is partially converted into outward horizontal force. Without a restraint, that force pushes the paver into the soft turf. Modified gravel (typically 21A or 3/4-inch minus) provides the structural ‘skeleton’ for your patio. If that base isn’t compacted to at least 95% Standard Proctor Density, those $20 stakes won’t have anything to grab onto. I tell my crew: if the plate compactor isn’t bouncing off the stone like a basketball, it isn’t hard enough. You are looking for a rock-hard surface that resists a 3/4-inch steel pin.
“Proper installation of edge restraints is critical to the long-term performance of segmental concrete pavements. These restraints must be placed on the compacted aggregate base to ensure they do not heave during freeze-thaw cycles.” Interlocking Concrete Pavement Institute (ICPI) Standards
How much modified gravel do I need for a patio base?
For a standard pedestrian patio, you need a minimum of 4 to 6 inches of compacted modified gravel. If you are dealing with heavy clay soils or vehicular traffic, that depth must increase to 8 or 12 inches. You calculate the volume by multiplying the square footage by the depth in feet, then dividing by 27 to get cubic yards. Always add 20% for compaction shrinkage.
Step-by-Step Remediation: The Professional Way
- Expose the Failure: Dig a 6-inch wide trench along the failing edge. Remove all soil and organic debris until you hit the gravel base.
- Reset the Units: Use a rubber mallet to tap the drifted pavers back into their original laying pattern. If they are too far gone, pull them up and screed a fresh 1-inch layer of coarse bedding sand.
- Install the Restraint: Place the HDPE or aluminum edging tight against the vertical face of the pavers. Do not leave a gap.
- Drive the 10-inch Spikes: Use the $20 stake hack. Drive one spike every 12 inches. For curved edges, drive one every 8 inches to maintain the radius.
- Backfill and Tamp: Fill the trench with the same modified gravel used in the base, not topsoil. Tamp it down until it is flush with the bottom of the paver.
- Apply Polymeric Sand: Sweep high-quality polymeric sand into the joints. Mist it with water to activate the polymers. This creates a water-resistant bond that prevents joint sand washout.
What is the best way to fix a sinking paver?
The best way to fix a sinking paver is to remove the affected units, excavate the underlying bedding sand, and inspect the aggregate base for settlement. You must add and compact more modified stone to level the area, then re-apply a 1-inch layer of coarse sand before re-installing the pavers and sweeping in new polymeric joint sand. Never just ‘top off’ a sinking paver with more sand; the underlying cause is always a base failure.
A Warning on Big-Box ‘Solution’ Products
Don’t be fooled by ‘no-dig’ edging kits sold at home improvement warehouses. They are garbage. These systems rely on short plastic pins that pull out of the ground the moment the soil gets saturated or the first frost heave occurs. Real landscaping is about mass and friction. A 10-inch galvanized spike has enough surface area to create significant frictional resistance within the gravel base. That is why it works. The cheap stuff is just a temporary cosmetic fix for a structural problem. If you aren’t sweating while you drive the stakes, you aren’t doing it right. It should take effort. The ground should fight back. That resistance is what keeps your patio from falling apart next season.
![Fixing 2026 Uneven Paver Walkways [Step-by-Step]](https://lawnmajesty.com/wp-content/uploads/2026/06/Fixing-2026-Uneven-Paver-Walkways-Step-by-Step.jpeg)
![Repairing Cracking Concrete Walkways [Fast Fix]](https://lawnmajesty.com/wp-content/uploads/2026/09/Repairing-Cracking-Concrete-Walkways-Fast-Fix.jpeg)