Repair 2026 Paver Gaps with This $15 Poly-Sand Trick
The Anatomy of a Failing Patio: Why Your Paver Gaps Are Widening
Paver gaps widen because of joint sand washout, lack of edge restraint, and sub-base settlement caused by hydrostatic pressure. When polymeric sand or traditional masonry sand erodes, the interlocking mechanism of the flexible pavement system fails, leading to lateral shifting and weed infestation. It is a structural failure disguised as a cosmetic nuisance.
I recently got called out to tear up a $30,000 patio that was sinking because the previous contractor used stone dust as a setting bed and skipped the polymeric jointing. The homeowner thought they were saving a few hundred bucks on materials. Instead, the water infiltrated the joints, saturated the subgrade, and turned the entire foundation into a slurry of mud. By the time I arrived, the paver units were rocking like loose teeth. This isn’t just about looks; it is about engineering. A patio is only as strong as its narrowest gap. If you don’t understand the ASTM C144 sand standards or the importance of modified gravel base compaction, you are just throwing money into a hole in the dirt. Most ‘pros’ today are just ‘mow-and-blow’ hacks who wouldn’t know a screed pipe from a garden hose. They fill gaps with cheap play sand and wonder why the first heavy rain washes it into the French drain.
The Forensic Autopsy of Failed Joints
Before you spend a dime, look at the gaps. Are they empty, or are they full of organic ‘gunk’? If it is gunk, you have a microbiology problem. That black stuff is decomposed organic matter feeding on nitrogen runoff from your lawn care routine. It holds moisture against the stone, leading to spalling and efflorescence. You must excavate this. Don’t just top-dress it. Top-dressing is the hallmark of a lazy contractor. You need a 1-inch depth minimum for polymeric sand to achieve its shear strength. Anything less is just a thin crust that will crack and flake away within one season.
“The structural integrity of a flexible pavement system depends entirely on the interlock provided by the jointing material. Without proper stabilization, paver units will inevitably migrate under load.” – ICPI Technical Specification 2
How much modified gravel do I need for a patio base?
For a standard pedestrian patio, you need 4 to 6 inches of compacted 21A or 411 modified gravel. This base layer must be mechanically compacted in 2-inch lifts to reach 95% Standard Proctor Density to prevent future paver gaps. Skipping this leads to heaving during freeze-thaw cycles.
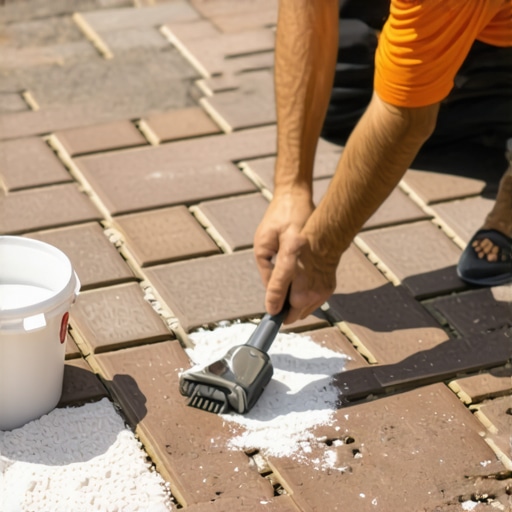
The $15 Poly-Sand Trick: Deep-Pack Consolidation
The secret to a 2026-ready repair is using a leaf blower on the ‘idle’ setting to vibrate the sand deep into the joints before misting. This low-cost technique ensures that the silica particles and polymer binders bridge the entire depth of the paver unit, preventing the hollow voids that cause surface cracking. It mimics the effect of a plate compactor without the risk of scuffing your stone. Most people just sweep the sand in and start watering. That is a recipe for failure. The water only penetrates the top quarter-inch, creating a ‘skin’ of hard sand over a hollow cavern of loose dust. When a car drives over it, or a heavy frost hits, that skin shatters. You need vertical density. By using the air pressure from a leaf blower—held at a 45-degree angle—you force the sand to settle and consolidate. It is about particle packing. You will see the sand level drop as it fills the voids. Keep adding sand until it sits 1/8th of an inch below the chamfer edge of the paver. This is the only way to ensure the polymers cross-link through the entire joint.
Technical Comparison of Jointing Materials
| Material Type | Durability | Average Cost | Best Use Case |
|---|---|---|---|
| Masonry Sand (ASTM C144) | Low (Washes out) | $5 / bag | Traditional brick on sand |
| Stone Dust | Very Low (Retains water) | $4 / bag | Never recommended for joints |
| Standard Polymeric Sand | High (Stabilized) | $25 / bag | Modern patios and walkways |
| High-Performance G2 Poly-Sand | Extreme (Rapid Set) | $35 / bag | Pool decks and high-slope areas |
Don’t buy the ‘all-purpose’ sand from the big-box store. It’s garbage. It has too many fines (dust-sized particles) and not enough angular silica. Angular sand grains lock together like a jigsaw puzzle. Round grains roll over each other like ball bearings. You want the jigsaw. Your garden design depends on this stability. If the pavers move, your edging plants will have their roots crushed or exposed. It is a chain reaction of failure.
Why is my polymeric sand not hardening?
Polymeric sand fails to harden if the pavers were damp during installation or if the activation misting was too heavy. Excess water washes away the polymer binders, leaving behind only inert sand. Conversely, under-watering prevents the chemical reaction from reaching the bottom of the joint, leading to a weak bond.
- Step 1: The Deep Clean. Use a pressure washer to clear out at least 1.5 inches of old material. Do not skip this.
- Step 2: Bone Dry Requirement. The pavers must be 100% dry. Even a hint of moisture will activate the polymers prematurely, leaving a hazy residue on the stone.
- Step 3: The Leaf Blower Vibe. Sweep the sand into the joints, then use the leaf blower trick to pack it down. Repeat until full.
- Step 4: The Three-Stage Mist. Mist the area lightly three times, waiting 5 minutes between each. Do not allow puddles to form.
“A retaining wall doesn’t fail because of the stone; it fails because of the water trapped behind it.” – Hardscape Engineering Axiom
This axiom applies to your patio surface too. If your soil grading is off and water pools on the surface, no amount of ‘trick’ sand will save you. You need a 2% slope—that is a 1-inch drop for every 4 feet of length—to move water away from your foundation. If you see moss growing in your paver joints, your drainage is failing. Moss doesn’t grow in dry sand; it grows in saturated silt. Correct the hydrology of your yard first. Check your downspouts. Are they dumping directly onto the patio? If so, you are essentially pressure-washing your joints every time it rains. Redirect that water with a pop-up emitter or a dry creek bed. It is basic civil engineering applied to your backyard. Every plant, every stone, and every grain of sand is part of an ecosystem. Treat it like one, or get ready to fix it again in 2027. It will rot if you don’t vent it. Don’t skip the compaction phase. It is the literal foundation of your success.
Maintenance Schedule for Stabilized Joints
Once you have performed the repair, do not touch it for 24 hours. The curing process requires an evaporation window. If it rains within 12 hours, you might be in trouble. Cover it with a tarp if the forecast looks dicey. In year one, expect the sand to settle slightly. This is normal. In year three, check for ant mounds. Ants are the natural enemy of hardscaping. They mine the sand out from under the stones to build their colonies, creating sub-surface voids. Use a cypermethrin-based barrier around the perimeter. It is cheaper than replacing a sunken section of patio. Stay away from pressure washing your patio every spring. You are literally blasting away your investment. A soft-wash with a mild detergent is all you need to keep the algae at bay without compromising the poly-sand bond.